Epson CX5800F Basics - Page 37
Editing or Deleting a Speed Dial Entry, Main Office, Edit Entry
 |
UPC - 010343856264
View all Epson CX5800F manuals
Add to My Manuals
Save this manual to your list of manuals |
Page 37 highlights
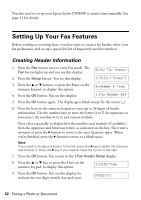
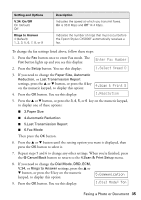
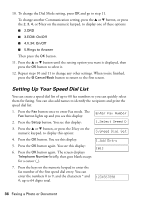
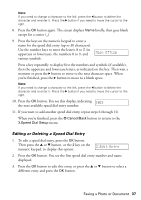
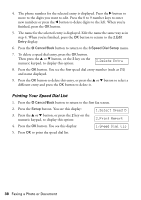
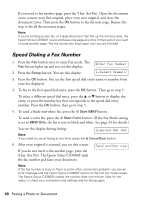
Note: If you need to change a character to the left, press the l button to delete the character and re-enter it. Press the r button if you need to move the cursor to the right. 8. Press the OK button again. The screen displays Name briefly, then goes blank except for a cursor (_). 9. Press the keys on the numeric keypad to enter a name for the speed dial entry (up to 30 characters). Use the number keys to enter the letters A to Z (in uppercase or lowercase), the numbers 0 to 9, and various symbols. Main Office Press a key repeatedly to display first the numbers and symbols (if available), then the uppercase and lowercase letters, as indicated on the key. Then wait a moment or press the r button to move to the next character space. When you're finished, press the r button to move to a blank space. Note: If you need to change a character to the left, press the l button to delete the character and re-enter it. Press the r button if you need to move the cursor to the right. 10. Press the OK button. You see this display, indicating [02] the next available speed dial entry number: 11. If you want to add another speed dial entry, repeat steps 6 through 10. When you're finished, press the y Cancel/Back button to return to the 3.Speed Dial Setup menu. Editing or Deleting a Speed Dial Entry 1. To edit a speed dial entry, press the OK button. Then press the u or d button, or the 2 key on the numeric keypad, to display this option: 2.Edit Entry 2. Press the OK button. You see the first speed dial entry number and name displayed. 3. Press the OK button to edit this entry, or press the u or d button to select a different entry and press the OK button. Faxing a Photo or Document 37
-
 1
1 -
2
-
3
-
4
-
5
-
6
-
7
-
8
-
9
-
10
-
11
-
12
-
13
-
14
-
15
-
16
-
17
-
18
-
19
-
20
-
21
-
22
-
23
-
24
-
25
-
26
-
27
-
28
-
29
-
30
-
31
-
 32
32 -
 33
33 -
 34
34 -
 35
35 -
 36
36 -
 37
37 -
 38
38 -
 39
39 -
 40
40 -
 41
41 -
 42
42 -
43
-
44
-
45
-
46
-
47
-
48
-
49
-
50
-
51
-
52
-
53
-
54
-
55
-
56
-
57
-
58
-
59
-
60
-
61
-
62
-
63
-
64
-
65
-
66
-
67
-
68
-
69
-
70
-
71
-
72
 |
 |
