Epson CX5800F Basics - Page 48
Cleaning the Print Head - stylus ink
 |
UPC - 010343856264
View all Epson CX5800F manuals
Add to My Manuals
Save this manual to your list of manuals |
Page 48 highlights
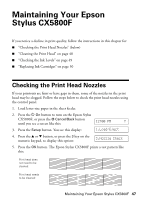
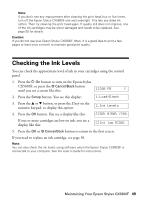
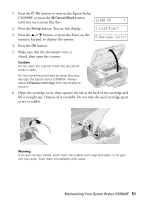
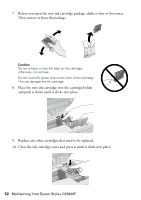
6. Press the y Cancel/Back button to return to the first screen. If the pattern does not look good, try cleaning the print head as described on the next page. Note: You can also check the print head nozzles using software when the Epson Stylus CX5800F is connected to your computer. See the User's Guide for instructions. Cleaning the Print Head If your printouts are unexpectedly light or faint, or you notice light or dark bands across your printout, you may need to clean the print head. This unclogs the nozzles so they can deliver ink properly. Run a nozzle check as described on page 47 to see if the print head needs cleaning. Note: Print head cleaning uses ink, so clean it only if quality declines and the nozzle check indicates that the print head needs to be cleaned. If you see an ink error message on the display, you cannot clean the print head. In this case, press the OK button and replace the appropriate ink cartridge first. See page 50 for details. 1. Press the P On button to turn on the Epson Stylus CX5800F, or press the y Cancel/Back button 12:00 PM Y until you see a screen like this: 2. Press the Setup button. You see this display: 1.Load/Eject 3. Press the u or d button, or press the 4 key on the 4.Head Cleaning numeric keypad, to display this option: 4. Press the OK button. The Epson Stylus CX5800F runs a head cleaning cycle and the message Cleaning . . . appears on the display. Caution: Never turn off the Epson Stylus CX5800F while head cleaning is in progress. You may damage it. 5. When the display returns to 4.Head Cleaning, run a nozzle check to verify that the print head is clean. See page 47 for details. 6. If there are still gaps or lines, or the test patterns are faint, run another cleaning cycle and check the nozzles again. 48 Maintaining Your Epson Stylus CX5800F
-
 1
1 -
2
-
3
-
4
-
5
-
6
-
7
-
8
-
9
-
10
-
11
-
12
-
13
-
14
-
15
-
16
-
17
-
18
-
19
-
20
-
21
-
22
-
23
-
24
-
25
-
26
-
27
-
28
-
29
-
30
-
31
-
32
-
33
-
34
-
35
-
36
-
37
-
38
-
39
-
40
-
41
-
42
-
 43
43 -
 44
44 -
 45
45 -
 46
46 -
 47
47 -
 48
48 -
 49
49 -
 50
50 -
 51
51 -
 52
52 -
 53
53 -
54
-
55
-
56
-
57
-
58
-
59
-
60
-
61
-
62
-
63
-
64
-
65
-
66
-
67
-
68
-
69
-
70
-
71
-
72
 |
 |
