Epson LQ-2500 User Manual - Page 15
Operating the Control Panel, initialized, default - liquid
 |
View all Epson LQ-2500 manuals
Add to My Manuals
Save this manual to your list of manuals |
Page 15 highlights
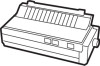
Now, turn the power ON. When you turn on the printer, several important things happen: The print head moves back and forth and stops at about 40 on the paper bail ruler. The ribbon carriage moves up and down to set the ribbon at the correct level for printing. The printer is initialized and set to certain default settings (which are fully described in Chapter 2 and Appendix E). The green POWER light on the control panel comes on. The red PAPER OUT light also comes on, and the display reads [PAPER OUT]. 5 Operating the Control Panel The LQ-2500 control panel is made up of three elements: the buttons, indicator lights, and SelecType Liquid Crystal Display (LCD), as shown in Figure 1-7. Figure 1-7 The control panel 1-6 Setting Up the Printer
-
 1
1 -
2
-
3
-
4
-
5
-
6
-
7
-
8
-
9
-
 10
10 -
 11
11 -
 12
12 -
 13
13 -
 14
14 -
 15
15 -
 16
16 -
 17
17 -
 18
18 -
 19
19 -
 20
20 -
21
-
22
-
23
-
24
-
25
-
26
-
27
-
28
-
29
-
30
-
31
-
32
-
33
-
34
-
35
-
36
-
37
-
38
-
39
-
40
-
41
-
42
-
43
-
44
-
45
-
46
-
47
-
48
-
49
-
50
-
51
-
52
-
53
-
54
-
55
-
56
-
57
-
58
-
59
-
60
-
61
-
62
-
63
-
64
-
65
-
66
-
67
-
68
-
69
-
70
-
71
-
72
-
73
-
74
-
75
-
76
-
77
-
78
-
79
-
80
-
81
-
82
-
83
-
84
-
85
-
86
-
87
-
88
-
89
-
90
-
91
-
92
-
93
-
94
-
95
-
96
-
97
-
98
-
99
-
100
-
101
-
102
-
103
-
104
-
105
-
106
-
107
-
108
-
109
-
110
-
111
-
112
-
113
-
114
-
115
-
116
-
117
-
118
-
119
-
120
-
121
-
122
-
123
-
124
-
125
-
126
-
127
-
128
-
129
-
130
-
131
-
132
-
133
-
134
-
135
-
136
-
137
-
138
-
139
-
140
-
141
-
142
-
143
-
144
-
145
-
146
-
147
-
148
-
149
-
150
-
151
-
152
-
153
-
154
-
155
-
156
-
157
-
158
-
159
-
160
-
161
-
162
-
163
-
164
-
165
-
166
-
167
-
168
-
169
-
170
-
171
-
172
-
173
-
174
-
175
-
176
-
177
-
178
-
179
-
180
-
181
-
182
-
183
-
184
 |
 |

Now, turn the power ON. When you turn on the printer, several
important things happen:
The print head moves back and forth and stops at about 40 on the
paper bail ruler.
The ribbon carriage moves up and down to set the ribbon at the
correct level for printing.
The printer is
initialized
and set to certain
default
settings (which are
fully described in Chapter 2 and Appendix E).
The green POWER light on the control panel comes on. The red
PAPER
OUT
light also comes on, and the display reads [PAPER OUT].
5
Operating the Control Panel
The LQ-2500 control panel is made up of three elements: the buttons,
indicator lights, and SelecType Liquid Crystal Display (LCD), as shown
in Figure 1-7.
Figure 1-7
The control panel
1-6
Setting Up the Printer