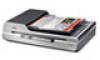
Epson WorkForce GT-1500 User Manual - Page 35
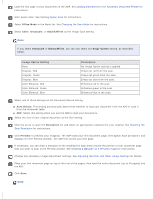
Office Mode, Color, Grayscale, Black&White, Image Option Setting, Description, Auto Detect
 |
View all Epson WorkForce GT-1500 manuals
Add to My Manuals
Save this manual to your list of manuals |
Page 35 highlights
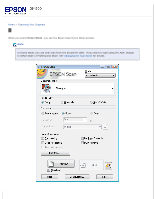
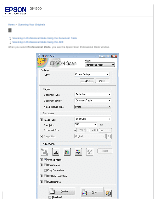
Load the first page of your documents in the ADF. See Loading Documents in the Automatic Document Feeder for instructions. Start Epson Scan. See Starting Epson Scan for instructions. Select Office Mode in the Mode list. See Changing the Scan Mode for instructions. Select Color, Grayscale, or Black&White as the Image Type setting. Note: If you select Grayscale or Black&White, you can also select an Image Option setting, as described below. Image Option Setting None Dropout: Red Dropout: Green Dropout: Blue Color Enhance: Red Color Enhance: Green Color Enhance: Blue Description No Image Option setting is applied. Drops out red from the scan. Drops out green from the scan. Drops out blue from the scan. Enhances red in the scan. Enhances green in the scan. Enhances blue in the scan. Select one of these settings as the Document Source setting. Auto Detect: This setting automatically determines whether to load your document from the ADF or scan it from the document table. ADF: Select this setting when you use the ADF to load your documents. Select the size of your original document as the Size setting. Click the arrow to open the Resolution list and select an appropriate resolution for your original. See Selecting the Scan Resolution for instructions. Click Preview to preview your image(s). The ADF loads your first document page, then Epson Scan prescans it and displays it in the Preview window. The ADF then ejects your first page. If necessary, you can draw a marquee (a line marking the scan area) around the portion of your document page that you want to scan in the Preview window. See Creating a Marquee on a Preview Image for instructions. Change any necessary Image Adjustment settings. See Adjusting the Color and Other Image Settings for details. Place your first document page on top of the rest of the pages, then load the entire document (up to 40 pages) into the ADF. Click Scan. Note:
-
 1
1 -
2
-
3
-
4
-
5
-
6
-
7
-
8
-
9
-
10
-
11
-
12
-
13
-
14
-
15
-
16
-
17
-
18
-
19
-
20
-
21
-
22
-
23
-
24
-
25
-
26
-
27
-
28
-
29
-
 30
30 -
 31
31 -
 32
32 -
 33
33 -
 34
34 -
 35
35 -
 36
36 -
 37
37 -
 38
38 -
 39
39 -
 40
40 -
41
-
42
-
43
-
44
-
45
-
46
-
47
-
48
-
49
-
50
-
51
-
52
-
53
-
54
-
55
-
56
-
57
-
58
-
59
-
60
-
61
-
62
-
63
-
64
-
65
-
66
-
67
-
68
-
69
-
70
-
71
-
72
-
73
-
74
-
75
-
76
-
77
-
78
-
79
-
80
-
81
-
82
-
83
-
84
-
85
-
86
-
87
-
88
-
89
-
90
-
91
-
92
-
93
-
94
-
95
-
96
-
97
-
98
-
99
-
100
-
101
-
102
-
103
-
104
-
105
-
106
-
107
-
108
-
109
-
110
-
111
-
112
-
113
-
114
-
115
-
116
-
117
-
118
-
119
-
120
-
121
-
122
-
123
-
124
-
125
-
126
-
127
-
128
-
129
-
130
-
131
-
132
-
133
-
134
-
135
-
136
-
137
-
138
-
139
-
140
-
141
-
142
-
143
-
144
-
145
-
146
-
147
-
148
-
149
 |
 |
