Epson WorkForce GT-1500 User Manual - Page 98
If you want to continue adjusting the color, repeat step 4.
 |
View all Epson WorkForce GT-1500 manuals
Add to My Manuals
Save this manual to your list of manuals |
Page 98 highlights
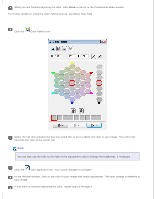
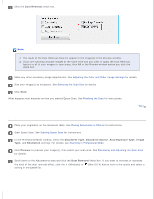
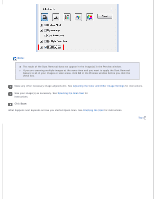
Click the color extractor icon. Your cursor changes to an eye dropper. In the Preview window, click on the color in your image that needs adjustment. The color you selected is moved to the center cell in the Color Palette window with variations in hue in the surrounding cells. Select the cell that contains the hue you would like to use to adjust the color in your image. This color now becomes the color of the center cell and the color change is reflected in your image. Note: You can also use the cells to the right of the adjustment area to change the brightness, if necessary. If you want to continue adjusting the color, repeat step 4. If you want to save the color for future scans, click the Note: save icon. The color appears in the save area. To load a previously saved color, select the color and click the apply to palette icon.
-
 1
1 -
2
-
3
-
4
-
5
-
6
-
7
-
8
-
9
-
10
-
11
-
12
-
13
-
14
-
15
-
16
-
17
-
18
-
19
-
20
-
21
-
22
-
23
-
24
-
25
-
26
-
27
-
28
-
29
-
30
-
31
-
32
-
33
-
34
-
35
-
36
-
37
-
38
-
39
-
40
-
41
-
42
-
43
-
44
-
45
-
46
-
47
-
48
-
49
-
50
-
51
-
52
-
53
-
54
-
55
-
56
-
57
-
58
-
59
-
60
-
61
-
62
-
63
-
64
-
65
-
66
-
67
-
68
-
69
-
70
-
71
-
72
-
73
-
74
-
75
-
76
-
77
-
78
-
79
-
80
-
81
-
82
-
83
-
84
-
85
-
86
-
87
-
88
-
89
-
90
-
91
-
92
-
 93
93 -
 94
94 -
 95
95 -
 96
96 -
 97
97 -
 98
98 -
 99
99 -
 100
100 -
 101
101 -
 102
102 -
 103
103 -
104
-
105
-
106
-
107
-
108
-
109
-
110
-
111
-
112
-
113
-
114
-
115
-
116
-
117
-
118
-
119
-
120
-
121
-
122
-
123
-
124
-
125
-
126
-
127
-
128
-
129
-
130
-
131
-
132
-
133
-
134
-
135
-
136
-
137
-
138
-
139
-
140
-
141
-
142
-
143
-
144
-
145
-
146
-
147
-
148
-
149
 |
 |
