Garmin GTR 200 GTR 200 Installation Manual - Page 29
COM Setup Table 3-4, COM Setup Selections, GTR 200 Installation Manual
 |
View all Garmin GTR 200 manuals
Add to My Manuals
Save this manual to your list of manuals |
Page 29 highlights
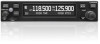
3.6.4.2 COM Setup Page The COM Setup page (Figure 3-3) allows the installer to configure various transmit and receive settings as listed in Table 3-4. For testing purposes, an "X" will appear in the appropriate TX, RX, and SQ checkboxes when the GTR 200 is transmitting, receiving, or the squelch is overridden or open ('open' squelch is defined as when the squelch is overridden and audio is heard). Refer to Section 3.6.4 to select the COM Setup Page. Use the LARGE Knob to scroll through the listed functions, then use the SMALL Knob to adjust the setting of the function. After the setting has been changed, turn the LARGE Knob to move the cursor to another function. Figure 3-3 COM Setup Page Table 3-4 COM Setup Page Selections Selection Description Frequency (MHz) Set frequency from 118-136 MHz. Frequency (kHz) Set frequency from 0-975 kHz in 25 kHz increments. This setting controls the volume of the sidetone audio for the unit during PTT, and is adjusted to correct either low or high sidetone volume. Increasing the setting increases the sidetone volume. Sidetone can be set from 0 to 10, a setting of 5 (default) represents the factory calibration. SIDETONE MIC GAIN Sidetone audio is routed to headset audio and to received audio out, and is generally output to an audio control panel. The Intercom Enable/Disable setting on the Audio Setup Page (see Table 3-5) affects the sidetone per the following: Intercom Enabled: Sidetone volume may also be linked to the ICS (intercom) volume. This is accomplished by selecting the Sidetone setting one turn counter clockwise from '00' setting, 'ICS' will be displayed (Figure 3-4). Intercom volume is adjustable in normal mode (see Pilots Guide). Sidetone audio that is sent to the received audio output (see Receiver Out Gain setting in Table 3-5) is the same volume as sidetone audio sent to the headset. Intercom Disabled: Sidetone audio is only sent to received audio output (not to the headset). Increasing or decreasing this setting, increases or decreases the transmit microphone gain respectively. Mic gain can be set from 0 to 10. A setting of 5 (default) represents the factory calibration, most headsets/microphones should work fine at this setting. Generally the mic gain setting should not be adjusted unless the pilot consistently gets reports that the transmitter sounds "weak". Most often, this setting is adjusted to compensate for "weak" or low output microphones. The transmit sidetone volume is affected by the mic gain setting, so an adjustment of the sidetone setting may be needed after adjusting the mic gain setting. 190-01553-00 Rev. A GTR 200 Installation Manual Page 3-7
-
 1
1 -
2
-
3
-
4
-
5
-
6
-
7
-
8
-
9
-
10
-
11
-
12
-
13
-
14
-
15
-
16
-
17
-
18
-
19
-
20
-
21
-
22
-
23
-
 24
24 -
 25
25 -
 26
26 -
 27
27 -
 28
28 -
 29
29 -
 30
30 -
 31
31 -
 32
32 -
 33
33 -
 34
34 -
35
-
36
-
37
-
38
-
39
-
40
-
41
-
42
-
43
-
44
-
45
-
46
-
47
-
48
-
49
-
50
-
51
-
52
-
53
-
54
-
55
-
56
-
57
-
58
-
59
-
60
-
61
-
62
-
63
-
64
-
65
-
66
-
67
-
68
-
69
-
70
-
71
-
72
-
73
-
74
-
75
 |
 |
