Gateway MT6452 8511882 - Gateway Notebook User Guide for Windows Vista - Page 84
Using voice recognition, Open the Speech Reference Card - sound card
 |
View all Gateway MT6452 manuals
Add to My Manuals
Save this manual to your list of manuals |
Page 84 highlights
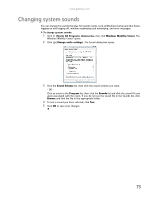
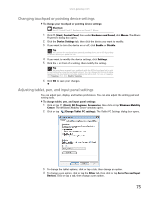
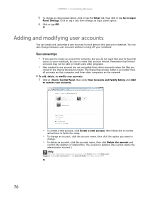
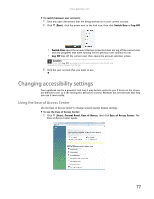
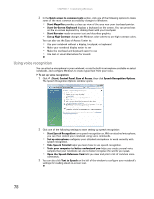
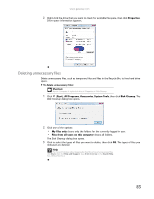
CHAPTER 7: Customizing Windows 2 In the Quick access to common tools section, click one of the following options to make some of the most common accessibility changes to Windows: • Start Magnifier provides a close-up view of the area near your touchpad pointer. • Start On-Screen Keyboard displays a keyboard on the screen. You can press keys on the on-screen keyboard by clicking them with your touchpad. • Start Narrator reads on-screen text and describes graphics. • Set up High Contrast changes the Windows color scheme to use high-contrast colors. You can also use the Ease of Access Center to: • Use your notebook without a display, touchpad, or keyboard • Make your notebook display easier to see • Make the touchpad and keyboard easier to use • Use text or visual alternatives for sounds Using voice recognition You can attach a microphone to your notebook, or use the built-in microphone available on select notebooks, and configure Windows to create typed text from your voice. To set up voice recognition: 1 Click (Start), Control Panel, Ease of Access, then click Speech Recognition Options. The Speech Recognition Options window opens. 2 Click one of the following settings to start setting up speech recognition: • Start Speech Recognition turns speech recognition on. With an attached microphone, you can then control your notebook using voice commands. • Set up microphone configures your attached microphone to work correctly with speech recognition. • Take Speech Tutorial helps you learn how to use speech recognition. • Train your computer to better understand you helps you create several voice samples that your notebook can use to better recognize the words you speak. • Open the Speech Reference Card lets you view and print a list of common voice commands. 3 You can also click Text to Speech on the left of the window to configure your notebook's settings for reading aloud on-screen text. 78
-
 1
1 -
2
-
3
-
4
-
5
-
6
-
7
-
8
-
9
-
10
-
11
-
12
-
13
-
14
-
15
-
16
-
17
-
18
-
19
-
20
-
21
-
22
-
23
-
24
-
25
-
26
-
27
-
28
-
29
-
30
-
31
-
32
-
33
-
34
-
35
-
36
-
37
-
38
-
39
-
40
-
41
-
42
-
43
-
44
-
45
-
46
-
47
-
48
-
49
-
50
-
51
-
52
-
53
-
54
-
55
-
56
-
57
-
58
-
59
-
60
-
61
-
62
-
63
-
64
-
65
-
66
-
67
-
68
-
69
-
70
-
71
-
72
-
73
-
74
-
75
-
76
-
77
-
78
-
 79
79 -
 80
80 -
 81
81 -
 82
82 -
 83
83 -
 84
84 -
 85
85 -
 86
86 -
 87
87 -
 88
88 -
 89
89 -
90
-
91
-
92
-
93
-
94
-
95
-
96
-
97
-
98
-
99
-
100
 |
 |