Gateway MX6452 8511386 - Gateway Notebook Hardware Reference Guide - Page 49
Replacing the hard drive kit
 |
View all Gateway MX6452 manuals
Add to My Manuals
Save this manual to your list of manuals |
Page 49 highlights
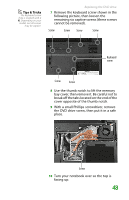
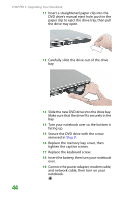
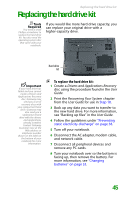
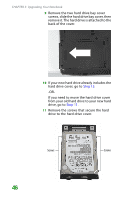
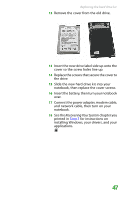
Replacing the hard drive kit Replacing the hard drive kit Tools Required You need a small Phillips screwdriver to replace the hard drive kit. You also need the operating system disc that came with your notebook. If you would like more hard drive capacity, you can replace your original drive with a higher-capacity drive. Hard drive kit Important If your hard drive has failed and you cannot create a Drivers and Applications Recovery disc, Gateway may send you a set of recovery discs with your replacement hard drive. Gateway may also send you a replacement hard drive with the drivers and applications already installed. Contact Gateway Customer Care at the Web address or telephone number shown on the label on the bottom of your notebook for more information. To replace the hard drive kit: 1 Create a Drivers and Applications Recovery disc using the procedure found in the User Guide. 2 Print the Recovering Your System chapter from the User Guide for use in Step 18. 3 Back up any data you want to transfer to the new hard drive. For more information, see "Backing up files" in the User Guide. 4 Follow the guidelines under "Preventing static electricity discharge" on page 38. 5 Turn off your notebook. 6 Disconnect the AC adapter, modem cable, and network cable. 7 Disconnect all peripheral devices and remove any PC cards. 8 Turn your notebook over so the bottom is facing up, then remove the battery. For more information, see "Changing batteries" on page 33. 45
-
 1
1 -
2
-
3
-
4
-
5
-
6
-
7
-
8
-
9
-
10
-
11
-
12
-
13
-
14
-
15
-
16
-
17
-
18
-
19
-
20
-
21
-
22
-
23
-
24
-
25
-
26
-
27
-
28
-
29
-
30
-
31
-
32
-
33
-
34
-
35
-
36
-
37
-
38
-
39
-
40
-
41
-
42
-
43
-
 44
44 -
 45
45 -
 46
46 -
 47
47 -
 48
48 -
 49
49 -
 50
50 -
 51
51 -
 52
52 -
 53
53 -
 54
54 -
55
-
56
-
57
-
58
-
59
-
60
-
61
-
62
-
63
-
64
-
65
-
66
-
67
-
68
-
69
-
70
-
71
-
72
-
73
-
74
-
75
-
76
-
77
-
78
-
79
-
80
-
81
-
82
-
83
-
84
-
85
-
86
 |
 |
