Gateway NV-79 Gateway Notebook User's Guide - English - Page 58
Configuring the TCP/IP protocol, Connecting to a wireless Ethernet network - user manual
 |
View all Gateway NV-79 manuals
Add to My Manuals
Save this manual to your list of manuals |
Page 58 highlights
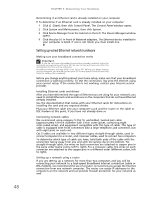
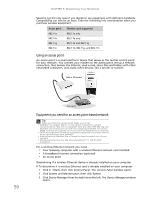
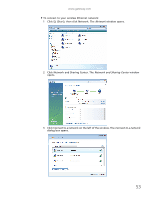
CHAPTER 5: Networking Your Notebook 5 If your computer does not already have a name, type a unique computer name in the Computer name box. This name identifies the computer to other users on the network. Use a computer name of up to 15 characters with no blank spaces. Each computer name must be unique on your network. All-numeric computer names are not allowed. Names must contain some letters. 6 Type a name for your workgroup in the Workgroup box. Use a workgroup name of up to 15 characters with no blank spaces. The workgroup name must be the same for all computers in your network workgroup, and the name must be different than any computer name on your network. 7 Click OK. When you are prompted to restart your computer, click Restart Now. Configuring the TCP/IP protocol A networking protocol is a language computers use to talk to each other. One of several available protocols must be set up on each computer you plan to use on your network. We recommend you use the Transmission Control Protocol/Internet Protocol (TCP/IP), which is widely accepted and compatible for local area networks (LANs), as well as for Internet communications. When networking is set up in Windows Vista™, TCP/IP is automatically installed as the default protocol. Using a DHCP server In order to use the TCP/IP protocol on a computer with a router or access point router, the protocol must be set to "Obtain an IP address from a DHCP server." This is typically preset when you receive your computer. Configuring your router After you have named your computers and set up TCP/IP on them, you can configure your router using your Web browser. For instructions, see your router's documentation. Connecting to a wireless Ethernet network Important Each computer on your network needs a unique Computer Name. All the computers on your network need the same Workgroup Name. You may have already named your computer and workgroup the first time you turned on your computer. Connecting to your network Help For more information about connecting to your network, click Start, then click Help and Support. Type the following keywords in the Search Help box, then press ENTER. • Connect to an available network • Manually add a wireless Ethernet network • Connecting to wireless Ethernet network. After you have named your computer and workgroup, you need to set up the network connection on your computer. 52
-
 1
1 -
2
-
3
-
4
-
5
-
6
-
7
-
8
-
9
-
10
-
11
-
12
-
13
-
14
-
15
-
16
-
17
-
18
-
19
-
20
-
21
-
22
-
23
-
24
-
25
-
26
-
27
-
28
-
29
-
30
-
31
-
32
-
33
-
34
-
35
-
36
-
37
-
38
-
39
-
40
-
41
-
42
-
43
-
44
-
45
-
46
-
47
-
48
-
49
-
50
-
51
-
52
-
 53
53 -
 54
54 -
 55
55 -
 56
56 -
 57
57 -
 58
58 -
 59
59 -
 60
60 -
 61
61 -
 62
62 -
 63
63 -
64
-
65
-
66
-
67
-
68
-
69
-
70
-
71
-
72
-
73
-
74
-
75
-
76
-
77
-
78
-
79
-
80
-
81
-
82
-
83
-
84
-
85
-
86
-
87
-
88
-
89
-
90
-
91
-
92
-
93
-
94
-
95
-
96
-
97
-
98
-
99
-
100
-
101
-
102
-
103
-
104
-
105
-
106
-
107
-
108
 |
 |