Gigabyte GSmart S1200 User Manual - GSmart S1200_WM6.5 English Version - Page 57
SIM Manager, 6 Spb Backup
 |
View all Gigabyte GSmart S1200 manuals
Add to My Manuals
Save this manual to your list of manuals |
Page 57 highlights
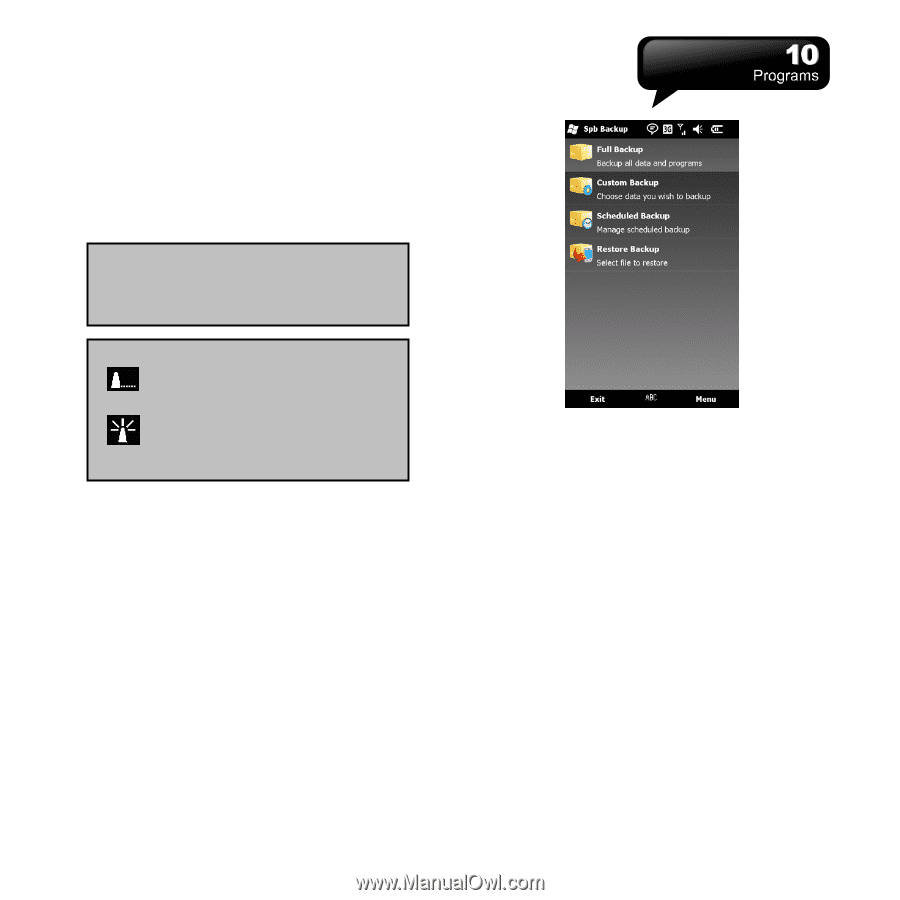
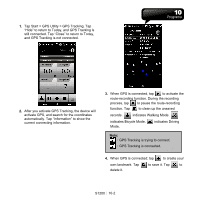
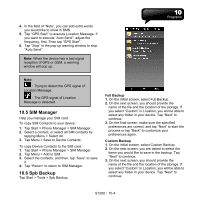
4. In the field of "Note", you can add extra words you would like to show in SMS. 5. Tap "GPS Start" to execute Location Message. If you want to execute "Auto Send", adjust the frequency, first. Then tap "GPS Start". 6. Tap "Stop" in the pop-up warning window to stop "Auto Send". Note: When the device has a bad signal reception of GPS or GSM, a warning window will pop up. Note: :Trying to detect the GPS signal of Location Message. :The GPS signal of Location Message is detected. 10.5 SIM Manager Help you manage your SIM card. To copy SIM Contacts to your device: 1. Tap Start > Phone Manager > SIM Manager. 2. Select a contact, or select all SIM contacts by tapping Menu > Select All. 3. Tap Menu > Save to Device Contacts. To copy Device Contacts to the SIM card: 1. Tap Start > Phone Manager > SIM Manager. 2. Tap Menu > Add to SIM. 3. Select the contacts, and then, tap "Save" to save it. 4. Tap "Return" to return to SIM Manager. 10.6 Spb Backup Tap Start > Tools > Spb Backup. Full Backup 1. On the initial screen, select Full Backup. 2. On the next screen, you should provide the name of the file and the location of the storage. If you select "Custom" in Location, you will be able to select any folder in your device. Tap "Next" to continue. 3. On the final screen, make sure the specified preferences are correct, and tap "Next" to start the process or tap "Back" to customize your preferences again. Custom Backup 1. On the initial screen, select Custom Backup. 2. On the next screen, you are asked to select the items you would like to save in the backup. Tap "Next" to continue. 3. On the next screen, you should provide the name of the file and the location of the storage. If you select "Custom" in Location, you will be able to select any folder in your device. Tap "Next" to continue. S1200│ 10-4
-
 1
1 -
2
-
3
-
4
-
5
-
6
-
7
-
8
-
9
-
10
-
11
-
12
-
13
-
14
-
15
-
16
-
17
-
18
-
19
-
20
-
21
-
22
-
23
-
24
-
25
-
26
-
27
-
28
-
29
-
30
-
31
-
32
-
33
-
34
-
35
-
36
-
37
-
38
-
39
-
40
-
41
-
42
-
43
-
44
-
45
-
46
-
47
-
48
-
49
-
50
-
51
-
 52
52 -
 53
53 -
 54
54 -
 55
55 -
 56
56 -
 57
57 -
 58
58 -
 59
59 -
 60
60 -
 61
61 -
 62
62 -
63
 |
 |