HP 1x1x16 IP Console Switch User Guide - Page 11
Performing a Side-Mount Type A Installation, Type B-Square-hole rails
 |
View all HP 1x1x16 manuals
Add to My Manuals
Save this manual to your list of manuals |
Page 11 highlights
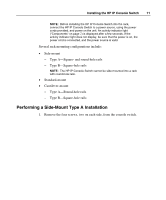
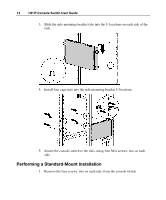
Installing the HP IP Console Switch 11 NOTE: Before installing the HP IP Console Switch into the rack, connect the HP IP Console Switch to a power source, using the power cords provided, and power on the unit. An activity indicator light ("Components" on page 7) is displayed after a few seconds. If the activity indicator light does not display, be sure that the power is on, the power cord is connected, and the power source is valid. Several rack mounting configurations include: • Side-mount − Type A-Square- and round-hole rails − Type B-Square-hole rails NOTE: The HP IP Console Switch cannot be side-mounted into a rack with round-hole rails. • Standard-mount • Cantilever-mount − Type A-Round-hole rails − Type B-Square-hole rails Performing a Side-Mount Type A Installation 1. Remove the four screws, two on each side, from the console switch.
-
 1
1 -
2
-
3
-
4
-
5
-
 6
6 -
 7
7 -
 8
8 -
 9
9 -
 10
10 -
 11
11 -
 12
12 -
 13
13 -
 14
14 -
 15
15 -
 16
16 -
17
-
18
-
19
-
20
-
21
-
22
-
23
-
24
-
25
-
26
-
27
-
28
-
29
-
30
-
31
-
32
-
33
-
34
-
35
-
36
-
37
-
38
-
39
-
40
-
41
-
42
-
43
-
44
-
45
-
46
-
47
-
48
-
49
-
50
-
51
-
52
-
53
-
54
-
55
-
56
-
57
-
58
-
59
-
60
-
61
-
62
-
63
-
64
-
65
-
66
-
67
-
68
-
69
-
70
-
71
-
72
-
73
-
74
-
75
-
76
-
77
-
78
-
79
-
80
-
81
-
82
-
83
-
84
-
85
-
86
-
87
-
88
-
89
-
90
-
91
-
92
-
93
-
94
-
95
-
96
-
97
-
98
-
99
-
100
-
101
-
102
-
103
-
104
-
105
-
106
-
107
-
108
-
109
-
110
-
111
-
112
-
113
-
114
-
115
-
116
-
117
-
118
-
119
-
120
-
121
-
122
-
123
-
124
-
125
-
126
-
127
 |
 |
