HP CB480A HP Color LaserJet CM4730 MFP - User Guide - Page 138
Printing booklets, Manual two-sided (duplex) printing, Layout options for printing on both sides
 |
View all HP CB480A manuals
Add to My Manuals
Save this manual to your list of manuals |
Page 138 highlights
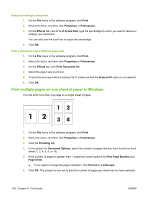
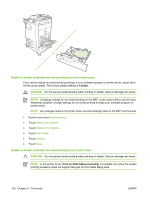
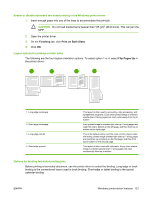
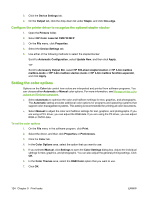
NOTE The default binding setting is to bind on the long edge when the page is set up for portrait orientation. To change to long-edge binding, click the Flip Pages Up check box. Printing booklets Some versions of the printer driver offer booklet-printing settings. Select binding on the left or right side on letter, legal, or A4 paper size. Windows 2000 and XP support booklet printing for all paper sizes. Manual two-sided (duplex) printing If you want to print on two sides (duplex) on paper other than the supported sizes or weights (for example, paper heavier than 120 g/m2 (32 lb) or very thin paper), you will have to go to the MFP and reinsert the paper manually after the first side has printed. CAUTION Do not use two-sided printing when printing on labels. Serious damage can result. 1. Click the Windows Start button, point to Settings, and then click Printers and Faxes. 2. Right-click the printer and select Properties. 3. Click the Device Settings tab. 4. Select Allow Manual Duplex. 5. Select the appropriate size and type. 6. On the Finishing tab, click Print on Both Sides or Print on Both Sides (Manually). 7. The default binding option is to bind on the long edge of the paper in portrait layout. To change the setting, click the Finishing tab and select the Flip pages up check box. 8. Click OK. The Print on Both Sides instructions appear. Follow the instructions to finish printing your document. NOTE If the total number of sheets to be duplexed exceeds the tray 1 capacity for manual duplex jobs, feed the top 100 sheets and press Menu. When prompted, feed the next 100 sheets and press Menu. Repeat as necessary until all the sheets from the output stack have been loaded into tray 1. Layout options for printing on both sides The four duplex orientation options are shown here. To select option 1 or 4, select Flip Pages Up in the printer driver. 122 Chapter 9 Print tasks ENWW
-
 1
1 -
2
-
3
-
4
-
5
-
6
-
7
-
8
-
9
-
10
-
11
-
12
-
13
-
14
-
15
-
16
-
17
-
18
-
19
-
20
-
21
-
22
-
23
-
24
-
25
-
26
-
27
-
28
-
29
-
30
-
31
-
32
-
33
-
34
-
35
-
36
-
37
-
38
-
39
-
40
-
41
-
42
-
43
-
44
-
45
-
46
-
47
-
48
-
49
-
50
-
51
-
52
-
53
-
54
-
55
-
56
-
57
-
58
-
59
-
60
-
61
-
62
-
63
-
64
-
65
-
66
-
67
-
68
-
69
-
70
-
71
-
72
-
73
-
74
-
75
-
76
-
77
-
78
-
79
-
80
-
81
-
82
-
83
-
84
-
85
-
86
-
87
-
88
-
89
-
90
-
91
-
92
-
93
-
94
-
95
-
96
-
97
-
98
-
99
-
100
-
101
-
102
-
103
-
104
-
105
-
106
-
107
-
108
-
109
-
110
-
111
-
112
-
113
-
114
-
115
-
116
-
117
-
118
-
119
-
120
-
121
-
122
-
123
-
124
-
125
-
126
-
127
-
128
-
129
-
130
-
131
-
132
-
 133
133 -
 134
134 -
 135
135 -
 136
136 -
 137
137 -
 138
138 -
 139
139 -
 140
140 -
 141
141 -
 142
142 -
 143
143 -
144
-
145
-
146
-
147
-
148
-
149
-
150
-
151
-
152
-
153
-
154
-
155
-
156
-
157
-
158
-
159
-
160
-
161
-
162
-
163
-
164
-
165
-
166
-
167
-
168
-
169
-
170
-
171
-
172
-
173
-
174
-
175
-
176
-
177
-
178
-
179
-
180
-
181
-
182
-
183
-
184
-
185
-
186
-
187
-
188
-
189
-
190
-
191
-
192
-
193
-
194
-
195
-
196
-
197
-
198
-
199
-
200
-
201
-
202
-
203
-
204
-
205
-
206
-
207
-
208
-
209
-
210
-
211
-
212
-
213
-
214
-
215
-
216
-
217
-
218
-
219
-
220
-
221
-
222
-
223
-
224
-
225
-
226
-
227
-
228
-
229
-
230
-
231
-
232
-
233
-
234
-
235
-
236
-
237
-
238
-
239
-
240
-
241
-
242
-
243
-
244
-
245
-
246
-
247
-
248
-
249
-
250
-
251
-
252
-
253
-
254
-
255
-
256
-
257
-
258
-
259
-
260
-
261
-
262
-
263
-
264
-
265
-
266
-
267
-
268
-
269
-
270
-
271
-
272
-
273
-
274
-
275
-
276
-
277
-
278
-
279
-
280
-
281
-
282
-
283
-
284
-
285
-
286
-
287
-
288
-
289
-
290
-
291
-
292
-
293
-
294
-
295
-
296
-
297
-
298
-
299
-
300
-
301
-
302
-
303
-
304
-
305
-
306
-
307
-
308
-
309
-
310
-
311
-
312
-
313
-
314
-
315
-
316
-
317
-
318
-
319
-
320
-
321
-
322
-
323
-
324
-
325
-
326
-
327
-
328
-
329
-
330
-
331
-
332
-
333
-
334
-
335
-
336
-
337
-
338
-
339
-
340
-
341
-
342
-
343
-
344
-
345
-
346
-
347
-
348
-
349
-
350
-
351
-
352
-
353
-
354
-
355
-
356
-
357
-
358
-
359
-
360
-
361
-
362
-
363
-
364
-
365
-
366
-
367
-
368
-
369
-
370
 |
 |
