| Section |
Page |
| Product basics |
17 |
| Product comparison |
18 |
| HP Color LaserJet CM4730 MFP |
18 |
| HP Color LaserJet CM4730f MFP |
18 |
| HP Color LaserJet CM4730fsk MFP |
19 |
| HP Color LaserJet CM4730fm MFP |
19 |
| Product features |
21 |
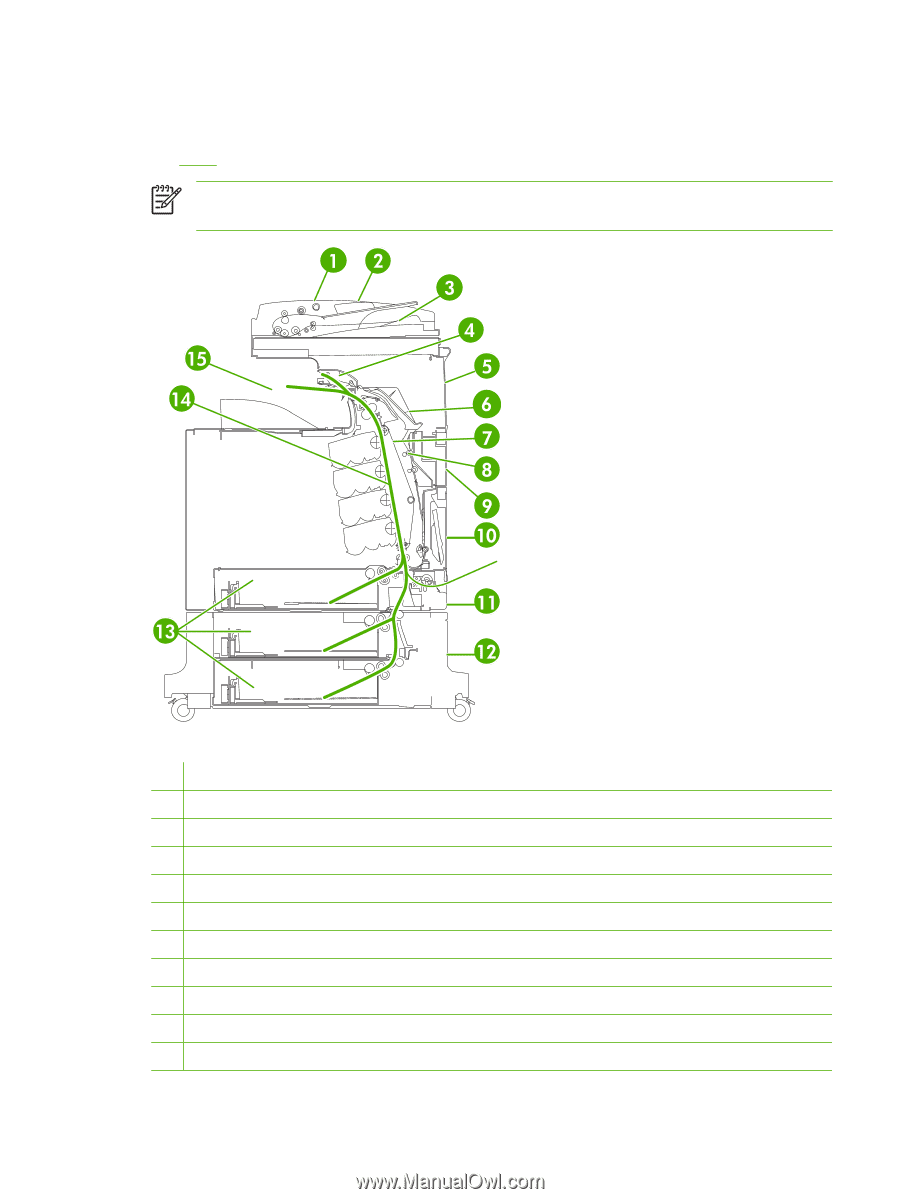
| Product walkaround |
25 |
| Front view |
25 |
| Back view |
26 |
| Interface ports |
27 |
| Serial number and model number location |
27 |
| Control panel |
29 |
| Use the control panel |
30 |
| Control-panel layout |
30 |
| Home screen |
31 |
| Buttons on the touchscreen |
32 |
| Control-panel help system |
32 |
| Navigate the Administration menu |
33 |
| Information menu |
34 |
| Default Job Options menu |
36 |
| Default Options for Originals |
36 |
| Image adjustment |
37 |
| Default Copy Options |
38 |
| Default Fax Options |
39 |
| Default E-mail Options |
40 |
| Default Send to Folder Options |
41 |
| Default Print Options |
42 |
| Time/Scheduling menu |
43 |
| Management menu |
45 |
| Initial Setup menu |
47 |
| Networking and I/O |
47 |
| Fax Setup |
55 |
| E-mail Setup |
58 |
| Send Setup menu |
58 |
| Device Behavior menu |
59 |
| Print Quality menu |
64 |
| Troubleshooting menu |
66 |
| Resets menu |
70 |
| Service menu |
71 |
| Software for Windows |
73 |
| Supported Windows versions |
74 |
| Install the printing-system software |
75 |
| Install Windows printing-system software for direct connections (USB or parallel) |
75 |
| Install Windows printing-system software for networks |
75 |
| Use Windows-sharing on a network |
76 |
| Install the software after the parallel or USB cable has been connected |
76 |
| Supported printer drivers |
78 |
| Remove software for Windows |
79 |
| Select the correct printer driver |
80 |
| Universal printer drivers |
80 |
| Driver Autoconfiguration |
80 |
| Automatic Configuration |
81 |
| Priority for print settings |
82 |
| Open the printer drivers |
83 |
| Software for Macintosh |
85 |
| Software for Macintosh computers |
86 |
| Remove software from Macintosh operating systems |
87 |
| Software for other operating systems |
89 |
| HP Web Jetadmin |
90 |
| UNIX |
91 |
| Connectivity |
93 |
| Parallel connection |
94 |
| USB connection |
95 |
| Auxiliary connection |
96 |
| Network configuration |
97 |
| Configure TCP/IPv4 parameters |
97 |
| Change the IP address |
97 |
| Set the subnet mask |
98 |
| Set the default gateway |
98 |
| Configure TCP/IPv6 parameters |
99 |
| Disable network protocols (optional) |
99 |
| Disable IPX/SPX |
99 |
| Disable AppleTalk |
100 |
| Disable DLC/LLC |
100 |
| HP Jetdirect EIO print servers |
100 |
| Network utilities |
101 |
| HP Web Jetadmin |
101 |
| Embedded Web server |
101 |
| HP Easy Printer Care software |
102 |
| Other components and utilities |
102 |
| Paper and print media |
103 |
| Understand paper and print media use |
104 |
| Supported paper and print media sizes |
105 |
| Custom paper sizes |
107 |
| Special paper or print media guidelines |
108 |
| Load paper and print media |
109 |
| Load tray 1 |
109 |
| Load trays 2, 3, or 4 |
110 |
| Load standard-sized media into tray 2, 3, or 4 |
110 |
| Loading undetectable standard-sized media into tray 2, 3, and 4 |
112 |
| Load custom-size media into tray 2 |
113 |
| Configure trays |
114 |
| Configure a tray when loading paper |
114 |
| Configure a tray to match print job settings |
114 |
| Configure a tray by using the Supplies Status menu |
115 |
| Automatic media type sensing (auto sense mode) |
115 |
| Tray 1 sensing |
115 |
| Tray 2–4 sensing |
116 |
| Select the media by source, type, or size |
116 |
| Source |
116 |
| Type and Size |
116 |
| Select the output bin |
117 |
| Standard output bins |
117 |
| 3-bin mailbox output bins |
117 |
| Select an output location |
118 |
| Configure the 3-bin mailbox |
118 |
| Configure the printer driver to recognize the 3-bin mailbox in Windows |
118 |
| Configure the printer driver to recognize the 3-bin mailbox in Macintosh |
119 |
| Select the 3-bin mailbox operating mode at the control panel |
119 |
| Select the 3-bin mailbox operating mode in the printer driver |
119 |
| Select the operating mode in the printer driver (Mac OS X) |
120 |
| Use product features |
121 |
| Economy settings |
122 |
| Sleep and wake |
122 |
| Job storage features |
123 |
| Gain access to the job storage features |
123 |
| Use the proof and hold feature |
124 |
| Create a proof and hold job |
124 |
| Print the remaining copies of a proof and hold job |
124 |
| Delete a proof and hold job |
124 |
| Use the personal job feature |
125 |
| Create a personal job |
125 |
| Print a personal job |
125 |
| Delete a personal job |
125 |
| Use the QuickCopy feature |
126 |
| Create a QuickCopy job |
126 |
| Print additional copies of a QuickCopy job |
126 |
| Delete a QuickCopy job |
126 |
| Use the stored job feature |
127 |
| Create a stored copy job |
127 |
| Create a stored print job |
127 |
| Print a stored job |
127 |
| Delete a stored job |
128 |
| Print tasks |
129 |
| Media type and tray loading |
130 |
| Windows printer-driver features |
132 |
| Create and use printing shortcuts in Windows |
132 |
| Set a custom paper size |
132 |
| Use different paper and print covers |
132 |
| Print a blank first page |
133 |
| Use watermarks |
133 |
| Resize documents |
133 |
| Print multiple pages on one sheet of paper in Windows |
134 |
| Print on both sides of the page (duplex printing) |
135 |
| Automatic two-sided (duplex) printing |
135 |
| Enable or disable automatic two-sided printing from the control panel |
136 |
| Enable or disable automatic two-sided printing in the printer driver |
136 |
| Enable or disable automatic two-sided printing in the Windows printer driver |
137 |
| Layout options for printing on both sides |
137 |
| Options for binding two-sided printing jobs |
137 |
| Printing booklets |
138 |
| Manual two-sided (duplex) printing |
138 |
| Layout options for printing on both sides |
138 |
| Create booklets |
139 |
| Set the stapling options |
139 |
| Select the stapler in the printer driver |
139 |
| Configure the printer driver to recognize the optional stapler stacker |
140 |
| Setting the color options |
140 |
| Use the Services tab |
141 |
| Using the HP Digital Imaging Options dialog box |
141 |
| Macintosh printer-driver features |
142 |
| Create and use printing shortcuts in Macintosh |
142 |
| Resize documents or print on a custom paper size |
142 |
| Print a cover page |
142 |
| Use watermarks |
143 |
| Print multiple pages on one sheet of paper in Macintosh |
143 |
| Print on both sides of the page (duplex printing) |
143 |
| Automatic duplex printing |
143 |
| Enable or disable automatic two-sided printing from the control panel |
145 |
| Enable or disable automatic two-sided printing in the Macintosh printer driver |
146 |
| Layout options for printing on both sides |
146 |
| Options for binding two-sided printing jobs |
147 |
| Manual duplex printing |
147 |
| Set the stapling options |
147 |
| Select the stapler in the printer driver |
147 |
| Configure the printer driver to recognize the optional stapler/stacker |
147 |
| Set the color options |
148 |
| Use the Services menu |
148 |
| Staple documents |
149 |
| Set the stapler at the control panel for printed jobs |
149 |
| Set the stapler at the control panel for all copy jobs |
149 |
| Set the stapler at the control panel for a single copy job |
150 |
| Configure the device to stop or continue when the staple cartridge is empty |
150 |
| Load staples |
150 |
| Cancel a print job |
152 |
| Stop the current print job from the control panel |
152 |
| Stop the current print job from the software program |
152 |
| Using color |
153 |
| HP ImageREt 3600 |
154 |
| Restrict color use |
155 |
| Restrict color printing |
155 |
| Restrict color copying |
155 |
| Paper selection |
156 |
| Color options |
157 |
| sRGB |
158 |
| Print in four colors — CMYK |
159 |
| CMYK ink set emulation (PostScript only) |
160 |
| Color matching |
161 |
| PANTONE® color matching |
161 |
| Sample book color matching |
161 |
| Printing color samples |
162 |
| Manage printer color options on Windows computers |
163 |
| Print in grayscale |
163 |
| Setting the color options in Windows |
163 |
| RGB Color (Color Themes) |
163 |
| Automatic or manual color adjustment |
164 |
| Manual color options |
164 |
| Manage printer color options on Macintosh computers |
166 |
| Print Color as Gray |
166 |
| Setting the color options in Macintosh |
166 |
| Advanced color options for text, graphics, and photographs |
166 |
| Halftone options |
166 |
| Neutral Grays |
167 |
| RGB Color |
167 |
| Edge Control |
167 |
| Copy |
169 |
| Use the Copy screen |
170 |
| Set the default copy options |
171 |
| Basic copy instructions |
172 |
| Copy from the scanner glass |
172 |
| Copy from the document feeder |
172 |
| Adjust the copy settings |
173 |
| Copy two-sided documents |
174 |
| Copying two-sided documents manually |
174 |
| Copy two-sided documents automatically |
174 |
| Copy mixed-size originals |
176 |
| Change the copy-collation setting |
177 |
| Copy photos and books |
178 |
| Combine copy jobs by using Job Build |
179 |
| Cancel a copy job |
180 |
| Scan and send to e-mail |
181 |
| Configure e-mail settings |
182 |
| Supported protocols |
182 |
| Configure e-mail server settings |
182 |
| Use the Send E-mail screen |
184 |
| Perform basic e-mail functions |
185 |
| Load documents |
185 |
| Send documents |
185 |
| Send a document |
185 |
| Use the auto-complete function |
186 |
| Use the address book |
187 |
| Create a recipient list |
187 |
| Use the local address book |
187 |
| Add e-mail addresses to the local address book |
188 |
| Delete e-mail addresses from the local address book |
188 |
| Change e-mail settings for the current job |
189 |
| Scan to a folder |
190 |
| Scan to a workflow destination |
191 |
| Fax |
193 |
| Analog fax |
194 |
| Connect the fax accessory to a phone line |
194 |
| Configure and use the fax features |
195 |
| Digital fax |
196 |
| Manage the MFP |
197 |
| Information pages |
198 |
| Embedded Web server |
200 |
| Open the embedded Web server |
200 |
| Information tab |
201 |
| Settings tab |
201 |
| Digital Sending tab |
202 |
| Networking tab |
202 |
| Other links |
202 |
| HP Easy Printer Care software |
204 |
| Supported operating systems |
204 |
| Open HP Easy Printer Care software |
204 |
| HP Easy Printer Care software sections |
204 |
| HP Web Jetadmin software |
206 |
| HP Printer Utility for Macintosh |
207 |
| Open the HP Printer Utility |
207 |
| Print a cleaning page |
207 |
| Print a configuration page |
207 |
| View supplies status |
208 |
| Order supplies online and use other support features |
208 |
| Upload a file to the printer |
208 |
| Update the firmware |
209 |
| Activate the two-sided printing (duplexing) mode |
209 |
| Lock or unlock printer storage devices |
209 |
| Save or print stored jobs |
209 |
| Configure trays |
210 |
| Change network settings |
210 |
| Open the embedded Web server |
210 |
| Set up e-mail alerts |
211 |
| Security features |
212 |
| Secure the embedded Web server |
212 |
| Foreign Interface Harness (FIH) |
212 |
| Requirements |
212 |
| Use the FIH |
212 |
| Enable the FIH portal |
212 |
| Disable the FIH portal |
213 |
| Secure Disk Erase |
213 |
| Data affected |
214 |
| Gain access to Secure Disk Erase |
214 |
| Additional Information |
214 |
| DSS authentication |
214 |
| Lock the control-panel menus |
214 |
| Set the real-time clock |
215 |
| Set the date format |
215 |
| Set the date |
215 |
| Set the time format |
215 |
| Set the time |
215 |
| Configure alerts |
217 |
| Upgrade the firmware |
218 |
| Determine the current firmware version |
218 |
| Download new firmware from the HP Web site |
218 |
| Transfer the new firmware to the MFP |
218 |
| Use FTP to upload the firmware through a browser |
218 |
| Use FTP to upgrade the firmware on a network connection |
219 |
| Use HP Web Jetadmin to upgrade the firmware |
220 |
| Use MS-DOS commands to upgrade the firmware |
220 |
| Use the HP Jetdirect firmware |
220 |
| Manage memory |
222 |
| Manage supplies |
223 |
| HP print cartridges |
223 |
| Non-HP print cartridges |
223 |
| Print cartridge authentication |
223 |
| HP fraud hotline |
223 |
| Print cartridge storage |
223 |
| Print cartridge life expectancy |
224 |
| Check the print cartridge life |
224 |
| On the MFP control panel |
224 |
| In the embedded Web server |
224 |
| Through HP Easy Printer Care software |
224 |
| Through HP Web Jetadmin |
224 |
| Maintenance |
225 |
| Replace supplies |
226 |
| Locate supplies |
226 |
| Supply replacement guidelines |
226 |
| Approximate replacement intervals for supplies |
226 |
| Change print cartridges |
227 |
| Clean the MFP |
228 |
| Clean the outside of the MFP |
228 |
| Clean the touchscreen |
228 |
| Clean the scanner glass |
228 |
| Cleaning the ADF delivery system |
229 |
| Clean the ADF delivery system |
229 |
| Clean the ADF rollers |
230 |
| Clean the mylar strip |
233 |
| ADF maintenance kit |
235 |
| Calibrate the scanner |
236 |
| Problem solving |
237 |
| Solving general problems |
238 |
| Troubleshooting checklist |
238 |
| Determining MFP problems |
240 |
| Control-panel message types |
241 |
| Control-panel messages |
242 |
| Jams |
255 |
| Jam recovery |
256 |
| Clear jams behind the right covers |
257 |
| Clear jams in tray 1 |
262 |
| Clear jams in tray 2, 3, or 4 |
262 |
| Clear jams in the stapler/stacker |
264 |
| Clear staple jams |
265 |
| Clear jams in the 3-bin mailbox |
266 |
| Clear jams in the output accessory bridge |
269 |
| Clear jams in the ADF |
270 |
| Media-handling problems |
272 |
| Printer feeds multiple sheets |
272 |
| Printer feeds incorrect page size |
272 |
| Printer pulls from incorrect tray |
272 |
| Media does not feed automatically |
273 |
| Media does not feed from tray 2, 3, or 4 |
273 |
| Transparencies or glossy paper will not feed |
274 |
| Envelopes jam or will not feed in the MFP |
274 |
| Output is curled or wrinkled |
275 |
| Printer will not duplex or duplexes incorrectly |
275 |
| Understand accessory lights for the 3-bin mailbox and stapler/stacker |
276 |
| Understand lights on the formatter |
277 |
| HP Jetdirect LEDs |
277 |
| Heartbeat LED |
277 |
| Correct print quality and copy quality problems |
279 |
| Print quality problems associated with media |
279 |
| Color printing problems |
279 |
| Printout color error |
279 |
| Incorrect shade |
280 |
| Missing color |
280 |
| Cartridge error |
280 |
| Color match error |
280 |
| Overhead transparency defects |
281 |
| Print quality problems associated with the environment |
281 |
| Print quality problems associated with jams |
281 |
| Print quality troubleshooting pages |
282 |
| Print quality troubleshooting tool |
282 |
| Image defect examples |
282 |
| Horizontal lines or streaks |
282 |
| Misaligned color |
284 |
| Vertical lines |
285 |
| Repetitive defects |
286 |
| Color fade in all colors |
287 |
| Color fade in one color |
288 |
| Fingerprints and media dents |
289 |
| Loose toner |
290 |
| Smeared toner |
291 |
| White areas on page |
292 |
| Media damage |
293 |
| Specs or stray toner |
294 |
| Skewed, stretched, or off-center page |
295 |
| Blank page |
296 |
| Horizontal lines |
297 |
| Page skew |
298 |
| Vertical lines |
299 |
| Image shifted |
300 |
| Unexpected image |
301 |
| Calibrate the MFP |
301 |
| Repetitive defect ruler |
301 |
| Solve fax problems |
303 |
| Solve e-mail problems |
304 |
| Validate the SMTP gateway address |
304 |
| Validate the LDAP gateway address |
304 |
| Solve problems with output accessories |
305 |
| Solve network connectivity problems |
306 |
| Solve network printing problems |
306 |
| Verify communication over the network |
306 |
| Solve common Macintosh problems |
308 |
| Supplies and accessories |
311 |
| Order parts, accessories, and supplies |
312 |
| Order directly from HP |
312 |
| Order through service or support providers |
312 |
| Order directly through the embedded Web server |
312 |
| Optional output devices |
313 |
| Output accessory bridge |
313 |
| 3-bin mailbox |
313 |
| Stapler/stacker |
314 |
| Part numbers |
315 |
| Accessories |
315 |
| Print cartridges |
315 |
| Maintenance kits |
315 |
| Customer replaceable units |
316 |
| Memory |
316 |
| Cables and interfaces |
316 |
| Service and support |
317 |
| Hewlett-Packard limited warranty statement |
317 |
| Customer self repair warranty service |
319 |
| HP customer care |
320 |
| Limited warranty for print cartridges and image drums |
322 |
| Color LaserJet Image Fuser Kit and Image Transfer Kit Limited Warranty Statement |
323 |
| Availability of support and service |
324 |
| HP maintenance agreements |
325 |
| On-site service agreements |
325 |
| Priority onsite service |
325 |
| Next-day onsite service |
325 |
| Weekly (volume) on-site service |
325 |
| MFP specifications |
327 |
| Physical specifications |
328 |
| Electrical specifications |
329 |
| Acoustic specifications |
330 |
| Environmental specifications |
331 |
| Regulatory information |
333 |
| Compliance with FCC regulations |
334 |
| Declaration of Conformity |
335 |
| Environmental product stewardship program |
336 |
| Protecting the environment |
336 |
| Ozone production |
336 |
| Power consumption |
336 |
| Toner consumption |
336 |
| Paper use |
336 |
| Plastics |
336 |
| HP LaserJet print supplies |
336 |
| Return and recycling instructions |
337 |
| United States and Puerto Rico |
337 |
| Multiple returns (two to eight cartridges) |
337 |
| Single returns |
337 |
| Shipping |
337 |
| Non-US returns |
337 |
| Paper |
337 |
| Material restrictions |
337 |
| Disposal of waste equipment by users in private households in the European Union |
338 |
| Material Safety Data Sheet (MSDS) |
338 |
| For more information |
339 |
| Certificate of volatility |
340 |
| Types of memory |
340 |
| Volatile memory |
340 |
| Non-volatile memory |
340 |
| Hard-disk-drive memory |
340 |
| Safety statements |
341 |
| Laser safety |
341 |
| Canadian DOC regulations |
341 |
| VCCI statement (Japan) |
341 |
| Power cord statement (Japan) |
341 |
| EMI statement (Korea) |
341 |
| EMI statement (Taiwan) |
341 |
| General telecom statement |
342 |
| Laser statement for Finland |
343 |
| Install memory and print server cards |
345 |
| Install memory and fonts |
346 |
| Install DDR memory DIMMs |
346 |
| Install a flash memory card |
350 |
| Enabling memory |
354 |
| Enable memory for Windows 98 and Me |
354 |
| Enable memory for Windows 2000 and XP |
355 |
| Install an HP Jetdirect or EIO print server card |
356 |

 1
1 2
2 3
3 4
4 5
5 6
6 7
7 8
8 9
9 10
10 11
11 12
12 13
13 14
14 15
15 16
16 17
17 18
18 19
19 20
20 21
21 22
22 23
23 24
24 25
25 26
26 27
27 28
28 29
29 30
30 31
31 32
32 33
33 34
34 35
35 36
36 37
37 38
38 39
39 40
40 41
41 42
42 43
43 44
44 45
45 46
46 47
47 48
48 49
49 50
50 51
51 52
52 53
53 54
54 55
55 56
56 57
57 58
58 59
59 60
60 61
61 62
62 63
63 64
64 65
65 66
66 67
67 68
68 69
69 70
70 71
71 72
72 73
73 74
74 75
75 76
76 77
77 78
78 79
79 80
80 81
81 82
82 83
83 84
84 85
85 86
86 87
87 88
88 89
89 90
90 91
91 92
92 93
93 94
94 95
95 96
96 97
97 98
98 99
99 100
100 101
101 102
102 103
103 104
104 105
105 106
106 107
107 108
108 109
109 110
110 111
111 112
112 113
113 114
114 115
115 116
116 117
117 118
118 119
119 120
120 121
121 122
122 123
123 124
124 125
125 126
126 127
127 128
128 129
129 130
130 131
131 132
132 133
133 134
134 135
135 136
136 137
137 138
138 139
139 140
140 141
141 142
142 143
143 144
144 145
145 146
146 147
147 148
148 149
149 150
150 151
151 152
152 153
153 154
154 155
155 156
156 157
157 158
158 159
159 160
160 161
161 162
162 163
163 164
164 165
165 166
166 167
167 168
168 169
169 170
170 171
171 172
172 173
173 174
174 175
175 176
176 177
177 178
178 179
179 180
180 181
181 182
182 183
183 184
184 185
185 186
186 187
187 188
188 189
189 190
190 191
191 192
192 193
193 194
194 195
195 196
196 197
197 198
198 199
199 200
200 201
201 202
202 203
203 204
204 205
205 206
206 207
207 208
208 209
209 210
210 211
211 212
212 213
213 214
214 215
215 216
216 217
217 218
218 219
219 220
220 221
221 222
222 223
223 224
224 225
225 226
226 227
227 228
228 229
229 230
230 231
231 232
232 233
233 234
234 235
235 236
236 237
237 238
238 239
239 240
240 241
241 242
242 243
243 244
244 245
245 246
246 247
247 248
248 249
249 250
250 251
251 252
252 253
253 254
254 255
255 256
256 257
257 258
258 259
259 260
260 261
261 262
262 263
263 264
264 265
265 266
266 267
267 268
268 269
269 270
270 271
271 272
272 273
273 274
274 275
275 276
276 277
277 278
278 279
279 280
280 281
281 282
282 283
283 284
284 285
285 286
286 287
287 288
288 289
289 290
290 291
291 292
292 293
293 294
294 295
295 296
296 297
297 298
298 299
299 300
300 301
301 302
302 303
303 304
304 305
305 306
306 307
307 308
308 309
309 310
310 311
311 312
312 313
313 314
314 315
315 316
316 317
317 318
318 319
319 320
320 321
321 322
322 323
323 324
324 325
325 326
326 327
327 328
328 329
329 330
330 331
331 332
332 333
333 334
334 335
335 336
336 337
337 338
338 339
339 340
340 341
341 342
342 343
343 344
344 345
345 346
346 347
347 348
348 349
349 350
350 351
351 352
352 353
353 354
354 355
355 356
356 357
357 358
358 359
359 360
360 361
361 362
362 363
363 364
364 365
365 366
366 367
367 368
368 369
369 370
370

