HP Color LaserJet 4730 HP LaserJet MFP - Analog Fax Accessory 300 Send Fax Dri - Page 77
An e-mail confirmation is not received, HP MFP Send Fax Properties
 |
View all HP Color LaserJet 4730 manuals
Add to My Manuals
Save this manual to your list of manuals |
Page 77 highlights
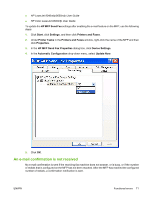
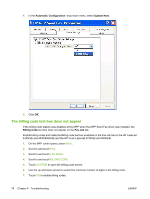
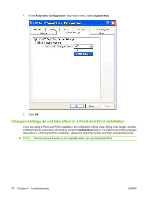
● HP LaserJet 9040mfp/9050mfp User Guide ● HP Color LaserJet 9500mfp User Guide To update the HP MFP Send Fax settings after enabling the e-mail feature on the MFP, use the following steps: 1. Click Start, click Settings, and then click Printers and Faxes. 2. Under Printer Tasks in the Printers and Faxes window, right-click the name of the MFP and then click Properties. 3. In the HP MFP Send Fax Properties dialog box, click Device Settings. 4. In the Automatic Configuration drop-down menu, select Update Now. 5. Click OK. An e-mail confirmation is not received No e-mail confirmation is sent if the receiving fax machine does not answer, or is busy, or if the number of redials that is configured on the MFP has not been reached. After the MFP has reached the configured number of redials, a confirmation notification is sent. ENWW Functional errors 71
-
 1
1 -
2
-
3
-
4
-
5
-
6
-
7
-
8
-
9
-
10
-
11
-
12
-
13
-
14
-
15
-
16
-
17
-
18
-
19
-
20
-
21
-
22
-
23
-
24
-
25
-
26
-
27
-
28
-
29
-
30
-
31
-
32
-
33
-
34
-
35
-
36
-
37
-
38
-
39
-
40
-
41
-
42
-
43
-
44
-
45
-
46
-
47
-
48
-
49
-
50
-
51
-
52
-
53
-
54
-
55
-
56
-
57
-
58
-
59
-
60
-
61
-
62
-
63
-
64
-
65
-
66
-
67
-
68
-
69
-
70
-
71
-
 72
72 -
 73
73 -
 74
74 -
 75
75 -
 76
76 -
 77
77 -
 78
78 -
 79
79 -
 80
80 -
 81
81 -
 82
82 -
83
-
84
-
85
-
86
-
87
-
88
 |
 |
