HP Designjet 510 HP Designjet 510 Printer series - Quick Reference Guide - Page 16
CAUTION, Enter, Replace Ink Cartridge - ink cartridges
 |
View all HP Designjet 510 manuals
Add to My Manuals
Save this manual to your list of manuals |
Page 16 highlights
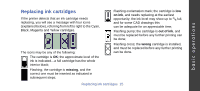
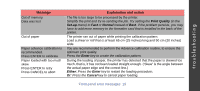
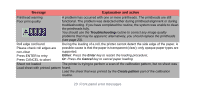
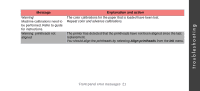
1 To replace a cartridge, first open the ink cartridge cover. CAUTION: Don't replace cartridges during printing. 2 Then remove the ink cartridge. 3 Insert the ink cartridge into its correct position, pushing it down until it clicks into place. Colored labels on the ink cartridges must correspond with the same colored labels on the printer. Arrows on the cartridges point towards the front of the printer. 4 When all cartridges are successfully installed the icons stop flashing; press Enter on the front panel (or await the time-out). 5 Close the ink cartridge cover. You will see the frontpanel message "HP ink cartridges successfully installed" You can replace an ink cartridge whenever you want. To do this: Select → Replace Ink Cartridge 16 Replacing ink cartridges
-
 1
1 -
2
-
3
-
4
-
5
-
6
-
7
-
8
-
9
-
10
-
 11
11 -
 12
12 -
 13
13 -
 14
14 -
 15
15 -
 16
16 -
 17
17 -
 18
18 -
 19
19 -
 20
20 -
 21
21 -
22
-
23
-
24
-
25
-
26
-
27
-
28
-
29
-
30
-
31
-
32
-
33
 |
 |
