HP EliteBook 2170p HP EliteBook 2170p Notebook PC Maintenance and Service Guid - Page 57
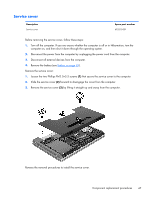
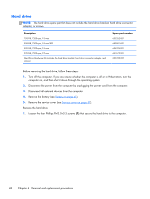
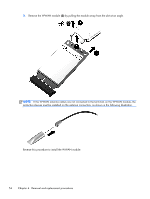
Lift the left side of the hard drive bracket, hard drive.
 |
View all HP EliteBook 2170p manuals
Add to My Manuals
Save this manual to your list of manuals |
Page 57 highlights
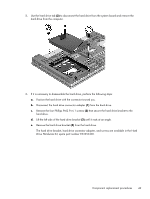
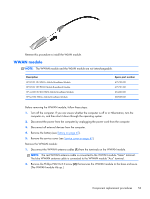
2. Use the hard drive tab (2) to disconnect the hard drive from the system board and remove the hard drive from the computer. 3. If it is necessary to disassemble the hard drive, perform the following steps: a. Position the hard drive with the connector toward you. b. Disconnect the hard drive connector adapter (1) from the hard drive. c. Remove the four Phillips PM2.9×4.1 screws (2) that secure the hard drive bracket to the hard drive. d. Lift the left side of the hard drive bracket (3) until it rests at an angle. e. Remove the hard drive bracket (4) from the hard drive. The hard drive bracket, hard drive connector adapter, and screws are available in the Hard Drive Hardware Kit, spare part number 693350-001. Component replacement procedures 49
-
 1
1 -
2
-
3
-
4
-
5
-
6
-
7
-
8
-
9
-
10
-
11
-
12
-
13
-
14
-
15
-
16
-
17
-
18
-
19
-
20
-
21
-
22
-
23
-
24
-
25
-
26
-
27
-
28
-
29
-
30
-
31
-
32
-
33
-
34
-
35
-
36
-
37
-
38
-
39
-
40
-
41
-
42
-
43
-
44
-
45
-
46
-
47
-
48
-
49
-
50
-
51
-
 52
52 -
 53
53 -
 54
54 -
 55
55 -
 56
56 -
 57
57 -
 58
58 -
 59
59 -
 60
60 -
 61
61 -
 62
62 -
63
-
64
-
65
-
66
-
67
-
68
-
69
-
70
-
71
-
72
-
73
-
74
-
75
-
76
-
77
-
78
-
79
-
80
-
81
-
82
-
83
-
84
-
85
-
86
-
87
-
88
-
89
-
90
-
91
-
92
-
93
-
94
-
95
-
96
-
97
-
98
-
99
-
100
-
101
-
102
-
103
-
104
-
105
-
106
-
107
-
108
-
109
-
110
-
111
-
112
-
113
-
114
-
115
-
116
-
117
-
118
 |
 |
