HP EliteBook 8770w RAID User Guide - Page 30
Allocating unallocated hard drive space for an HP image, Start, My Computer, Manage, Disk Management - review
 |
View all HP EliteBook 8770w manuals
Add to My Manuals
Save this manual to your list of manuals |
Page 30 highlights
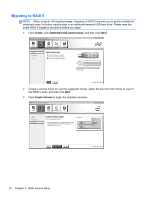
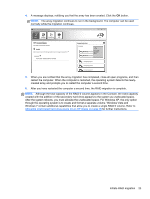
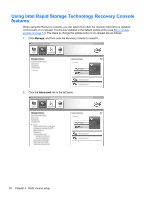
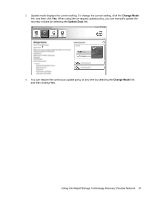
Allocating unallocated hard drive space for an HP image If you want one continuous C: partition for RAID 0 and RAID 5, you must allocate the unallocated space after the system reboots for the final time. You can create an additional partition, or you can extend the (C:) partition. In order to extend the (C:) partition, you must move the Extensible Firmware Interface (EFI) and Recovery partitions using the following procedure. The EFI partition stores QuickLook, system diagnostics, and BIOS Flash Recovery files. The Recovery partition contains files that allow you to restore the computer to the factory image. NOTE: If the functionality of the EFI and Recovery partitions is not required, these partitions can be deleted. In Windows XP: 1. After the system reboots, select Start, right-click My Computer, and then click Manage from the drop-down menu. 2. In the left pane under Storage, click Disk Management. The Disk Management window displays the unallocated space and two partitions: (C:) and HP_TOOLS. 3. Right-click the Unallocated capacity, and then select New Partition from the drop-down menu. The New Partition Wizard opens. 4. Click Next. 5. Select Primary Partition, and then click Next. The partition size defaults to the maximum. 6. Click Next. 7. Assign a drive letter, and then click Next. 8. Select the NTFS format, enter the volume name, and then click Next. 9. Review your selections, and then click Finish to complete the formatting. In Windows Vista and Windows 7: 1. Select Start, right-click Computer, and then click Manage from the drop-down menu. The Computer Management window displays. 2. In the left pane under Storage, click Disk Management. The Disk Management window displays the existing partitions and unallocated space-(C:), HP_TOOLS, and HP_RECOVERY. Write down the size displayed for the HP_RECOVERY partition (for example, 11.76GB), and retain this information for an upcoming step. NOTE: The drive letters shown in Disk Management may vary depending on your system configuration. 3. Connect an external USB drive with at least 40 GB of free capacity to a USB port on the computer. 4. Open Windows Explorer, and then select the primary drive (C:). 26 Chapter 5 RAID volume setup
-
 1
1 -
2
-
3
-
4
-
5
-
6
-
7
-
8
-
9
-
10
-
11
-
12
-
13
-
14
-
15
-
16
-
17
-
18
-
19
-
20
-
21
-
22
-
23
-
24
-
 25
25 -
 26
26 -
 27
27 -
 28
28 -
 29
29 -
 30
30 -
 31
31 -
 32
32 -
 33
33 -
 34
34 -
 35
35 -
36
-
37
-
38
-
39
-
40
-
41
 |
 |