HP EliteBook 8770w RAID User Guide - Page 31
Hide Protected Operating System Files, Folder and Search Options - windows 10
 |
View all HP EliteBook 8770w manuals
Add to My Manuals
Save this manual to your list of manuals |
Page 31 highlights
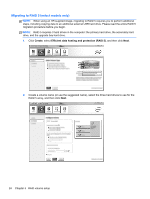
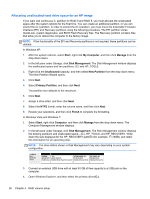
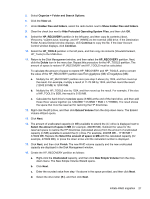
5. Select Organize > Folder and Search Options. 6. Click the View tab. 7. Under Hidden files and folders, select the radio button next to Show hidden files and folders. 8. Clear the check box next to Hide Protected Operating System Files, and then click OK. 9. Select the HP_RECOVERY partition in the left pane, and then copy its contents (\boot, \Recovery, \system.save, bootmgr, and HP_WINRE) to the external USB drive. If the Destination Folder Access Denied window displays, click Continue to copy the file. If the User Account Control window displays, click Continue. 10. Select the HP_TOOLS partition in the left pane, and then copy its contents (\Hewlett-Packard, HP_Tools) to the USB drive. 11. Return to the Disk Management window, and then select the HP_RECOVERY partition. Next, click the Delete icon in the menu bar. Repeat this procedure for the HP_TOOLS partition. The amount of space to restore HP_RECOVERY and HP_TOOLS must be calculated. To calculate the amount of space to restore HP_RECOVERY and HP_TOOLS, and to convert the value of the HP_RECOVERY partition size from gigabytes (GB) to megabytes (MB): a. Multiply the HP_RECOVERY partition size (see step 2 above) by 1024, and then round up the result. For example, multiply a result of 11.76 GB by 1024, and then round the result (12042.24 MB) to 12043 MB. b. Multiply the HP_TOOLS size by 1024, and then round up the result. For example, if the size of HP_TOOLS is 5GB, the result is 5120 MB. c. Calculate the hard drive's metadata space (6 MB) at the end of the hard drive, and then add these three values together (ex 12043MB + 5120MB + 6MB = 17169MB). The result shows the space that must be reserved for restoring the HP directories. 12. Right-click the (C:) drive, and then click Extend Volume from the drop-down menu. The Extend Volume Wizard opens. 13. Click Next. 14. The amount of unallocated capacity (in MB) available to extend the (C:) drive is displayed next to Select the amount of space in MB (for example, 494098 MB). Subtract the value for the reserved space to restore the HP directories (calculated above) from the amount of unallocated capacity (in MB) available to extend the (C:) drive. For example, 494098 MB - 17169 MB = 476929 MB. Replace the Select the amount of space in MB with the calculated capacity (for example, 476929 MB), or press the down arrow until the calculated number is displayed. 15. Click Next, and then click Finish. The new RAID volume capacity and the new unallocated capacity are displayed in the Disk Management window. 16. Create the HP_RECOVERY partition as follows: a. Right-click the Unallocated capacity, and then click New Simple Volume from the dropdown menu. The New Simple Volume Wizard opens. b. Click Next. c. Enter the rounded value from step 11a above in the space provided, and then click Next. d. Select the drive letter (E:), and then click Next. Initiate RAID migration 27
-
 1
1 -
2
-
3
-
4
-
5
-
6
-
7
-
8
-
9
-
10
-
11
-
12
-
13
-
14
-
15
-
16
-
17
-
18
-
19
-
20
-
21
-
22
-
23
-
24
-
25
-
 26
26 -
 27
27 -
 28
28 -
 29
29 -
 30
30 -
 31
31 -
 32
32 -
 33
33 -
 34
34 -
 35
35 -
 36
36 -
37
-
38
-
39
-
40
-
41
 |
 |