HP Officejet Pro 8000 User Guide - Page 17
Install the accessories, Install the duplexer, Install Tray 2, CAUTION - driver
 |
View all HP Officejet Pro 8000 manuals
Add to My Manuals
Save this manual to your list of manuals |
Page 17 highlights
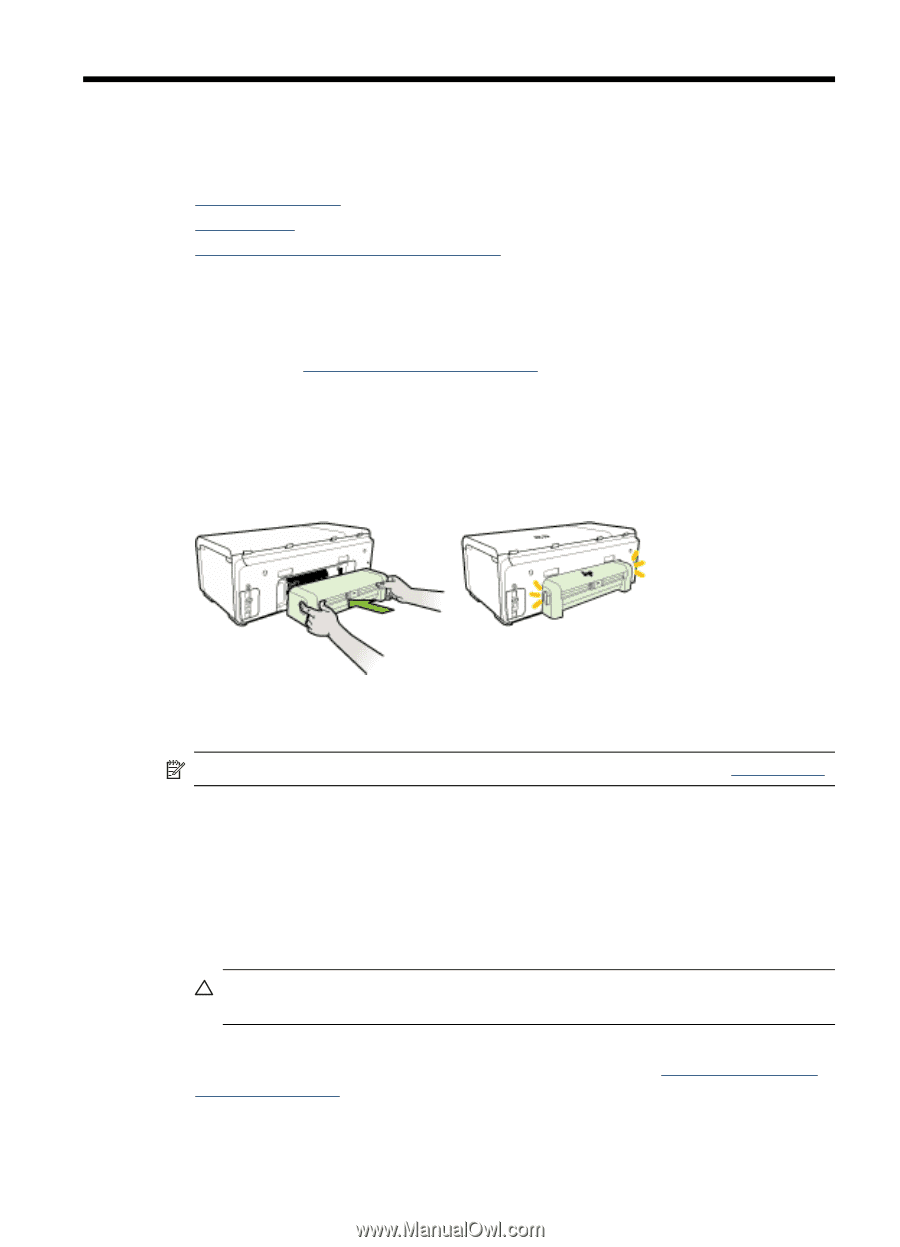
2 Install the accessories This section contains the following topics: • Install the duplexer • Install Tray 2 • Turn on accessories in the printer driver Install the duplexer You can print on both sides of a sheet of paper automatically. For information on using the duplexer, see Print on both sides (duplexing). To install the duplexer ▲ Slide the duplexer into the device until the unit locks into place. Do not press the buttons on either side of the duplexer when installing the unit; use them only for removing the unit from the device. Install Tray 2 NOTE: Tray 2 is sold as an accessory. For ordering information, see Accessories. Tray 2 can hold up to 250 sheets of plain paper. To install Tray 2 1. Unpack the tray, remove the packing tapes and materials, and move the tray to the prepared location. The surface must be sturdy and level. 2. Turn off the device, and disconnect the power cord. 3. Set the device on top of the tray. CAUTION: Be careful to keep your fingers and hands clear of the bottom of the device. 4. Connect the power cord and turn on the device. 5. Enable Tray 2 in the printer driver. For more information, see Turn on accessories in the printer driver. Install the accessories 13
-
 1
1 -
2
-
3
-
4
-
5
-
6
-
7
-
8
-
9
-
10
-
11
-
 12
12 -
 13
13 -
 14
14 -
 15
15 -
 16
16 -
 17
17 -
 18
18 -
 19
19 -
 20
20 -
 21
21 -
 22
22 -
23
-
24
-
25
-
26
-
27
-
28
-
29
-
30
-
31
-
32
-
33
-
34
-
35
-
36
-
37
-
38
-
39
-
40
-
41
-
42
-
43
-
44
-
45
-
46
-
47
-
48
-
49
-
50
-
51
-
52
-
53
-
54
-
55
-
56
-
57
-
58
-
59
-
60
-
61
-
62
-
63
-
64
-
65
-
66
-
67
-
68
-
69
-
70
-
71
-
72
-
73
-
74
-
75
-
76
-
77
-
78
-
79
-
80
-
81
-
82
-
83
-
84
-
85
-
86
-
87
-
88
-
89
-
90
-
91
-
92
-
93
-
94
-
95
-
96
-
97
-
98
-
99
-
100
-
101
-
102
-
103
-
104
-
105
-
106
-
107
-
108
-
109
-
110
-
111
-
112
-
113
-
114
-
115
-
116
-
117
-
118
-
119
-
120
-
121
-
122
-
123
-
124
-
125
-
126
-
127
-
128
-
129
-
130
-
131
-
132
-
133
-
134
-
135
-
136
-
137
-
138
-
139
-
140
 |
 |