HP Officejet Pro 8000 User Guide - Page 27
Con trays, the paper stack to the back of the tray. - printer driver
 |
View all HP Officejet Pro 8000 manuals
Add to My Manuals
Save this manual to your list of manuals |
Page 27 highlights
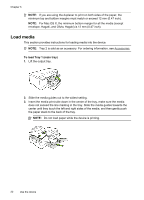
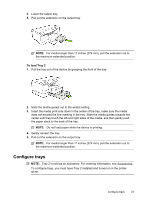
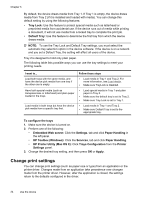
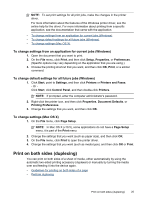
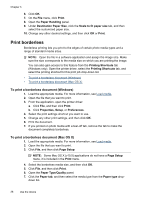
4. Lower the output tray. 5. Pull out the extension on the output tray. NOTE: For media longer than 11 inches (279 mm), pull the extension out to the maximum extended position. To load Tray 2 1. Pull the tray out of the device by grasping the front of the tray. 2. Slide the media guides out to the widest setting. 3. Insert the media print-side down in the center of the tray, make sure the media does not exceed the line marking in the tray. Slide the media guides towards the center until they touch the left and right sides of the media, and then gently push the paper stack to the back of the tray. NOTE: Do not load paper while the device is printing. 4. Gently reinsert the tray. 5. Pull out the extension on the output tray. NOTE: For media longer than 11 inches (279 mm), pull the extension out to the maximum extended position. Configure trays NOTE: Tray 2 is sold as an accessory. For ordering information, see Accessories. To configure trays, you must have Tray 2 installed and turned on in the printer driver. Configure trays 23
-
 1
1 -
2
-
3
-
4
-
5
-
6
-
7
-
8
-
9
-
10
-
11
-
12
-
13
-
14
-
15
-
16
-
17
-
18
-
19
-
20
-
21
-
 22
22 -
 23
23 -
 24
24 -
 25
25 -
 26
26 -
 27
27 -
 28
28 -
 29
29 -
 30
30 -
 31
31 -
 32
32 -
33
-
34
-
35
-
36
-
37
-
38
-
39
-
40
-
41
-
42
-
43
-
44
-
45
-
46
-
47
-
48
-
49
-
50
-
51
-
52
-
53
-
54
-
55
-
56
-
57
-
58
-
59
-
60
-
61
-
62
-
63
-
64
-
65
-
66
-
67
-
68
-
69
-
70
-
71
-
72
-
73
-
74
-
75
-
76
-
77
-
78
-
79
-
80
-
81
-
82
-
83
-
84
-
85
-
86
-
87
-
88
-
89
-
90
-
91
-
92
-
93
-
94
-
95
-
96
-
97
-
98
-
99
-
100
-
101
-
102
-
103
-
104
-
105
-
106
-
107
-
108
-
109
-
110
-
111
-
112
-
113
-
114
-
115
-
116
-
117
-
118
-
119
-
120
-
121
-
122
-
123
-
124
-
125
-
126
-
127
-
128
-
129
-
130
-
131
-
132
-
133
-
134
-
135
-
136
-
137
-
138
-
139
-
140
 |
 |
