HP R1500 HP 3 Phase UPS User Guide - Page 15
Select the proper holes in the rack for positioning the UPS in the rack.
 |
View all HP R1500 manuals
Add to My Manuals
Save this manual to your list of manuals |
Page 15 highlights
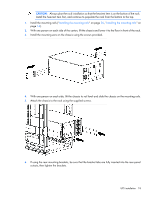
CAUTION: Always plan the rack installation so that the heaviest item is on the bottom of the rack. Install the heaviest item first, and continue to populate the rack from the bottom to the top. NOTE: Mounting hardware for square- and round-holed racks is included in the UPS kit. 1. Select the proper holes in the rack for positioning the UPS in the rack. The UPS rails are installed in positions 1 and 12. 2. Loosen the hex nuts, and extend the brackets to the desired length. UPS installation 15
-
 1
1 -
2
-
3
-
4
-
5
-
6
-
7
-
8
-
9
-
 10
10 -
 11
11 -
 12
12 -
 13
13 -
 14
14 -
 15
15 -
 16
16 -
 17
17 -
 18
18 -
 19
19 -
 20
20 -
21
-
22
-
23
-
24
-
25
-
26
-
27
-
28
-
29
-
30
-
31
-
32
-
33
-
34
-
35
-
36
-
37
-
38
-
39
-
40
-
41
-
42
-
43
-
44
-
45
-
46
-
47
-
48
-
49
-
50
-
51
-
52
-
53
-
54
-
55
-
56
-
57
-
58
-
59
-
60
-
61
-
62
-
63
-
64
-
65
-
66
-
67
-
68
-
69
-
70
-
71
-
72
-
73
-
74
-
75
-
76
-
77
-
78
-
79
-
80
-
81
-
82
-
83
-
84
-
85
-
86
-
87
-
88
-
89
-
90
-
91
-
92
-
93
-
94
-
95
-
96
-
97
-
98
-
99
-
100
-
101
-
102
-
103
-
104
-
105
-
106
-
107
-
108
-
109
-
110
-
111
-
112
-
113
-
114
-
115
 |
 |

UPS installation 15
CAUTION:
Always plan the rack installation so that the heaviest item is on the bottom of the rack.
Install the heaviest item first, and continue to populate the rack from the bottom to the top.
NOTE:
Mounting hardware for square- and round-holed racks is included in the UPS kit.
1.
Select the proper holes in the rack for positioning the UPS in the rack.
The UPS rails are installed in positions 1 and 12.
2.
Loosen the hex nuts, and extend the brackets to the desired length.