HP R1500 HP 3 Phase UPS User Guide - Page 67
Transferring the UPS between modes, Configuring the UPS, Changing the language
 |
View all HP R1500 manuals
Add to My Manuals
Save this manual to your list of manuals |
Page 67 highlights
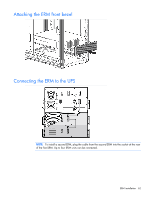
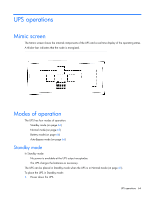
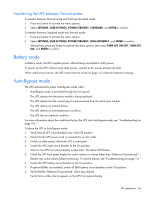
9. Press any button to activate the menu options. 10. Select CONTROL, GO TO BYPASS MODE. The Auto-Bypass and Power On LEDs illuminated solid, indicating the UPS is operating in Auto-Bypass mode. The load is now powered by utility power. 11. Switch the load connector circuit breaker to the On position. 12. Press ESC until the HP logo appears. Transferring the UPS between modes To transfer between Normal mode and Auto-Bypass mode: 1. Press any button to activate the menu options. 2. Select CONTROL, GO TO BYPASS MODE, and ENTER to confirm. To transfer between Auto-Bypass mode and Normal mode: 1. Press any button to activate the menu options. 2. Select CONTROL, GO TO NORMAL MODE, and ENTER to confirm. Alternatively, press any button to activate the menu options, then select TURN UPS ON/OFF, TURN UPS ON, and ENTER to confirm. Configuring the UPS NOTE: If ERMS are used in a parallel system • Each UPS must have its own ERM. • Each UPS must have the same number of ERMs per UPS to ensure consistent runtimes. NOTE: Standalone and parallel UPSs automatically detect the number of ERMs connected. Changing the language Press and hold the far left button for approximately five seconds to select the language menu. This action is possible from any LCD menu screen. Changing display functions As the default or after 15 minutes of inactivity, the LCD displays the selectable startup screen. The default is the HP logo and can be changed to the Mimic screen (on page 64) in the User Settings menu. The backlit LCD automatically dims after a long period of inactivity. Press any button to restore the screen. Press any button to activate the menu options. Use the up and down arrow buttons to scroll through the menu structure. Press the right arrow button to enter a submenu. Press the right arrow button to select an option. Press the ESC/left arrow button to cancel or return to the previous menu. Menu map for display functions UPS operations 67
-
 1
1 -
2
-
3
-
4
-
5
-
6
-
7
-
8
-
9
-
10
-
11
-
12
-
13
-
14
-
15
-
16
-
17
-
18
-
19
-
20
-
21
-
22
-
23
-
24
-
25
-
26
-
27
-
28
-
29
-
30
-
31
-
32
-
33
-
34
-
35
-
36
-
37
-
38
-
39
-
40
-
41
-
42
-
43
-
44
-
45
-
46
-
47
-
48
-
49
-
50
-
51
-
52
-
53
-
54
-
55
-
56
-
57
-
58
-
59
-
60
-
61
-
 62
62 -
 63
63 -
 64
64 -
 65
65 -
 66
66 -
 67
67 -
 68
68 -
 69
69 -
 70
70 -
 71
71 -
 72
72 -
73
-
74
-
75
-
76
-
77
-
78
-
79
-
80
-
81
-
82
-
83
-
84
-
85
-
86
-
87
-
88
-
89
-
90
-
91
-
92
-
93
-
94
-
95
-
96
-
97
-
98
-
99
-
100
-
101
-
102
-
103
-
104
-
105
-
106
-
107
-
108
-
109
-
110
-
111
-
112
-
113
-
114
-
115
 |
 |
