HP R1500 HP 3 Phase UPS User Guide - Page 90
Replacing the ERM
 |
View all HP R1500 manuals
Add to My Manuals
Save this manual to your list of manuals |
Page 90 highlights
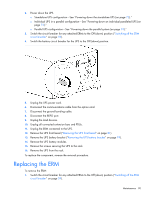
2. Power down the UPS. o Standalone UPS configuration-See "Powering down the standalone UPS (on page 72)." o Individual UPS in a parallel configuration-See "Powering down an individual paralleled UPS (on page 72)." o Parallel UPS configuration-See "Powering down the parallel system (on page 73)." 3. Switch the circuit breaker for any attached ERMs to the Off (down) position ("Switching off the ERM circuit breaker" on page 59). 4. Switch the battery circuit breaker for the UPS to the Off (down) position. 5. Unplug the UPS power cord. 6. Disconnect the communications cable from the option card. 7. Disconnect the ground bonding cable. 8. Disconnect the REPO port. 9. Unplug the load devices. 10. Unplug all connected extension bars and PDUs. 11. Unplug the ERM connected to the UPS. 12. Remove the UPS front bezel ("Removing the UPS front bezel" on page 81). 13. Remove the UPS battery bracket ("Removing the UPS battery bracket" on page 19). 14. Remove the UPS battery modules. 15. Remove the screws securing the UPS to the rack. 16. Remove the UPS from the rack. To replace the component, reverse the removal procedure. Replacing the ERM To remove the ERM: 1. Switch the circuit breaker for any attached ERMs to the Off (down) position ("Switching off the ERM circuit breaker" on page 59). Maintenance 90
-
 1
1 -
2
-
3
-
4
-
5
-
6
-
7
-
8
-
9
-
10
-
11
-
12
-
13
-
14
-
15
-
16
-
17
-
18
-
19
-
20
-
21
-
22
-
23
-
24
-
25
-
26
-
27
-
28
-
29
-
30
-
31
-
32
-
33
-
34
-
35
-
36
-
37
-
38
-
39
-
40
-
41
-
42
-
43
-
44
-
45
-
46
-
47
-
48
-
49
-
50
-
51
-
52
-
53
-
54
-
55
-
56
-
57
-
58
-
59
-
60
-
61
-
62
-
63
-
64
-
65
-
66
-
67
-
68
-
69
-
70
-
71
-
72
-
73
-
74
-
75
-
76
-
77
-
78
-
79
-
80
-
81
-
82
-
83
-
84
-
 85
85 -
 86
86 -
 87
87 -
 88
88 -
 89
89 -
 90
90 -
 91
91 -
 92
92 -
 93
93 -
 94
94 -
 95
95 -
96
-
97
-
98
-
99
-
100
-
101
-
102
-
103
-
104
-
105
-
106
-
107
-
108
-
109
-
110
-
111
-
112
-
113
-
114
-
115
 |
 |
