Intel SBXD62 User Guide - Page 32
Save Settings, an Intel® Blade Server Chassis SBCE
 |
UPC - 735858185448
View all Intel SBXD62 manuals
Add to My Manuals
Save this manual to your list of manuals |
Page 32 highlights
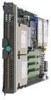
configuration information by using the Configuration/Setup Utility program. When you restart the blade server, it displays a message indicating that the memory configuration has changed. Start the Configuration/Setup Utility program and select Save Settings. See "Configuration/Setup Utility Menu Choices" on page 36 for more information. To install a DIMM, complete the following steps: 1. Read the safety information beginning on page 65 in Appendix C, "Safety Information" and "Installation Guidelines" on page 15. 2. Read the documentation that comes with the DIMMs. 3. Shut down the operating system, turn off the blade server, and remove the blade server from the Intel® Blade Server Chassis SBCE. See "Removing the Blade Server from an Intel® Blade Server Chassis SBCE" on page 17 for instructions. 4. Carefully lay the blade server on a flat, non-conductive surface. 5. Open the blade server cover (see "Opening the Blade Server Cover" on page 18 for instructions). DIMM 2 DIMM 1 DIMM slot 4 DIMM slot 3 AF000434 6. Locate the DIMM connectors on the system board (see the above illustration). Determine the connectors into which you will install the DIMMs. 7. Touch the static-protective package that contains the DIMM option to any unpainted metal surface on the Intel® Blade Server Chassis SBCE or any unpainted metal surface on any other grounded rack component in the rack you are installing the DIMM option in for at least 2 seconds; then, remove the DIMM from its package. 8. To install the DIMMs, repeat the following steps for each DIMM that you install: a. Turn the DIMM so that the DIMM keys align correctly with the connector on the system board. Important: To avoid breaking the retaining clips or damaging the DIMM connectors, handle the clips gently. 22 Intel® Server Compute Blade SBXD62 Installation and User's Guide
-
 1
1 -
2
-
3
-
4
-
5
-
6
-
7
-
8
-
9
-
10
-
11
-
12
-
13
-
14
-
15
-
16
-
17
-
18
-
19
-
20
-
21
-
22
-
23
-
24
-
25
-
26
-
 27
27 -
 28
28 -
 29
29 -
 30
30 -
 31
31 -
 32
32 -
 33
33 -
 34
34 -
 35
35 -
 36
36 -
 37
37 -
38
-
39
-
40
-
41
-
42
-
43
-
44
-
45
-
46
-
47
-
48
-
49
-
50
-
51
-
52
-
53
-
54
-
55
-
56
-
57
-
58
-
59
-
60
-
61
-
62
-
63
-
64
-
65
-
66
-
67
-
68
-
69
-
70
-
71
-
72
-
73
-
74
-
75
-
76
-
77
-
78
-
79
-
80
-
81
-
82
-
83
-
84
-
85
-
86
-
87
-
88
-
89
-
90
-
91
-
92
-
93
-
94
-
95
-
96
-
97
-
98
-
99
-
100
-
101
-
102
-
103
-
104
-
105
-
106
-
107
-
108
-
109
-
110
-
111
-
112
-
113
-
114
-
115
-
116
-
117
-
118
 |
 |
