Kenwood KDC X493 Instruction Manual - Page 21
Speaker Setting, Audio Setup
 |
UPC - 019048182111
View all Kenwood KDC X493 manuals
Add to My Manuals
Save this manual to your list of manuals |
Page 21 highlights
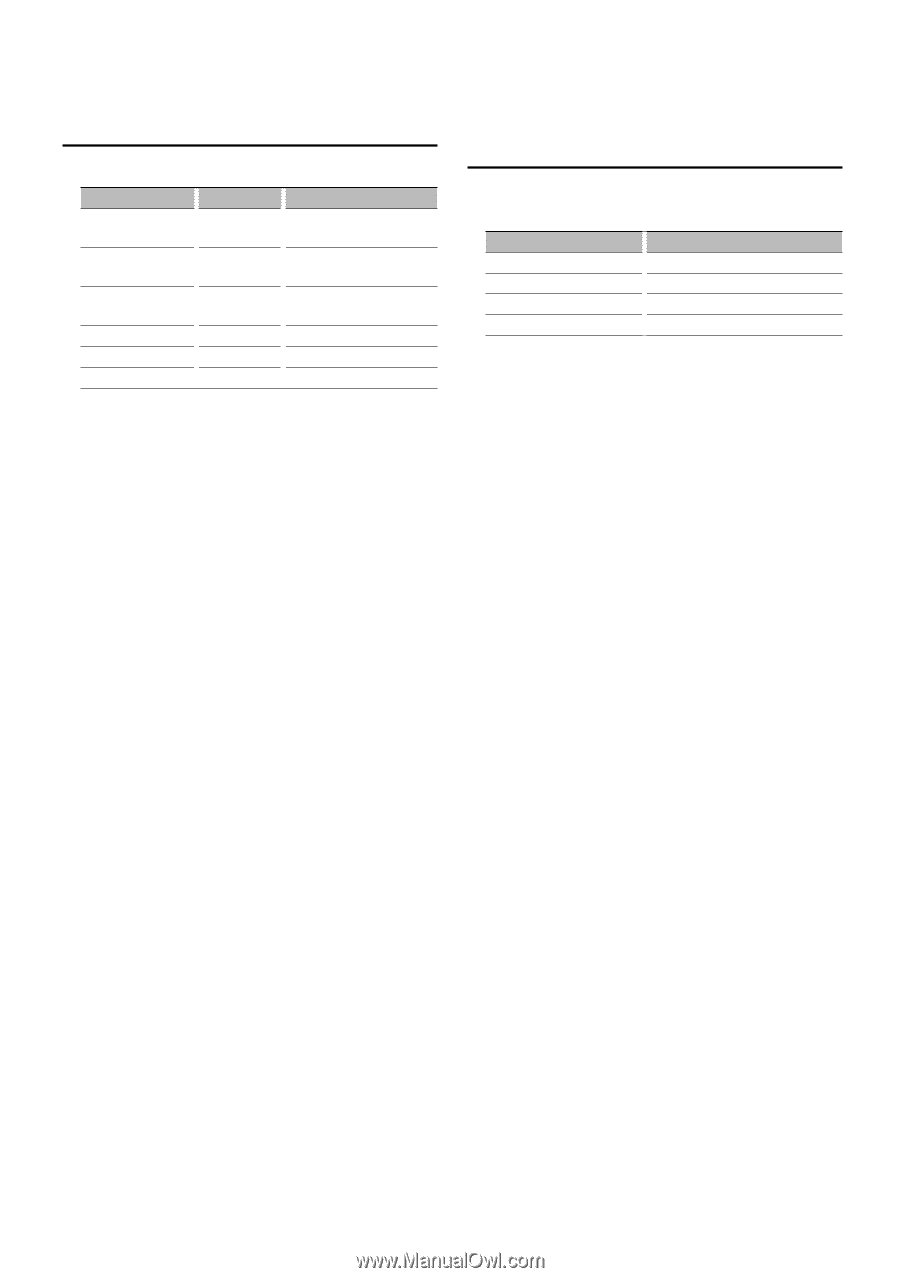
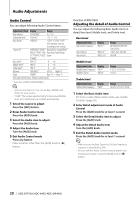
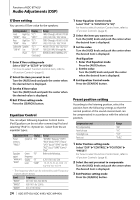
Audio Setup You can set Sound system , such as follows; Adjustment Item Front High Pass Filter* Rear High Pass Filter* Low Pass Filter* Display "HPF F" "HPF R" "LPF SW" Subwoofer Phase SW PHASE" Volume offset "V-OFFSET" Dual Zone System "2ZONE" Range Through/40*/60*/80/100/ 120/150/180/220* Hz Through/40*/60*/80/100/ 120/150/180/220* Hz 50*/60/80/100*/120/ Through Hz Reverse (180°)/ Normal (0°) -8 - ±0 (AUX: -8- +8) OFF/ON * Function of KDC-X493. * Function of KDC-MP442U. ⁄ • Volume offset: Sets each source's volume as a difference from the basic volume. • Dual Zone System Main source and sub source (Auxiliary input) output Front channel and Rear channel separately. - Set up the channel of sub source by "ZONE2" of (page 6). - Select Main source by [SRC] button. - Adjust the volume of Front channel by [AUD] knob. - Adjust the volume of Rear channel by (page 20) or [5]/[∞] button on the remote control (page 34). - The Audio Control has no effect on sub source. 1 Select the source to adjust Press the [SRC] button. 2 Enter Audio Setup mode Press the [AUD] knob for at least 1 second. 3 Select the Audio Setup item to adjust Press the [AUD] knob. 4 Adjust the Audio setup item Turn the [AUD] knob. 5 Exit Audio Setup mode Press the [AUD] knob for at least 1 second. Function of KDC-X493/MP442U Speaker Setting Fine-tuning so that the System Q value is optimal when setting the speaker type as follows; Speaker type OFF For 5 & 4 in. speaker For 6 & 6x9 in. speaker For the OEM speaker Display "SP SEL OFF" "SP SEL 5/4" "SP SEL 6x9/6" "SP SEL OEM" 1 Enter Standby Press the [SRC] button. Select the "STANDBY" display. 2 Enter Speaker Setting mode Press the [AUD] knob. 3 Select the Speaker type Turn the [AUD] knob. 4 Exit Speaker Setting mode Press the [AUD] knob. English | 21
-
 1
1 -
2
-
3
-
4
-
5
-
6
-
7
-
8
-
9
-
10
-
11
-
12
-
13
-
14
-
15
-
 16
16 -
 17
17 -
 18
18 -
 19
19 -
 20
20 -
 21
21 -
 22
22 -
 23
23 -
 24
24 -
 25
25 -
 26
26 -
27
-
28
-
29
-
30
-
31
-
32
-
33
-
34
-
35
-
36
-
37
-
38
-
39
-
40
-
41
-
42
-
43
-
44
-
45
-
46
-
47
-
48
-
49
-
50
-
51
-
52
-
53
-
54
-
55
-
56
-
57
-
58
-
59
-
60
-
61
-
62
-
63
-
64
-
65
-
66
-
67
-
68
-
69
-
70
-
71
-
72
-
73
-
74
-
75
-
76
-
77
-
78
-
79
-
80
-
81
-
82
-
83
-
84
-
85
-
86
-
87
-
88
-
89
-
90
-
91
-
92
-
93
-
94
-
95
-
96
-
97
-
98
-
99
-
100
-
101
-
102
-
103
-
104
-
105
-
106
-
107
-
108
-
109
-
110
-
111
-
112
-
113
-
114
-
115
-
116
-
117
-
118
-
119
-
120
-
121
-
122
-
123
-
124
-
125
-
126
-
127
-
128
-
129
-
130
-
131
-
132
-
133
-
134
-
135
-
136
-
137
-
138
-
139
-
140
 |
 |