Kodak Pro 14n User Guide - Page 88
ISO, Setting ISO using the Image LCD
 |
UPC - 041771334376
View all Kodak Pro 14n manuals
Add to My Manuals
Save this manual to your list of manuals |
Page 88 highlights
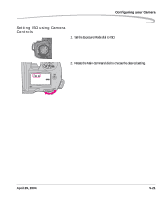
Configuring your Camera ISO Setting ISO using the Image LCD ISO determines the sensitivity of the camera system to light. Increasing or decreasing the ISO increases or decreases sensitivity. The range of available ISO settings varies, depending on the image resolution. Resolution Range 13.5 MP (100%) 80 - 400 6.0 MP (67%) 80 - 800 3.4 MP (50%) 80 - 800 0.8 MP (25%) 80 - 800 You can change ISO settings in 1/3 stop increments using the Main-Command dial. The factory default is 100. You can set ISO using the Image LCD (see below) or using camera controls (see page 5-21). 1. Choose ISO from the Capture menu, then choose the desired setting. 2. Press the OK button. Shortcut: • You can also access this function using the Digital Status LCD shortcut (see page 2-15). 5-20 April 29, 2004
-
 1
1 -
2
-
3
-
4
-
5
-
6
-
7
-
8
-
9
-
10
-
11
-
12
-
13
-
14
-
15
-
16
-
17
-
18
-
19
-
20
-
21
-
22
-
23
-
24
-
25
-
26
-
27
-
28
-
29
-
30
-
31
-
32
-
33
-
34
-
35
-
36
-
37
-
38
-
39
-
40
-
41
-
42
-
43
-
44
-
45
-
46
-
47
-
48
-
49
-
50
-
51
-
52
-
53
-
54
-
55
-
56
-
57
-
58
-
59
-
60
-
61
-
62
-
63
-
64
-
65
-
66
-
67
-
68
-
69
-
70
-
71
-
72
-
73
-
74
-
75
-
76
-
77
-
78
-
79
-
80
-
81
-
82
-
 83
83 -
 84
84 -
 85
85 -
 86
86 -
 87
87 -
 88
88 -
 89
89 -
 90
90 -
 91
91 -
 92
92 -
 93
93 -
94
-
95
-
96
-
97
-
98
-
99
-
100
-
101
-
102
-
103
-
104
-
105
-
106
-
107
-
108
-
109
-
110
-
111
-
112
-
113
-
114
-
115
-
116
-
117
-
118
-
119
-
120
-
121
-
122
-
123
-
124
-
125
-
126
-
127
-
128
-
129
-
130
-
131
-
132
-
133
-
134
-
135
-
136
-
137
-
138
-
139
-
140
-
141
-
142
-
143
-
144
-
145
-
146
-
147
-
148
-
149
-
150
-
151
-
152
-
153
-
154
-
155
-
156
-
157
-
158
-
159
-
160
-
161
-
162
-
163
-
164
-
165
-
166
-
167
-
168
-
169
-
170
-
171
-
172
-
173
-
174
-
175
-
176
-
177
-
178
-
179
-
180
-
181
-
182
-
183
-
184
-
185
-
186
-
187
-
188
-
189
-
190
-
191
-
192
-
193
-
194
-
195
-
196
-
197
-
198
-
199
-
200
-
201
-
202
-
203
-
204
-
205
-
206
-
207
-
208
-
209
-
210
-
211
-
212
-
213
-
214
-
215
-
216
-
217
-
218
-
219
-
220
-
221
-
222
-
223
-
224
-
225
-
226
-
227
-
228
-
229
-
230
 |
 |
