Kyocera FS-C8500DN FS-C8500DN Printer Driver User Guide Ver. 11.6 - Page 84
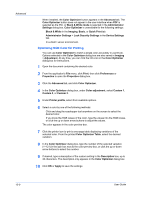
Optimizing RGB Color for Printing
 |
View all Kyocera FS-C8500DN manuals
Add to My Manuals
Save this manual to your list of manuals |
Page 84 highlights
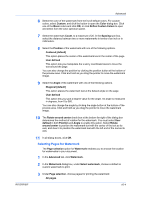
Advanced When installed, the Color Optimizer button appears in the Advanced tab. The Color Optimizer button does not appear in the user interface when PDF is selected as the PDL or Black & White mode is selected in the Administrator Settings dialog box. Color Optimizer is unavailable for the following settings: Black & White in the Imaging, Basic, or Quick Print tab. Administrator Settings > Lock Security Settings in the Device Settings tab. In a client / server environment. Optimizing RGB Color for Printing You can use Color Optimizer to match a single color accurately in a print job. Options selected in the Color Optimizer dialog box are also saved in Imaging > Adjustment. At any time, you can click the Info icon in the Color Optimizer dialog box for instructions. 1 Open the document containing the desired color. 2 From the application's File menu, click Print, then click Preferences or Properties to open the Properties dialog box. 3 Click the Advanced tab, and click Color Optimizer. 4 In the Color Optimizer dialog box, under Color adjustment, select Custom 1, Custom 2, or Custom 3. 5 Under Printer profile, select from available options. 6 Select a color by one of the following methods: Click and drag the eyedropper tool anywhere on the screen to select the desired color. If you know the RGB values of the color, type the values into the RGB boxes, or click the up or down arrow buttons to adjust the values. The color appears in the color preview box. 7 Click the printer icon to print a one-page table displaying variations of the selected color. From the printed Color Optimizer Table, select the desired variation. 8 In the Color Optimizer dialog box, type the number of the selected variation (1-121) in the spin box next to the color preview box, or click the up or down arrow buttons to select the number. 9 If desired, type a description of the custom setting in the Description box, up to 30 characters. The description only appears in the Color Optimizer dialog box. 10 Click OK or Apply to save the settings. 10-9 User Guide
-
 1
1 -
2
-
3
-
4
-
5
-
6
-
7
-
8
-
9
-
10
-
11
-
12
-
13
-
14
-
15
-
16
-
17
-
18
-
19
-
20
-
21
-
22
-
23
-
24
-
25
-
26
-
27
-
28
-
29
-
30
-
31
-
32
-
33
-
34
-
35
-
36
-
37
-
38
-
39
-
40
-
41
-
42
-
43
-
44
-
45
-
46
-
47
-
48
-
49
-
50
-
51
-
52
-
53
-
54
-
55
-
56
-
57
-
58
-
59
-
60
-
61
-
62
-
63
-
64
-
65
-
66
-
67
-
68
-
69
-
70
-
71
-
72
-
73
-
74
-
75
-
76
-
77
-
78
-
 79
79 -
 80
80 -
 81
81 -
 82
82 -
 83
83 -
 84
84 -
 85
85 -
 86
86 -
 87
87 -
 88
88 -
 89
89 -
90
-
91
-
92
-
93
-
94
-
95
-
96
-
97
-
98
 |
 |
