Kyocera TASKalfa 4551ci Printing System (11),(12),(13),(14) Configuration and - Page 11
Stages of installation on the network, Administering the E100
 |
View all Kyocera TASKalfa 4551ci manuals
Add to My Manuals
Save this manual to your list of manuals |
Page 11 highlights
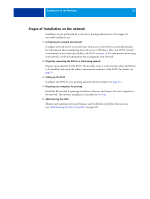
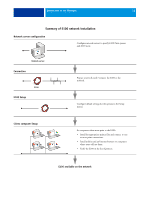
CONNECTING TO THE NETWORK 11 Stages of installation on the network Installation can be performed by a network or printing administrator. The stages of a successful installation are: 1 Configuring the network environment Configure network servers to provide users with access to the E100 as a networked printer. For information about configuring network servers in Windows, Mac, and UNIX network environments as they relate specifically to the E100, see page 13. For information about using your network, see the documentation that accompanies your network. 2 Physically connecting the E100 to a functioning network Prepare a network node for the E100. Obtain cable, route it to the location where the E100 is to be installed, and attach the cable to the network connector of the E100. For details, see page 21. 3 Setting up the E100 Configure the E100 for your printing and network environment (see page 31). 4 Preparing user computers for printing Install the files needed for printing, install user software, and connect the user computers to the network. The software installation is described in Printing. 5 Administering the E100 Monitor and maintain system performance and troubleshoot problems that may arise (see "Administering the Fiery Controller" on page 38).
-
 1
1 -
2
-
3
-
4
-
5
-
 6
6 -
 7
7 -
 8
8 -
 9
9 -
 10
10 -
 11
11 -
 12
12 -
 13
13 -
 14
14 -
 15
15 -
 16
16 -
17
-
18
-
19
-
20
-
21
-
22
-
23
-
24
-
25
-
26
-
27
-
28
-
29
-
30
-
31
-
32
-
33
-
34
-
35
-
36
-
37
-
38
-
39
-
40
-
41
-
42
-
43
-
44
-
45
-
46
-
47
-
48
-
49
-
50
-
51
-
52
-
53
-
54
-
55
-
56
-
57
-
58
-
59
 |
 |