Lenovo ThinkCentre A58e User Guide - Page 25
Installing or replacing a PCI card, Notes
 |
View all Lenovo ThinkCentre A58e manuals
Add to My Manuals
Save this manual to your list of manuals |
Page 25 highlights
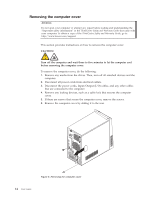
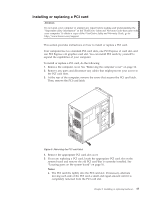
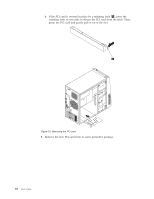
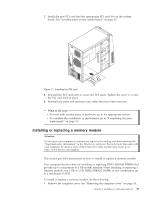
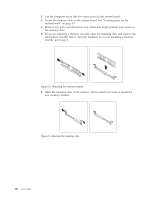
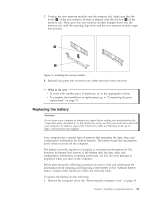
Installing or replacing a PCI card Attention Do not open your computer or attempt any repair before reading and understanding the "Important safety information" in the ThinkCentre Safety and Warranty Guide that came with your computer. To obtain a copy of the ThinkCentre Safety and Warranty Guide, go to: http://www.lenovo.com/support This section provides instructions on how to install or replace a PCI card. Your computer has two standard PCI card slots, one PCI Express x1 card slot, and one PCI Express x16 graphics card slot. You can install PCI cards by yourself to expand the capabilities of your computer. To install or replace a PCI card, do the following: 1. Remove the computer cover. See "Removing the computer cover" on page 14. 2. Remove any parts and disconnect any cables that might prevent your access to the PCI card slots. 3. At the rear of the computer, remove the screw that secures the PCI card latch. Then, remove the PCI card latch. Figure 9. Removing the PCI card latch 4. Remove the appropriate PCI card slot cover. 5. If you are replacing a PCI card, locate the appropriate PCI card slot on the system board and remove the old PCI card that is currently installed. See "Locating parts on the system board" on page 10. Notes: a. The PCI card fits tightly into the PCI card slot. If necessary, alternate moving each side of the PCI card a small and equal amount until it is completely removed from the PCI card slot. Chapter 2. Installing or replacing hardware 17
-
 1
1 -
2
-
3
-
4
-
5
-
6
-
7
-
8
-
9
-
10
-
11
-
12
-
13
-
14
-
15
-
16
-
17
-
18
-
19
-
 20
20 -
 21
21 -
 22
22 -
 23
23 -
 24
24 -
 25
25 -
 26
26 -
 27
27 -
 28
28 -
 29
29 -
 30
30 -
31
-
32
-
33
-
34
-
35
-
36
-
37
-
38
-
39
-
40
-
41
-
42
-
43
-
44
-
45
-
46
-
47
-
48
-
49
-
50
-
51
-
52
-
53
-
54
-
55
-
56
-
57
-
58
-
59
-
60
-
61
-
62
-
63
-
64
-
65
-
66
-
67
-
68
-
69
-
70
 |
 |