Lexmark 12N0009 Finisher Setup and User's Guide - Page 18
Setup, click, adjustment knobs
 |
UPC - 734646560092
View all Lexmark 12N0009 manuals
Add to My Manuals
Save this manual to your list of manuals |
Page 18 highlights
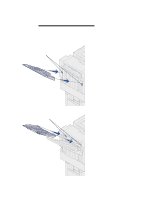
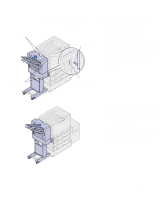
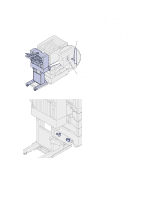
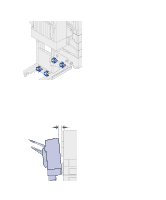
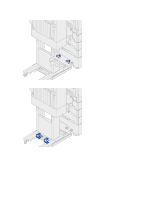
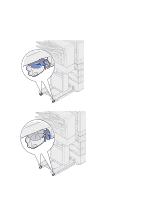
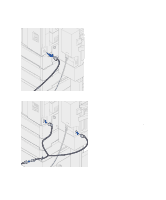
14 Setup 1 Loosen the guide rail thumbscrews. If you previously lowered or raised the guide rail plate, the thumbscrews will already be loose. 2 Rotate the rear adjustment knobs to equally align the top and bottom of the finisher with the printer. To move the top of the finisher closer to the printer, rotate the adjustment knobs clockwise. To move the top of the finisher away from the printer, rotate the adjustment knobs counterclockwise. 3 Roll the finisher toward the printer until the finisher locks to the docking plate pins. You hear a click when the finisher locks into position.
-
 1
1 -
2
-
3
-
4
-
5
-
6
-
7
-
8
-
9
-
10
-
11
-
12
-
 13
13 -
 14
14 -
 15
15 -
 16
16 -
 17
17 -
 18
18 -
 19
19 -
 20
20 -
 21
21 -
 22
22 -
 23
23 -
24
-
25
-
26
-
27
-
28
-
29
-
30
-
31
-
32
-
33
-
34
-
35
-
36
-
37
-
38
-
39
-
40
-
41
-
42
-
43
-
44
-
45
-
46
-
47
-
48
-
49
-
50
-
51
-
52
-
53
-
54
-
55
-
56
-
57
-
58
-
59
-
60
-
61
-
62
-
63
-
64
-
65
-
66
-
67
-
68
-
69
-
70
 |
 |

14
Setup
1
Loosen the guide rail
thumbscrews.
If you previously lowered or raised
the guide rail plate, the
thumbscrews will already be
loose.
2
Rotate the rear adjustment knobs
to equally align the top and bottom
of the finisher with the printer.
To move the top of the finisher
closer to the printer, rotate the
adjustment knobs clockwise.
To move the top of the finisher
away from the printer, rotate the
adjustment knobs
counterclockwise.
3
Roll the finisher toward the printer
until the finisher locks to the
docking plate pins.
You hear a
click
when the finisher
locks into position.