Lexmark 12N0009 Finisher Setup and User's Guide - Page 9
the side of the printer cabinet or, guide rail plate with the holes
 |
UPC - 734646560092
View all Lexmark 12N0009 manuals
Add to My Manuals
Save this manual to your list of manuals |
Page 9 highlights
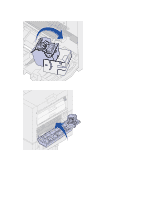
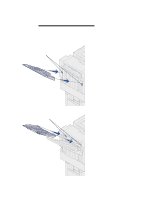
Docking plate Tab Guide rail plate 2 Insert the docking plate tabs into the printer. The tabs on the bottom of the docking plate must be inserted into the handholds on the printer so the docking plate will be flush against the printer. 3 Align the thumbscrews on the docking plate with the holes in the side of the printer. 4 Tighten the docking plate thumbscrews. 5 Align the thumbscrews on the guide rail plate with the holes in Tab the side of the printer cabinet or stand. 6 Tighten the guide rail plate thumbscrews. 7 Align the thumbscrews on the guide rail with the holes in the guide rail plate. 8 Tighten the guide rail thumbscrews. Setup 5
-
 1
1 -
2
-
3
-
 4
4 -
 5
5 -
 6
6 -
 7
7 -
 8
8 -
 9
9 -
 10
10 -
 11
11 -
 12
12 -
 13
13 -
 14
14 -
15
-
16
-
17
-
18
-
19
-
20
-
21
-
22
-
23
-
24
-
25
-
26
-
27
-
28
-
29
-
30
-
31
-
32
-
33
-
34
-
35
-
36
-
37
-
38
-
39
-
40
-
41
-
42
-
43
-
44
-
45
-
46
-
47
-
48
-
49
-
50
-
51
-
52
-
53
-
54
-
55
-
56
-
57
-
58
-
59
-
60
-
61
-
62
-
63
-
64
-
65
-
66
-
67
-
68
-
69
-
70
 |
 |

5
Setup
2
Insert the docking plate tabs into
the printer.
The tabs on the bottom of the
docking plate must be inserted
into the handholds on the printer
so the docking plate will be flush
against the printer.
3
Align the thumbscrews on the
docking plate with the holes in the
side of the printer.
4
Tighten the docking plate
thumbscrews.
5
Align the thumbscrews on the
guide rail plate with the holes in
the side of the printer cabinet or
stand.
6
Tighten the guide rail plate
thumbscrews.
7
Align the thumbscrews on the
guide rail with the holes in the
guide rail plate.
8
Tighten the guide rail
thumbscrews.
Docking plate
Guide rail plate
Tab
Tab