Lexmark 12N0009 Finisher Setup and User's Guide - Page 6
compliant, your printer controls the, power to the finisher.
 |
UPC - 734646560092
View all Lexmark 12N0009 manuals
Add to My Manuals
Save this manual to your list of manuals |
Page 6 highlights
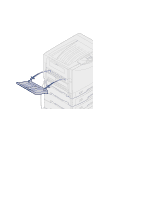
Bin 1 Bin 2 Entry guide Latch Top cover Hole punch box Stapler Familiarize yourself with the names and locations of items on the front and rear of your new finisher. This will help you during finisher setup. To ensure your finisher is Energy Star compliant, your printer controls the power to the finisher. Stapler door Finisher stand Bin 1 Guide rail Front Top cover Bin 2 Latch Rear Finisher stand 2 Introduction
-
 1
1 -
 2
2 -
 3
3 -
 4
4 -
 5
5 -
 6
6 -
 7
7 -
 8
8 -
 9
9 -
 10
10 -
 11
11 -
 12
12 -
13
-
14
-
15
-
16
-
17
-
18
-
19
-
20
-
21
-
22
-
23
-
24
-
25
-
26
-
27
-
28
-
29
-
30
-
31
-
32
-
33
-
34
-
35
-
36
-
37
-
38
-
39
-
40
-
41
-
42
-
43
-
44
-
45
-
46
-
47
-
48
-
49
-
50
-
51
-
52
-
53
-
54
-
55
-
56
-
57
-
58
-
59
-
60
-
61
-
62
-
63
-
64
-
65
-
66
-
67
-
68
-
69
-
70
 |
 |

2
Introduction
Familiarize yourself with the names and
locations of items on the front and rear of
your new finisher. This will help you
during finisher setup.
To ensure your finisher is Energy Star
compliant, your printer controls the
power to the finisher.
Stapler
Guide rail
Latch
Stapler door
Hole punch box
Top cover
Bin 2
Bin 1
Finisher stand
Finisher stand
Latch
Bin 2
Bin 1
Top cover
Front
Rear
Entry guide