Lexmark 12N0009 Finisher Setup and User's Guide - Page 50
Clearing paper jams, Paper Jam Check Area <x>
 |
UPC - 734646560092
View all Lexmark 12N0009 manuals
Add to My Manuals
Save this manual to your list of manuals |
Page 50 highlights
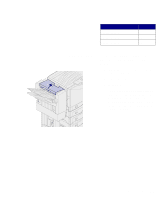
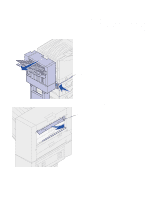
6 Tighten the guide rail thumbscrews. 7 Print and punch another piece of paper. 8 Repeat steps 2 and 3. If the holes are not aligned repeat steps 3 through 8. Clearing paper jams 200 Paper Jam Check Area G 200 Paper Jam Check Area I 200 Paper Jam Check Area H By carefully selecting and loading paper, you can avoid most paper jams. For information on avoiding paper jams, refer to the Lexmark C910 Publications CD. When a finisher paper jam occurs, the 200 Paper Jam Check Area message appears on the printer operator panel. The illustration at the left identifies the areas you must check to clear a finisher paper jam. Refer to your printer's Quick Reference or publications CD for information about clearing jams in the printer. You must clear the jam and then press Go to resume printing. The Jam Recovery menu item in the Setup Menu determines whether the printer reprints the jammed page. Refer to your printer's publications CD for information about the Jam Recovery menu item. 46 Troubleshooting
-
 1
1 -
2
-
3
-
4
-
5
-
6
-
7
-
8
-
9
-
10
-
11
-
12
-
13
-
14
-
15
-
16
-
17
-
18
-
19
-
20
-
21
-
22
-
23
-
24
-
25
-
26
-
27
-
28
-
29
-
30
-
31
-
32
-
33
-
34
-
35
-
36
-
37
-
38
-
39
-
40
-
41
-
42
-
43
-
44
-
 45
45 -
 46
46 -
 47
47 -
 48
48 -
 49
49 -
 50
50 -
 51
51 -
 52
52 -
 53
53 -
 54
54 -
 55
55 -
56
-
57
-
58
-
59
-
60
-
61
-
62
-
63
-
64
-
65
-
66
-
67
-
68
-
69
-
70
 |
 |
