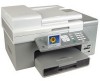
Lexmark 13R0223 User's Guide - Page 119
Scanning, Scanning a document
 |
UPC - 734646091732
View all Lexmark 13R0223 manuals
Add to My Manuals
Save this manual to your list of manuals |
Page 119 highlights
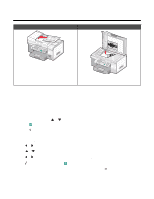
Scanning Automatic Document Feeder (ADF) Scanner glass Use the Automatic Document Feeder (ADF) for multiple-page A4, letter, or legal size documents. Use the scanner glass for single pages, small items (such as postcards or photos), transparencies, photo paper, or thin media (such as magazine clippings). Note: If you want to customize scan settings, see "Using Scan and the Scan Mode menu" on page 51. Scanning a document 1 Make sure the printer is connected to a computer, and both the printer and the computer are on. 2 Load an original document faceup into the Automatic Document Feeder (ADF) or facedown on the scanner glass. Note: Do not load postcards, photos, small items, transparencies, photo paper, or thin media (such as magazine clippings) into the Automatic Document Feeder (ADF). Place these items on the scanner glass. 3 From the control panel, press or repeatedly until Scan is highlighted. • Press for a Quick Scan. • Press if you want to specify information about the scan job. The message Downloading scan applications list from your computer. Please wait. appears for a few seconds. The Scan Mode menu appears with the Scan to menu item highlighted. 4 Press or repeatedly until the destination to which you want to scan appears. 5 Press or repeatedly to reach the Color menu item. 6 Press or repeatedly until the value you want, either Color or Black & White, appears. 7 Press to preview the scan job, or press to start the scan job. 8 If you want to save the scanned image, from the software application, click File ª Save As. 9 Enter the file name, format, and location where you want the scanned image saved. 10 Click Save. 119
-
 1
1 -
2
-
3
-
4
-
5
-
6
-
7
-
8
-
9
-
10
-
11
-
12
-
13
-
14
-
15
-
16
-
17
-
18
-
19
-
20
-
21
-
22
-
23
-
24
-
25
-
26
-
27
-
28
-
29
-
30
-
31
-
32
-
33
-
34
-
35
-
36
-
37
-
38
-
39
-
40
-
41
-
42
-
43
-
44
-
45
-
46
-
47
-
48
-
49
-
50
-
51
-
52
-
53
-
54
-
55
-
56
-
57
-
58
-
59
-
60
-
61
-
62
-
63
-
64
-
65
-
66
-
67
-
68
-
69
-
70
-
71
-
72
-
73
-
74
-
75
-
76
-
77
-
78
-
79
-
80
-
81
-
82
-
83
-
84
-
85
-
86
-
87
-
88
-
89
-
90
-
91
-
92
-
93
-
94
-
95
-
96
-
97
-
98
-
99
-
100
-
101
-
102
-
103
-
104
-
105
-
106
-
107
-
108
-
109
-
110
-
111
-
112
-
113
-
 114
114 -
 115
115 -
 116
116 -
 117
117 -
 118
118 -
 119
119 -
 120
120 -
 121
121 -
 122
122 -
 123
123 -
 124
124 -
125
-
126
-
127
-
128
-
129
-
130
-
131
-
132
-
133
-
134
-
135
-
136
-
137
-
138
-
139
-
140
-
141
-
142
-
143
-
144
-
145
-
146
-
147
-
148
-
149
-
150
-
151
-
152
-
153
-
154
-
155
-
156
-
157
-
158
-
159
-
160
-
161
-
162
-
163
-
164
-
165
-
166
-
167
-
168
-
169
-
170
-
171
-
172
-
173
-
174
-
175
-
176
-
177
-
178
-
179
-
180
-
181
-
182
-
183
-
184
-
185
-
186
-
187
-
188
-
189
-
190
-
191
-
192
-
193
-
194
-
195
-
196
-
197
-
198
 |
 |
