Lexmark 13R0223 User's Guide - Page 87
Understanding and using tray linking, Setup, Paper Handling, Size - Tray 1, Auto Detect
 |
UPC - 734646091732
View all Lexmark 13R0223 manuals
Add to My Manuals
Save this manual to your list of manuals |
Page 87 highlights
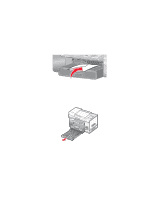
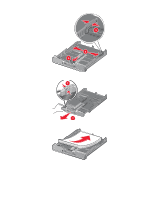
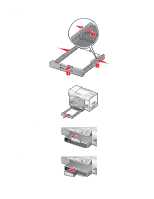
4 Close the top cover to avoid dark edges on the scanned image. Understanding and using tray linking If your printer has the optional Tray 2 installed, there is a feature called tray linking that lets the printer select paper from one tray until it becomes empty, and then automatically begin feeding paper from the other tray. You must load the same size and same type of media in both trays. When the trays are linked, the printer has a total paper capacity of 300 sheets, since Tray 1 and Tray 2 each hold 150 sheets. When you are using tray linking, it is very important that you load the same size and type of paper in both trays. The paper sizes you can load are letter, A4, or legal. You can load plain or photo paper. Notes: • If both trays do not have the same type of paper when they are linked, a job could mistakenly print on the wrong paper type. • Never mix paper sizes or types in a tray. Enabling tray linking 1 Load Tray 1 and Tray 2 with the same size and type of paper. 2 From the control panel, press or repeatedly until Setup is highlighted. 3 Press . The Setup menu appears with the Paper Handling submenu highlighted. 4 Press . The Size - Tray 1 submenu appears. 5 Press or until you reach the size of the paper loaded in Tray 1. 6 Press or repeatedly until the Type - Tray 1 submenu is highlighted. 7 Press or until you reach the paper type loaded in Tray 1. If you want, you can select Auto Detect. 8 Press or repeatedly until the Size - Tray 2 submenu is highlighted. 87
-
 1
1 -
2
-
3
-
4
-
5
-
6
-
7
-
8
-
9
-
10
-
11
-
12
-
13
-
14
-
15
-
16
-
17
-
18
-
19
-
20
-
21
-
22
-
23
-
24
-
25
-
26
-
27
-
28
-
29
-
30
-
31
-
32
-
33
-
34
-
35
-
36
-
37
-
38
-
39
-
40
-
41
-
42
-
43
-
44
-
45
-
46
-
47
-
48
-
49
-
50
-
51
-
52
-
53
-
54
-
55
-
56
-
57
-
58
-
59
-
60
-
61
-
62
-
63
-
64
-
65
-
66
-
67
-
68
-
69
-
70
-
71
-
72
-
73
-
74
-
75
-
76
-
77
-
78
-
79
-
80
-
81
-
 82
82 -
 83
83 -
 84
84 -
 85
85 -
 86
86 -
 87
87 -
 88
88 -
 89
89 -
 90
90 -
 91
91 -
 92
92 -
93
-
94
-
95
-
96
-
97
-
98
-
99
-
100
-
101
-
102
-
103
-
104
-
105
-
106
-
107
-
108
-
109
-
110
-
111
-
112
-
113
-
114
-
115
-
116
-
117
-
118
-
119
-
120
-
121
-
122
-
123
-
124
-
125
-
126
-
127
-
128
-
129
-
130
-
131
-
132
-
133
-
134
-
135
-
136
-
137
-
138
-
139
-
140
-
141
-
142
-
143
-
144
-
145
-
146
-
147
-
148
-
149
-
150
-
151
-
152
-
153
-
154
-
155
-
156
-
157
-
158
-
159
-
160
-
161
-
162
-
163
-
164
-
165
-
166
-
167
-
168
-
169
-
170
-
171
-
172
-
173
-
174
-
175
-
176
-
177
-
178
-
179
-
180
-
181
-
182
-
183
-
184
-
185
-
186
-
187
-
188
-
189
-
190
-
191
-
192
-
193
-
194
-
195
-
196
-
197
-
198
 |
 |
