Lexmark 13R0223 User's Guide - Page 56
Using the Change Print File Default Settings submenu, Setup, Change Print File Default Settings
 |
UPC - 734646091732
View all Lexmark 13R0223 manuals
Add to My Manuals
Save this manual to your list of manuals |
Page 56 highlights
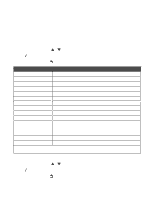
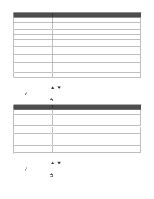
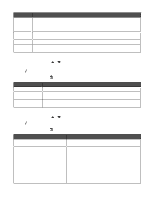
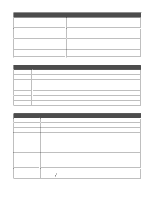
Use this To Photo Size Set the photo size. Values are Hagaki, L, 2L, 60 x 80 mm, A6, 10 x 15 cm, A5, B5, A4, 13 x 18 cm, 3.5 x 5 in., 4 x 6 in., 5 x 7 in., 8 x 10 in., and 8.5 x 11 in. Note: Automatic is also in the list, but it is not selectable. The value changes to automatic based on the value chosen for Layout. Layout Specify a layout for the photos. Values are Automatic, Borderless (1 Per Page), One Photo Centered, or 1 Per Page through 16 Per Page. Quality Specify a print quality for the photo. For more information, see "Quality" on page 55. Paper Handling Change settings related to the loading of paper in the paper tray or trays. For more information, see "Using the Paper Handling submenu" on page 54. Using the Change Print File Default Settings submenu 1 From the Setup menu, press highlighted. or repeatedly until Change Print File Default Settings is 2 Press . 3 After changing values, press to save these values and exit this submenu. Use this To Quality Specify a print quality. For more information, see "Quality" on page 55. Paper Handling Change settings related to the loading of paper in the paper tray or trays. For more information, see "Using the Paper Handling submenu" on page 54. Change Default Settings View the Print File Default Settings menu, from which you can change the values for print quality and paper handling and save them as settings. Using the Change Fax Default Settings submenu 1 From the Setup menu, press or repeatedly until Change Fax Default Settings is highlighted. 2 Press . 3 After changing values, press to save these values and exit this submenu. Use this Speed Dial Phone Book History and Reports To Access the Phone Book menu. For more information, see "Using the Phone Book submenu" on page 57. Access the History and Reports menu. Values are: • View History on Screen • Print Sent History • Print Received History • View Pending Faxes • Report-choose manual or automatic printing of the report • Print Fax Activity History-print a report of the last 40 faxes sent or received • Confirmation-choose whether or not to receive confirmation of successful fax transmissions 56
-
 1
1 -
2
-
3
-
4
-
5
-
6
-
7
-
8
-
9
-
10
-
11
-
12
-
13
-
14
-
15
-
16
-
17
-
18
-
19
-
20
-
21
-
22
-
23
-
24
-
25
-
26
-
27
-
28
-
29
-
30
-
31
-
32
-
33
-
34
-
35
-
36
-
37
-
38
-
39
-
40
-
41
-
42
-
43
-
44
-
45
-
46
-
47
-
48
-
49
-
50
-
 51
51 -
 52
52 -
 53
53 -
 54
54 -
 55
55 -
 56
56 -
 57
57 -
 58
58 -
 59
59 -
 60
60 -
 61
61 -
62
-
63
-
64
-
65
-
66
-
67
-
68
-
69
-
70
-
71
-
72
-
73
-
74
-
75
-
76
-
77
-
78
-
79
-
80
-
81
-
82
-
83
-
84
-
85
-
86
-
87
-
88
-
89
-
90
-
91
-
92
-
93
-
94
-
95
-
96
-
97
-
98
-
99
-
100
-
101
-
102
-
103
-
104
-
105
-
106
-
107
-
108
-
109
-
110
-
111
-
112
-
113
-
114
-
115
-
116
-
117
-
118
-
119
-
120
-
121
-
122
-
123
-
124
-
125
-
126
-
127
-
128
-
129
-
130
-
131
-
132
-
133
-
134
-
135
-
136
-
137
-
138
-
139
-
140
-
141
-
142
-
143
-
144
-
145
-
146
-
147
-
148
-
149
-
150
-
151
-
152
-
153
-
154
-
155
-
156
-
157
-
158
-
159
-
160
-
161
-
162
-
163
-
164
-
165
-
166
-
167
-
168
-
169
-
170
-
171
-
172
-
173
-
174
-
175
-
176
-
177
-
178
-
179
-
180
-
181
-
182
-
183
-
184
-
185
-
186
-
187
-
188
-
189
-
190
-
191
-
192
-
193
-
194
-
195
-
196
-
197
-
198
 |
 |
