Lexmark X7350 User's Guide - Page 92
Network name does not appear in the list, Jams and misfeeds troubleshooting, Paper jam in the printer
 |
View all Lexmark X7350 manuals
Add to My Manuals
Save this manual to your list of manuals |
Page 92 highlights
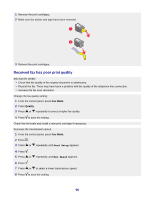
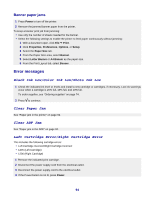
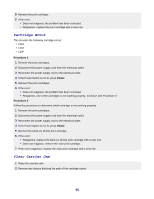
1 Check the Ethernet cable for any obvious damage. 2 Firmly plug one end of the Ethernet cable into the printer. 3 Firmly plug the other end of the Ethernet cable into the network hub or wall connection. If you are also using a USB cable: 1 Check the USB cable for any obvious damage. 2 Firmly plug the rectangular end of the USB cable into the USB port of the computer. The USB port is marked with the USB symbol . 3 Firmly plug the square end of the USB cable into the USB port on the back of the printer. Contact your system support person to make sure the printer is connected to a working network connection. Make sure the printer is connected to a power source and is turned on. For more information, see "Power button is not lit" on page 76. Network name does not appear in the list SSID is not being broadcast. Make sure security keys are correct. Jams and misfeeds troubleshooting Paper jam in the printer To remove the paper: 1 Open the rear access door. 2 Firmly grasp the paper, and gently pull it out. 3 Close the rear door. 4 Press . If the paper is accessible from the front of the printer: 1 Raise the paper exit tray. 2 Firmly grasp the paper, and gently pull it out. 3 Lower the paper exit tray. 4 Press . Paper jam in the ADF 1 Flip open the ADF by grasping the notch in the left side of the ADF and pulling up. 2 Firmly grasp the paper, and gently pull it out. 92
-
 1
1 -
2
-
3
-
4
-
5
-
6
-
7
-
8
-
9
-
10
-
11
-
12
-
13
-
14
-
15
-
16
-
17
-
18
-
19
-
20
-
21
-
22
-
23
-
24
-
25
-
26
-
27
-
28
-
29
-
30
-
31
-
32
-
33
-
34
-
35
-
36
-
37
-
38
-
39
-
40
-
41
-
42
-
43
-
44
-
45
-
46
-
47
-
48
-
49
-
50
-
51
-
52
-
53
-
54
-
55
-
56
-
57
-
58
-
59
-
60
-
61
-
62
-
63
-
64
-
65
-
66
-
67
-
68
-
69
-
70
-
71
-
72
-
73
-
74
-
75
-
76
-
77
-
78
-
79
-
80
-
81
-
82
-
83
-
84
-
85
-
86
-
 87
87 -
 88
88 -
 89
89 -
 90
90 -
 91
91 -
 92
92 -
 93
93 -
 94
94 -
 95
95 -
 96
96 -
 97
97 -
98
-
99
-
100
-
101
-
102
-
103
-
104
-
105
-
106
-
107
-
108
-
109
-
110
-
111
-
112
 |
 |
