Lexmark Z65n User's Guide (1.06 MB)
Lexmark Z65n Manual
 |
View all Lexmark Z65n manuals
Add to My Manuals
Save this manual to your list of manuals |
Lexmark Z65n manual content summary:
- Lexmark Z65n | User's Guide (1.06 MB) - Page 1
User's Guide Z65n Color Jetprinter™ User's Guide December 2001 www.lexmark.com - Lexmark Z65n | User's Guide (1.06 MB) - Page 2
Software clause at DFARS 252.227-7013 and in applicable FAR provisions: Lexmark International, Inc., Lexington, KY 40550. Federal Communications Commission (FCC) compliance information statement The Lexmark Z65n Color Jetprinter and grounded cable such as Lexmark part number 12A2405 for USB attach. - Lexmark Z65n | User's Guide (1.06 MB) - Page 3
software to meet your printing needs 4 Preparing for network printing 5 Network printing checklist 5 Finding the MAC address of your printer 6 Configuring a network printer (Windows 7 Manually configuring the network printer 8 Installing additional listed printers 10 Adding a remote network - Lexmark Z65n | User's Guide (1.06 MB) - Page 4
paper tray 2 25 Printing for fun 27 Printing a digital photo on a photo card (Windows 28 Troubleshooting checklist 31 Setup troubleshooting 33 Index 44 Thank you for buying a Lexmark Z65n printer! • To set up your printer for Windows operating systems, Mac OS 8.6 to 9.2, or Mac OS X version - Lexmark Z65n | User's Guide (1.06 MB) - Page 5
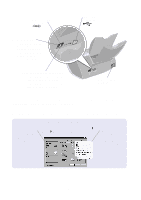
If this button is flashing, press it once to clear a paper jam. Paper guide Slide next to paper for proper feeding. Each paper tray has a paper guide. Front cover Open to install cartridges or clear a paper jam. Power button Press to turn the printer on or off. Paper exit tray Extend to hold paper - Lexmark Z65n | User's Guide (1.06 MB) - Page 6
. • If this light is flashing, your network is transmitting data. Network connection speed light • If this light is on, your network transmits data at 100Mbps. • If this light is off, your network transmits data at 10Mbps. Power supply connector For information about connecting your printer to an - Lexmark Z65n | User's Guide (1.06 MB) - Page 7
your document open, click File Page Setup. Note: Your software screens may appear slightly different from the ones shown depending table to select a print quality or paper type setting: Windows 1 With your document open, click File Print Properties or or photo Transparency, coated, glossy, or - Lexmark Z65n | User's Guide (1.06 MB) - Page 8
(Windows), Lexmark Z65 Control Panel (Mac OS 8.6 to 9.2), or Lexmark Z65 Utility (Mac OS X) for: • Aligning and maintaining cartridges • Viewing printer status information, such as the paper type detected in paper tray 1 and ink levels • Troubleshooting • Printing a test page • Networking Refer - Lexmark Z65n | User's Guide (1.06 MB) - Page 9
the steps in "Finding the MAC address of your printer" on page 6. 4 Continue with "Configuring a network printer (Windows)" on page 7 or "Configuring a network printer (Macintosh)" on page 14 to install the printer software and configure your network printer. Network printing checklist Make sure all - Lexmark Z65n | User's Guide (1.06 MB) - Page 10
set of numbers assigned to devices on a network. To view updated printer information, including updates about adding your printer to your network, visit the Lexmark Web site at www.lexmark.com/publications. Look for Lexmark Z65n printer information. Finding the MAC address of your printer You may - Lexmark Z65n | User's Guide (1.06 MB) - Page 11
you to align the cartridges The printer software automatically found and configured your printer on your network. Go to step 4 on page 8 to continue the printer software installation. More than one Lexmark Z65n listed on the Printer Installation screen The printer software found more than one - Lexmark Z65n | User's Guide (1.06 MB) - Page 12
directions on the screens to install and align the cartridges. 5 From the Printer Setup is Complete screen, click Test Page to print a test page on the network printer. 6 Click Finished to complete the printer software installation. Manually configuring the network printer 1 From the Search Results - Lexmark Z65n | User's Guide (1.06 MB) - Page 13
3 From the Lexmark Network Configuration screen, select your unconfigured printer from the list using the MAC address. For help, see "Finding the MAC address of your printer" on page 6. - If your printer is not listed and your printer is on a remote subnet, see "Adding a remote network printer" on - Lexmark Z65n | User's Guide (1.06 MB) - Page 14
directions on the screens to align the cartridges. 5 From the Printer Setup is Complete screen, click Test Page to print a test page on the network printer. 6 Click Finished to complete the printer software installation. Installing additional listed printers Complete the following process for each - Lexmark Z65n | User's Guide (1.06 MB) - Page 15
configured. This adds just one printer to the list. - Select Multiple new printers, and then enter the IP address of the remote subnet. All available printers are added to the list, including unconfigured printers. 4 Click OK. 5 From the Lexmark Network Configuration screen, click Refresh. 11 - Lexmark Z65n | User's Guide (1.06 MB) - Page 16
printer (Windows)" on page 7 on the first network computer. 2 Complete the following set of steps for each network computer you want to print to the network printer. a Insert the printer software CD into the CD-ROM drive of another network computer. b When the Lexmark printer software installation - Lexmark Z65n | User's Guide (1.06 MB) - Page 17
in paper tray 1 and ink levels. For help, see "Using the software to meet your printing needs" on page 4. Finding unlisted printers Your printer may not appear in the list of available printers on the Lexmark Network Configuration screen because: • You may have a printer problem. Perform the - Lexmark Z65n | User's Guide (1.06 MB) - Page 18
are displayed. 3 When the Lexmark printer software installation screen appears, click Install and Agree. If you see: This happened: Now: When adding a single printer: Cartridges Changed screen (Mac OS 8.6 to 9.2) or Printer Selection screen (Mac OS X) The printer software automatically found and - Lexmark Z65n | User's Guide (1.06 MB) - Page 19
: Now: More than one Lexmark Z65n printer listed on the Printer Selection screen The printer software found more than one Lexmark Z65n printer on your network. If your printer is listed with an IP address: 1 Select your printer from the list. You may need to know the MAC address to select the - Lexmark Z65n | User's Guide (1.06 MB) - Page 20
to install and align the cartridges. Mac OS X version 10.0.3 to 10.1 1 From the Printer Selection screen, click Open Print Center. The Printer List appears. 2 If your printer is listed, continue with step 3. If your printer is not listed, click Add Printer, and then select Lexmark Inkjet Networking - Lexmark Z65n | User's Guide (1.06 MB) - Page 21
the red close button. 6 From the Printer Selection screen, click Continue. 7 From the Lexmark Z65 Utility, click the red close button to complete the printer software installation. Manually configuring a single unconfigured printer 1 From the New Network Printer Found screen, click Continue. 17 - Lexmark Z65n | User's Guide (1.06 MB) - Page 22
screens to install and align the cartridges. 4 From the Printer Setup is Complete screen, click Test Page to print a test page on the network printer. 5 Click Finished to complete the printer software installation. Manually configuring multiple printers 1 From the Printer Selection screen, select - Lexmark Z65n | User's Guide (1.06 MB) - Page 23
to continue the printer software installation. 6 Follow the steps for your operating system: Mac OS 8.6 to 9.2 Mac OS X version 10.0.3 to 10.1 When the printer software prompts you, follow the directions on the screen to install and align the cartridges. 1 From the Printer Selection screen - Lexmark Z65n | User's Guide (1.06 MB) - Page 24
subnet instead of your local subnet: 1 If your remote network printer is already configured, continue with step 2. If your remote network printer is not configured: a From a computer on the same subnet as the remote printer, configure your printer following the steps on page 14. b Continue with step - Lexmark Z65n | User's Guide (1.06 MB) - Page 25
to continue the printer software installation. 6 Follow the steps for your operating system: Mac OS 8.6 to 9.2 Mac OS X version 10.0.3 to 10.1 When the printer software prompts you, follow the directions on the screen to install and align the cartridges. 1 From the Printer Selection screen - Lexmark Z65n | User's Guide (1.06 MB) - Page 26
complete the printer software installation. Viewing network printer settings After the software is installed on your network computer, you can use it to: • Find the Printer Name, IP address, and MAC address. • Change IP address information. • Check printer status information, such as ink levels. For - Lexmark Z65n | User's Guide (1.06 MB) - Page 27
for Windows 127 to 355.6 mm (5.0 to 14.0 in.) for Macintosh Note: Banner paper may be longer. If you load transparencies or plain, coated, photo, or glossy paper into paper tray 1, your printer detects the paper type and automatically adjusts the Paper Type setting in the printer software for you - Lexmark Z65n | User's Guide (1.06 MB) - Page 28
should extend beyond the top of paper tray 1. 3 Make sure the paper tray 1 button is selected. Paper tray 1 button 4 Follow the steps for your operating system to open the printer software and print your document. Windows Mac OS 8.6 to 9.2 Mac OS X version 10.0.3 to 10.1 1 With your document - Lexmark Z65n | User's Guide (1.06 MB) - Page 29
type sensor, so you will need to select a paper type in the printer software. To print a document from this tray: 1 Load the paper, with the print side facing you, against the right side of the paper tray. 2 Squeeze and slide the paper guide to the left edge of the paper. Notes: - To avoid a paper - Lexmark Z65n | User's Guide (1.06 MB) - Page 30
your operating system to open the printer software and print your document. Windows Mac OS 8.6 to 9.2 Mac OS X version 10.0.3 to 10.1 Print. 2 From the Printer pop-up menu, choose Lexmark Z65. 3 From the pop-up menu, choose Quality & Media. 4 Select a print quality. 5 From the Tray 2 (Rear) pop - Lexmark Z65n | User's Guide (1.06 MB) - Page 31
Print on both sides of a sheet of paper Booklet Envelope Print many pages on the same sheet Banner Poster Transparency Iron-on transfer Note: The printer software for your operating system may not support all of these features. 27 - Lexmark Z65n | User's Guide (1.06 MB) - Page 32
photo on a photo card (Windows) 1 Load up to 10 photo cards vertically against the right side of paper tray 1. When you load photo cards, make sure: - You carefully read the instructions that came with your cards. - The print side is facing you. - You do not push the cards too far into the printer - Lexmark Z65n | User's Guide (1.06 MB) - Page 33
4 Open your digital photo in your photo application. 5 When you are ready to print your photo, click File Print Properties or Preferences. 6 From the I Want To menu, click Print a photograph. I Want To menu 29 - Lexmark Z65n | User's Guide (1.06 MB) - Page 34
sure Paper Source is set to Printer Setting or Tray 1 (Front). 10 From Print Properties, photo as it exits the printer and let it dry completely before stacking. More fun printing ideas To learn how to print special projects, follow the steps for your operating system. Windows 1 Refer to the Lexmark Z65 - Lexmark Z65n | User's Guide (1.06 MB) - Page 35
, see page 23. Did you install the printer software correctly? Windows Mac OS 8.6 to 9.2 Mac OS X version 10.0.3 to 10.1 From your desktop, click Start Programs or All Programs. If Lexmark Z65 does not appear in your list of programs, install the printer software (see page 42). From the Apple - Lexmark Z65n | User's Guide (1.06 MB) - Page 36
from any external devices. 2 Connect your printer directly to your computer with a USB cable. 3 Follow the instructions for your operating system to print a test page. Windows 1 Open the Lexmark Z65 Solution Center (see page 4). 2 From the Troubleshooting tab, click Print a test page. Macintosh - Lexmark Z65n | User's Guide (1.06 MB) - Page 37
paper tray light is blinking. A communications error message appeared. My network printer is not working. My printer is still not working. See page: 34 for Windows 34 for Macintosh 35 for Windows and Macintosh 35 for Windows and Macintosh 36 for Windows 37 for Macintosh 38 for Windows 39 for Mac OS - Lexmark Z65n | User's Guide (1.06 MB) - Page 38
cable, such as Lexmark P/N 12A2405. To continue software installation, follow the steps on the setup sheet that came with your printer. If the screen reappears and you are connecting your printer to a network, see "Manually configuring the network printer" on page 8. The New Network Printer Found or - Lexmark Z65n | User's Guide (1.06 MB) - Page 39
your printer is selected (see page 1). • For more information, follow the instructions for your operating system. Windows Macintosh If there is an error message on your screen, follow the instructions on it. For additional help, see page 4. Refer to the Troubleshooting topic for this problem in - Lexmark Z65n | User's Guide (1.06 MB) - Page 40
. (Windows) First, see if checking the items on page 31 solves the problem. Then: a Close all open software applications. b Restart your computer. c Reinsert the printer software CD. When you insert the printer software CD, you should see one of the following Lexmark printer software installation - Lexmark Z65n | User's Guide (1.06 MB) - Page 41
items on page 31 solves the problem. Then: a Close all open software applications. b Reinsert the printer software CD. When you insert the printer software CD, you should see one of the following Lexmark printer software installation screens: Mac OS 8.6 to 9.2 Mac OS X version 10.0.3 to 10.1 If - Lexmark Z65n | User's Guide (1.06 MB) - Page 42
. For help identifying the MAC address of your printer, see page 6. To check the printer port and change it, if necessary, follow the steps for your operating system. Windows 98/Me Windows 2000 Windows XP a Click Start Settings Printers. b Right-click the Lexmark Z65 printer icon, and then click - Lexmark Z65n | User's Guide (1.06 MB) - Page 43
. (Mac OS 8.6 to 9.2) First, see if checking the list on page 31 solves the problem. Make sure your printer is selected in Chooser: a From the Apple menu, choose Chooser. b In the left window, highlight the Lexmark Z65 printer icon. If your printer is not listed, install the printer software (see - Lexmark Z65n | User's Guide (1.06 MB) - Page 44
the OS X disk icon Library folder Printers folder Lexmark folder. b Double-click the Lexmark Z65 Utility icon. c From the Cartridges tab, click Print Test Page. - If a test page prints, your printer is working properly. Check your software application documentation for troubleshooting information - Lexmark Z65n | User's Guide (1.06 MB) - Page 45
to print. If there is still a problem: a DIsconnect your printer from your network. b Connect your printer directly to your computer with a USB cable, such as Lexmark P/N 12A2405. c Uninstall and then reinstall the printer software. For help: - See page 42 for Windows. - See page 43 for Macintosh - Lexmark Z65n | User's Guide (1.06 MB) - Page 46
screen does not appear, see page 36. c Follow instructions on your screen to complete printer software installation. Verify printer software installation a Click Start Programs or All Programs Lexmark Z65 Lexmark Z65 Solution Center. b From the Troubleshooting tab, click Print a test page. If the - Lexmark Z65n | User's Guide (1.06 MB) - Page 47
your screen to complete printer software installation. Verify printer software installation Follow the instructions for your operating system to print a test page: Mac OS 8.6 to 9.2 a From the Apple menu, choose Control Panels Lexmark Z65 Control Panel. b From the Cartridges tab, click Print Test - Lexmark Z65n | User's Guide (1.06 MB) - Page 48
, MAC address 6 installing printer software Macintosh 14, 43 Windows 7, 42 L loading paper 23, 25 photo cards 28 M MAC address, identifying 6 Macintosh Add Remote Printers screen . . . . 20 Configure Network Printer screen 18 Control Panel (Mac OS 8.6 to 9.2) 4 New Network Printer Found - Lexmark Z65n | User's Guide (1.06 MB) - Page 49
paper type 1, 23 troubleshooting alignment page 35 cartridges 31 checklist 31 communications error message . 41 installing software Macintosh 43 Windows 42 network printer 41 paper tray light 41 power light 35 printer cable 31 printer not printing Mac OS 8.6 to 9.2 39 Mac OS X 10.0.3 to - Lexmark Z65n | User's Guide (1.06 MB) - Page 50
46 - Lexmark Z65n | User's Guide (1.06 MB) - Page 51
by anyone other than Lexmark or a Lexmark authorized servicer • Operation of a product beyond the limit of its duty cycle • Use of printing media outside of Lexmark specifications • Supplies (such as ink) not furnished by Lexmark • Products, components, parts, materials, software, or interfaces not - Lexmark Z65n | User's Guide (1.06 MB) - Page 52
and Lexmark with diamond design are trademarks of Lexmark International, Inc., registered in the United States and/or other countries. Color Jetprinter is a trademark of Lexmark International, Inc. © 2001 Lexmark International, Inc. 740 West New Circle Road Lexington, Kentucky 40550 www.lexmark.com
-
 1
1 -
 2
2 -
 3
3 -
 4
4 -
 5
5 -
 6
6 -
 7
7 -
8
-
9
-
10
-
11
-
12
-
13
-
14
-
15
-
16
-
17
-
18
-
19
-
20
-
21
-
22
-
23
-
24
-
25
-
26
-
27
-
28
-
29
-
30
-
31
-
32
-
33
-
34
-
35
-
36
-
37
-
38
-
39
-
40
-
41
-
42
-
43
-
44
-
45
-
46
-
47
-
48
-
49
-
50
-
51
-
52
 |
 |

www.lexmark.com
User’s Guide
December 2001
Z65n Color Jetprinter
™
User’s Guide