Lexmark Z65n User's Guide (1.06 MB) - Page 9
Preparing for network printing, Network printing checklist - windows xp
 |
View all Lexmark Z65n manuals
Add to My Manuals
Save this manual to your list of manuals |
Page 9 highlights
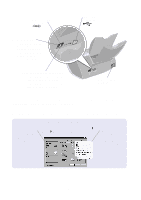
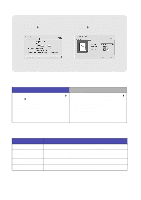
Preparing for network printing Network printer configuration is the process of assigning a name and a unique network address (IP address) to your printer so network computers can print to it. To prepare your network printer for network printer configuration: 1 Follow the steps on the setup sheet to connect your printer to your network with an Ethernet cable (RJ-45). 2 Read and follow the "Network printing checklist". 3 Follow the steps in "Finding the MAC address of your printer" on page 6. 4 Continue with "Configuring a network printer (Windows)" on page 7 or "Configuring a network printer (Macintosh)" on page 14 to install the printer software and configure your network printer. Network printing checklist Make sure all the cable connections are secure. Make sure your printer is on and connected to your network with a RJ-45 Ethernet cable. For help, refer to the setup sheet that came with your printer. Make sure the computers on your network are on and connected to the network. Make sure the network link light is on. This verifies that your printer is connected to your network. For information about locating this light on your printer, see page 2. Windows 98/Me, Windows 2000, or Windows XP: TCP/IP (a networking protocol) must be active and running on all the network computers you want to print to the network printer. Refer to the documentation you used to set up your network, the Windows online help, or a network administrator. 5
-
 1
1 -
2
-
3
-
 4
4 -
 5
5 -
 6
6 -
 7
7 -
 8
8 -
 9
9 -
 10
10 -
 11
11 -
 12
12 -
 13
13 -
 14
14 -
15
-
16
-
17
-
18
-
19
-
20
-
21
-
22
-
23
-
24
-
25
-
26
-
27
-
28
-
29
-
30
-
31
-
32
-
33
-
34
-
35
-
36
-
37
-
38
-
39
-
40
-
41
-
42
-
43
-
44
-
45
-
46
-
47
-
48
-
49
-
50
-
51
-
52
 |
 |
