Linksys BEFSR41 User Guide - Page 19
Continue on to the next to complete your network setup. - router setup
 |
UPC - 745883549344
View all Linksys BEFSR41 manuals
Add to My Manuals
Save this manual to your list of manuals |
Page 19 highlights
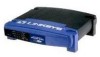
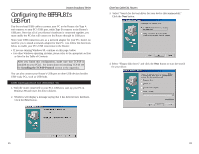
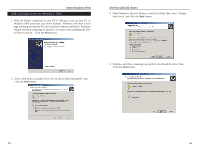
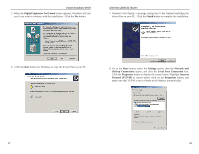
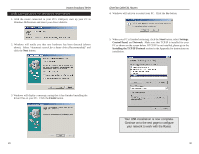
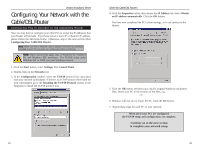
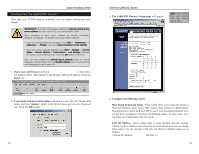
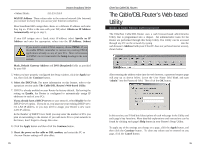
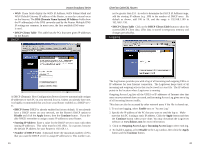
Instant Broadband Series Configuring Your Network with the Cable/DSL Router Configuring PCs to Connect to the Cable/DSL Router Now you may have to configure your other PCs to accept the IP addresses that your Router will provide. If you have not set a static IP or dynamic IP address, please follow the directions below. Otherwise, skip to the next section titled Configuring Your Cable/DSL Router. Note: Make sure that a network card or adapter has been successfully installed in each PC you plan on configuring before continuing. Note: These instructions apply only to Windows 95, Windows 98, and Windows ME machines. For TCP/IP setup under Windows NT or 2000, see your Windows manual. 1. Click the Start button, select Settings, then Control Panel. 2. Double-click on the Network icon. 3. In the Configuration window, select the TCP/IP protocol line associated with your network card/adapter. If there is no TCP/IP protocol line listed for your card/adapter, go to the Installing the TCP/IP Protocol section in the Appendix to install the TCP/IP protocol now. 31 EtherFast Cable/DSL Routers 4. Click the Properties button, then choose the IP Address tab. Select Obtain an IP address automatically. Click the OK button. You have now completed the PC's client settings, so it can connect to the Router. 5. Click the OK button. Windows may ask for original Windows installation files. Direct your PC to the location of the files, e.g., D:\win98, D:\win9x, D:\win95, or c:\windows\options\cabs. 6. Windows will ask you to restart the PC. Click the Yes button. 7. Repeat these steps for each PC on your network. When all of your PCs are configured, the TCP/IP setup and configuration are complete. Continue on to the next section to complete your network setup. 32
-
 1
1 -
2
-
3
-
4
-
5
-
6
-
7
-
8
-
9
-
10
-
11
-
12
-
13
-
 14
14 -
 15
15 -
 16
16 -
 17
17 -
 18
18 -
 19
19 -
 20
20 -
 21
21 -
 22
22 -
 23
23 -
 24
24 -
25
-
26
-
27
-
28
-
29
-
30
-
31
-
32
-
33
-
34
-
35
-
36
-
37
-
38
-
39
-
40
-
41
-
42
-
43
-
44
-
45
 |
 |