Linksys BEFSR41 User Guide - Page 22
Obtain an IP address, automatically, Obtain an IP address automatically, PPPoE, User Name, Password - firmware
 |
UPC - 745883549344
View all Linksys BEFSR41 manuals
Add to My Manuals
Save this manual to your list of manuals |
Page 22 highlights
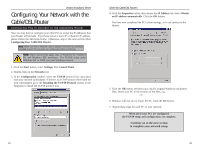
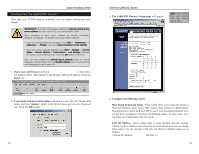
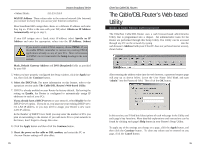
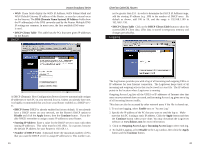
Setup Instant Broadband Series Note: The Setup page in this picture may differ slightly from the one you see. The Basic Setup screen is the first screen you see when you access the Setup Utility. If you have already installed and set up your Router, you have already seen this screen and properly configured all of the screen's values. • Host Name & Domain Name These fields allow you to supply a host and domain name for the Router. Some ISPs require these names as identification. You may have to check with your ISP to see if your Broadband Internet service has been configured with a host and domain name. In most cases, leaving these fields blank will work. • Firmware Version This entry shows the version and date of the firmware you are using. Future versions of the Router's firmware will be posted and available for download on the Linksys Web site at www.linksys.com. • LAN IP Address and Subnet Mask The values for the Router's IP Address and Subnet Mask are shown here. The default value is 192.168.1.1 for the IP address and 255.255.255.0 for the Subnet Mask. 37 EtherFast Cable/DSL Routers • WAN IP Address This is the IP address that your Router has, when seen from the external WAN, or the Internet. • Subnet Mask This is the Router's Subnet Mask, as seen by external users on the Internet (including your ISP). If you select Obtain an IP address automatically, your ISP will assign these values. • Default Gateway Address Your ISP will provide you with the Default Gateway IP Address. If you select Obtain an IP address automatically, your ISP will assign these values. • DNS (Domain Name Server) IP Address Your ISP will provide you with at least one DNS Server IP Address. If you select Obtain an IP address automatically, these values will be assigned by your ISP. You can check whether the values you entered for the above settings are correct by testing your Internet access. • PPPoE (Point-to-Point Protocol over Ethernet) Some DSL-based ISPs use PPPoE to establish communications with their end-users. If you are using a DSL line, check with your ISP to see if they use PPPoE. If they do use PPPoE, you must enable it. To enable PPPoE: 1. Click on the PPPoE option in the Login section of the Setup screen. 2. Enter the User Name you use to log on to your Internet connection. 3. Enter your corresponding Password. • Connect on Demand If you aren't actively using the Internet, you can configure your Router to cut your connection with your ISP after a certain period of time. If you have been disconnected due to inactivity, Connect on Demand enables your Router to automatically re-establish your connection as soon as you attempt to access the Internet again. If you wish to activate Connect on Demand, choose the Enable option. • Max Idle Time Max Idle Time is the number of minutes that passes before the Router drops your Internet connection, due to inactivity. If you want your Internet connection to remain on at all times, enter zero (0) in this field and click the Apply button. Otherwise, enter in the number of minutes you want to elapse before your Internet access disconnects. • Keep Alive Option This option keeps your PPPoE-enabled Internet access connected indefinitely, even when it sits idle. It keeps the connection alive by sending out a few data packets periodically, so your Internet service thinks that the connection is still active. To use this option, click on the box next to Keep Alive to select it, and click the Apply button. 38
-
 1
1 -
2
-
3
-
4
-
5
-
6
-
7
-
8
-
9
-
10
-
11
-
12
-
13
-
14
-
15
-
16
-
 17
17 -
 18
18 -
 19
19 -
 20
20 -
 21
21 -
 22
22 -
 23
23 -
 24
24 -
 25
25 -
 26
26 -
 27
27 -
28
-
29
-
30
-
31
-
32
-
33
-
34
-
35
-
36
-
37
-
38
-
39
-
40
-
41
-
42
-
43
-
44
-
45
 |
 |
