Linksys BEFSR41 User Guide - Page 42
The TCP/IP Installation is now complete. - uplink port
 |
UPC - 745883549344
View all Linksys BEFSR41 manuals
Add to My Manuals
Save this manual to your list of manuals |
Page 42 highlights
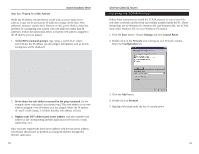
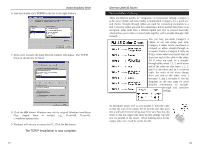
Instant Broadband Series 6. Find and double-click TCP/IP in the list to the right (below). 7. After a few seconds, the main Network window will appear. The TCP/IP Protocol should now be listed. 8. Click the OK button. Windows may ask for original Windows installation files. Supply them as needed, e.g., D:\win98, D:\win95, c:\windows\options\cabs. 9. Windows will ask you to restart the PC. Click the Yes button. The TCP/IP Installation is now complete. 77 EtherFast Cable/DSL Routers Twisted-Pair Cabling There are different grades, or "categories," of twisted-pair cabling. Category 5 is the most reliable and most highly recommended. Category 3 is a good second choice. Straight-through cables are used for connecting computers to a hub. Crossover cables are used for connecting a hub to another hub (there is an exception: some hubs have a built-in uplink port that is crossed internally, which allows you to link or connect hubs together with a straight-through cable instead). You can buy pre-made Category 5 cables, or cut and crimp your own. Category 5 cables can be purchased or crimped as either straight-through or crossover. Inside a Category 5 cable are 8 thin, color-coded wires inside that run from one end of the cable to the other. All 8 wires are used. In a straightthrough cable, wires 1, 2, 3, and 6 at one end of the cable are also wires 1, 2, 3, and 6 at the other end. In a crossover cable, the order of the wires change from one end to the other: wire 1 becomes 3, and 2 becomes 6. See the diagrams on the next page for more detailed information on straight- through and crossover cabling. To determine which wire is wire number 1, hold the cable so that the end of the plastic RJ-45 tip (the part that goes into a wall jack first) is facing away from you. Face the clip down so that the copper side faces up (the springy clip will now be parallel to the floor). When looking down on the copper side, wire 1 will be on the far left. 78
-
 1
1 -
2
-
3
-
4
-
5
-
6
-
7
-
8
-
9
-
10
-
11
-
12
-
13
-
14
-
15
-
16
-
17
-
18
-
19
-
20
-
21
-
22
-
23
-
24
-
25
-
26
-
27
-
28
-
29
-
30
-
31
-
32
-
33
-
34
-
35
-
36
-
 37
37 -
 38
38 -
 39
39 -
 40
40 -
 41
41 -
 42
42 -
 43
43 -
 44
44 -
 45
45
 |
 |
