Linksys BEFSR41 User Guide - Page 7
Getting to Know the 1-Port EtherFast, Cable/DSL Router - reset
 |
UPC - 745883549344
View all Linksys BEFSR41 manuals
Add to My Manuals
Save this manual to your list of manuals |
Page 7 highlights
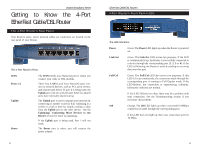
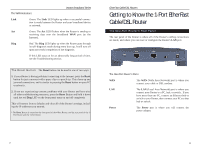
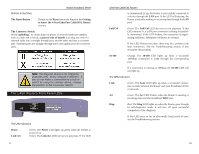
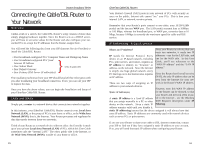
The WAN Indicators Instant Broadband Series Link Green. The Link LED lights up when a successful connection is made between the Router and your broadband device or network. Act Green. The Act LED flickers when the Router is sending or receiving data over the broadband WAN port (to the Internet). Diag Red. The Diag LED lights up when the Router goes through its self-diagnosis mode during every boot-up. It will turn off upon successful completion of the diagnosis. If this LED stays on for an abnormally long period of time, see the Troubleshooting section. The Reset Button* The Reset button can be used in one of two ways. 1. If your Router is having problems connecting to the Internet, press the Reset button for just a moment with a paper clip or a pencil tip. This clears up any jammed connections, and is similar to pressing the Reset button on your PC to reboot it. 2. If you are experiencing extreme problems with your Router and have tried all other troubleshooting measures, press the Reset Button and hold it down until the red Diag LED on the front panel turns on and off completely. This will restore factory defaults and clear all of the Router's settings, including the IP addresses you entered. * The Reset Button is located on the front panel of the 4-Port Router, and the rear panel of the 3Port Router and the 1-Port Router. EtherFast Cable/DSL Routers Getting to Know the 1-Port EtherFast Cable/DSL Router The One-Port Router's Rear Panel The rear panel of the Router is where all of the Router's cabling connections are made, and where you can reset or configure the Router's LAN port. The One-Port Router's Ports WAN The WAN (Wide Area Network) port is where you connect your cable or DSL modem. LAN The LAN (Local Area Network) port is where you connect your Router to a PC, hub, or switch. If you have more than one PC, connect an Ethernet hub or switch to your Router, then connect your PCs to that hub or switch. Power The Power port is where you will connect the power adapter. 7 8
-
 1
1 -
 2
2 -
 3
3 -
 4
4 -
 5
5 -
 6
6 -
 7
7 -
 8
8 -
 9
9 -
 10
10 -
 11
11 -
 12
12 -
13
-
14
-
15
-
16
-
17
-
18
-
19
-
20
-
21
-
22
-
23
-
24
-
25
-
26
-
27
-
28
-
29
-
30
-
31
-
32
-
33
-
34
-
35
-
36
-
37
-
38
-
39
-
40
-
41
-
42
-
43
-
44
-
45
 |
 |
