Linksys WAG54G User Guide - Page 38
The Access Restrictions Tab, Internet Policy Summary
 |
View all Linksys WAG54G manuals
Add to My Manuals
Save this manual to your list of manuals |
Page 38 highlights
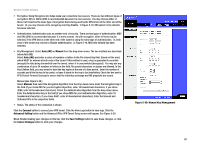
Wireless-G ADSL Gateway The Access Restrictions Tab Internet Access The Access Restrictions tab, shown in Figure 5-22, allows you to block or allow specific kinds of Internet usage. You can set up Internet access policies for specific computers and set up filters by using network port numbers. • Internet Access Policy. Multiple Filters can be saved as Internet Access Policies. When you wish to edit one, select the number of the Policy from the drop-down menu. The tab will change to reflect the settings of this Policy. If you wish to delete this Policy, click the Delete button. To see a summary of all Policies, click the Summary button. The summaries are listed on this screen, shown in Figure 5-23, with their name and settings. To return to the Filters tab, click the Close button. • Enter Policy Name. Policies are created from the fields presented here. To create an Internet Access policy: 1. Enter a Policy Name in the field provided. Select Internet Access as the Policy Type. 2. Click the Edit List button. This will open the List of computers screen, shown in Figure 5-24. From this screen, you can enter the IP address or MAC address of any computer to which this policy will apply. You can even enter ranges of computers by IP address. Click the Apply button to save your settings, the Cancel button to undo any changes, and the Close button to return to the Filters tab. 3. If you wish to Deny or Allow Internet access for those computers you listed on the List of PCs screen, click the option. 4. You can filter access to various services accessed over the Internet, such as FTP or Telnet, by selecting a service from the drop-down menus next to Blocked Services. If a service isn't listed, you can click the Add/ Edit Service button to open the Port Service screen, shown in Figure 5-25, and add a service to the list. You will need to enter a Service name, as well as the Protocol and Port Range used by the service. 5. By selecting the appropriate setting next to Days and Time, choose when Internet access will be filtered. 6. Click the Save Settings button to activate the policy. Chapter 5: Configuring the Gateway The Access Restrictions Tab Figure 5-22: Access Restriction Figure 5-23: Internet Policy Summary 31
-
 1
1 -
2
-
3
-
4
-
5
-
6
-
7
-
8
-
9
-
10
-
11
-
12
-
13
-
14
-
15
-
16
-
17
-
18
-
19
-
20
-
21
-
22
-
23
-
24
-
25
-
26
-
27
-
28
-
29
-
30
-
31
-
32
-
 33
33 -
 34
34 -
 35
35 -
 36
36 -
 37
37 -
 38
38 -
 39
39 -
 40
40 -
 41
41 -
 42
42 -
 43
43 -
44
-
45
-
46
-
47
-
48
-
49
-
50
-
51
-
52
-
53
-
54
-
55
-
56
-
57
-
58
-
59
-
60
-
61
-
62
-
63
-
64
-
65
-
66
-
67
-
68
-
69
-
70
-
71
-
72
-
73
-
74
-
75
-
76
-
77
-
78
-
79
-
80
-
81
-
82
-
83
-
84
-
85
-
86
-
87
-
88
-
89
-
90
-
91
-
92
-
93
-
94
-
95
 |
 |
