Oki C5400 Guide: User's, C5400 Series (American English) - Page 285
Job Options, Proof and Print, Job Name, Collate, Print
 |
View all Oki C5400 manuals
Add to My Manuals
Save this manual to your list of manuals |
Page 285 highlights
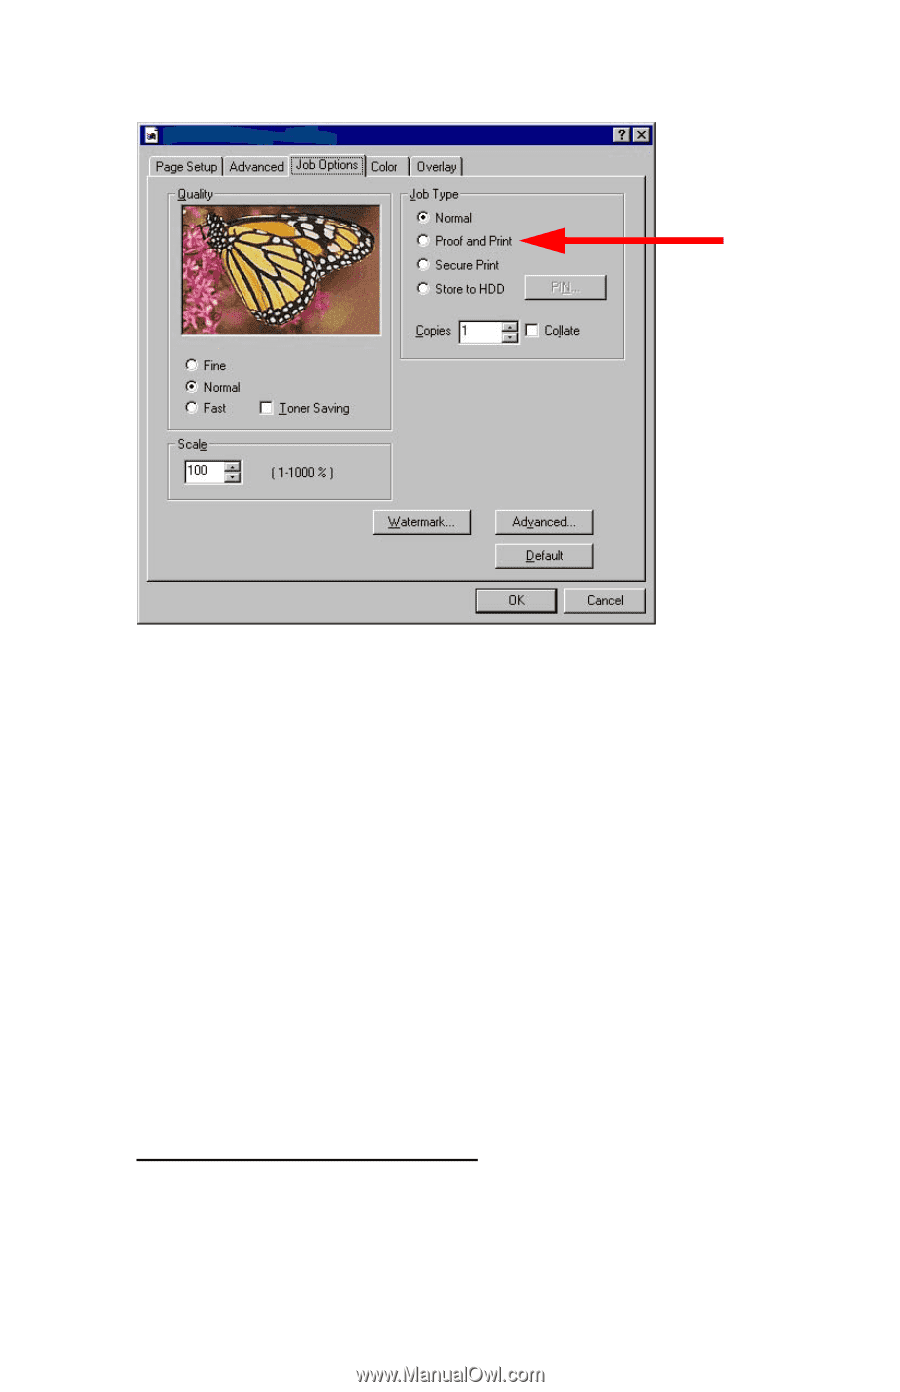
3. On the Job Options tab, select Proof and Print. 4. In the dialog box which appears, enter a Job Name and 4-digit password (PIN) of your choice (0000 to 9999), then click OK. (If no dialog box appears, click PIN.) 5. Enter the number of copies to be printed, then select Collate if applicable. 6. Click OK to return to the Print dialog box. 7. Click Print. The document is processed to a print file and stored on the printer's hard disk drive. One copy prints for proofing. 8. Once the proof is approved, print the additional copies of the document using the front panel (see below). Printing The Approved Document from The Front Panel 1. Press + to enter the menu mode. PRINT JOBS MENU Windows: Postscript Emulation Driver • 283
-
 1
1 -
2
-
3
-
4
-
5
-
6
-
7
-
8
-
9
-
10
-
11
-
12
-
13
-
14
-
15
-
16
-
17
-
18
-
19
-
20
-
21
-
22
-
23
-
24
-
25
-
26
-
27
-
28
-
29
-
30
-
31
-
32
-
33
-
34
-
35
-
36
-
37
-
38
-
39
-
40
-
41
-
42
-
43
-
44
-
45
-
46
-
47
-
48
-
49
-
50
-
51
-
52
-
53
-
54
-
55
-
56
-
57
-
58
-
59
-
60
-
61
-
62
-
63
-
64
-
65
-
66
-
67
-
68
-
69
-
70
-
71
-
72
-
73
-
74
-
75
-
76
-
77
-
78
-
79
-
80
-
81
-
82
-
83
-
84
-
85
-
86
-
87
-
88
-
89
-
90
-
91
-
92
-
93
-
94
-
95
-
96
-
97
-
98
-
99
-
100
-
101
-
102
-
103
-
104
-
105
-
106
-
107
-
108
-
109
-
110
-
111
-
112
-
113
-
114
-
115
-
116
-
117
-
118
-
119
-
120
-
121
-
122
-
123
-
124
-
125
-
126
-
127
-
128
-
129
-
130
-
131
-
132
-
133
-
134
-
135
-
136
-
137
-
138
-
139
-
140
-
141
-
142
-
143
-
144
-
145
-
146
-
147
-
148
-
149
-
150
-
151
-
152
-
153
-
154
-
155
-
156
-
157
-
158
-
159
-
160
-
161
-
162
-
163
-
164
-
165
-
166
-
167
-
168
-
169
-
170
-
171
-
172
-
173
-
174
-
175
-
176
-
177
-
178
-
179
-
180
-
181
-
182
-
183
-
184
-
185
-
186
-
187
-
188
-
189
-
190
-
191
-
192
-
193
-
194
-
195
-
196
-
197
-
198
-
199
-
200
-
201
-
202
-
203
-
204
-
205
-
206
-
207
-
208
-
209
-
210
-
211
-
212
-
213
-
214
-
215
-
216
-
217
-
218
-
219
-
220
-
221
-
222
-
223
-
224
-
225
-
226
-
227
-
228
-
229
-
230
-
231
-
232
-
233
-
234
-
235
-
236
-
237
-
238
-
239
-
240
-
241
-
242
-
243
-
244
-
245
-
246
-
247
-
248
-
249
-
250
-
251
-
252
-
253
-
254
-
255
-
256
-
257
-
258
-
259
-
260
-
261
-
262
-
263
-
264
-
265
-
266
-
267
-
268
-
269
-
270
-
271
-
272
-
273
-
274
-
275
-
276
-
277
-
278
-
279
-
 280
280 -
 281
281 -
 282
282 -
 283
283 -
 284
284 -
 285
285 -
 286
286 -
 287
287 -
 288
288 -
 289
289 -
 290
290 -
291
-
292
-
293
-
294
-
295
-
296
-
297
-
298
-
299
-
300
-
301
-
302
-
303
-
304
-
305
-
306
-
307
-
308
-
309
-
310
-
311
-
312
-
313
-
314
-
315
-
316
-
317
-
318
-
319
-
320
-
321
-
322
-
323
-
324
-
325
-
326
-
327
-
328
 |
 |
Windows: Postscript Emulation Driver
°
283
3.
On the
Job Options
tab, select
Proof and Print
.
4.
In the dialog box which appears, enter a
Job Name
and 4-digit
password (PIN) of your choice (0000 to 9999), then click
OK
. (If
no dialog box appears, click
PIN
.)
5.
Enter the number of copies to be printed, then select
Collate
if
applicable.
6.
Click
OK
to return to the
Print
dialog box.
7.
Click
Print
.
The document is processed to a print file and stored on the printer°s
hard disk drive. One copy prints for proofing
.
8.
Once the proof is approved, print the additional copies of the
document using the front panel (see below).
Printing The Approved Document from The Front Panel
1.
Press
+
to enter the menu mode.
PRINT JOBS MENU