Oki ML591 Microline 590/591 User's Guide - Page 32
Form Tear-Off Feature continued
 |
View all Oki ML591 manuals
Add to My Manuals
Save this manual to your list of manuals |
Page 32 highlights
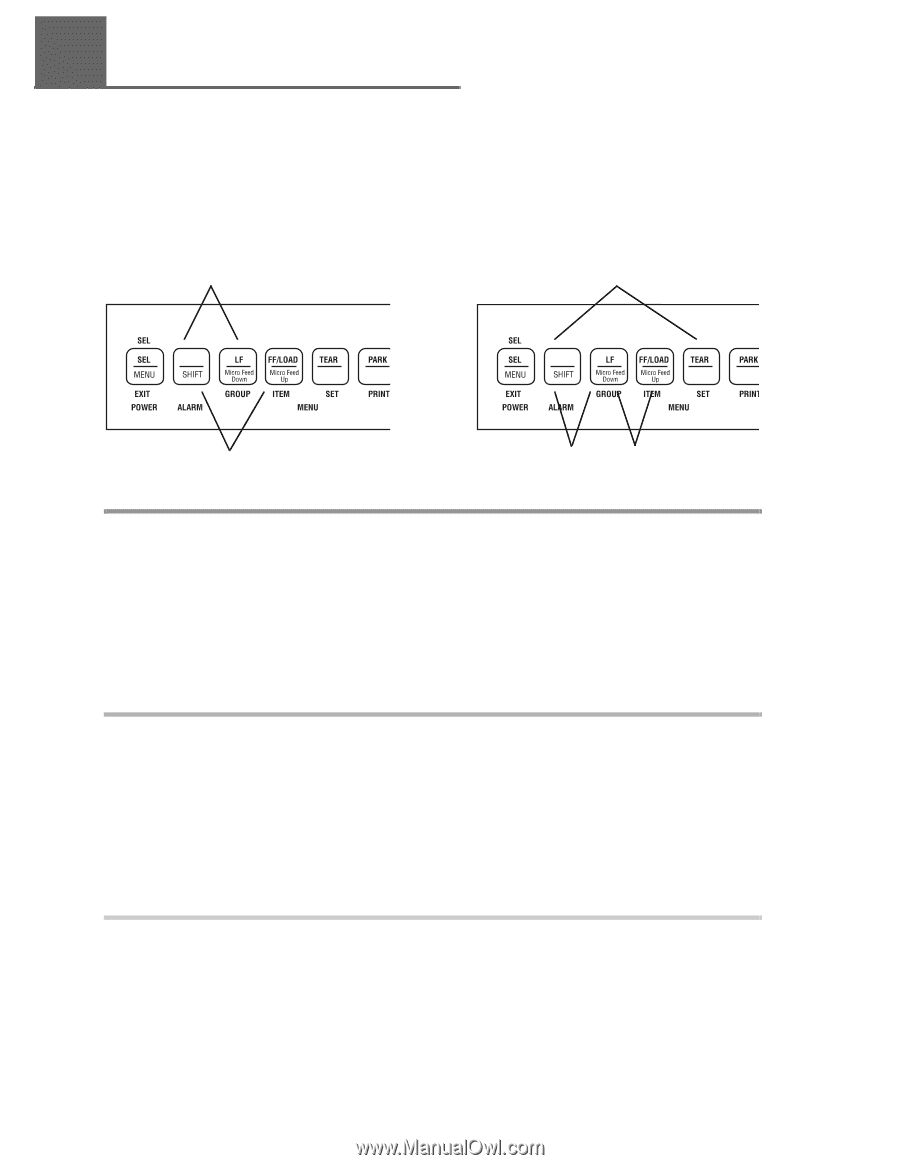
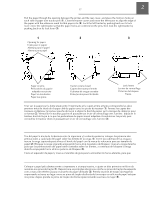
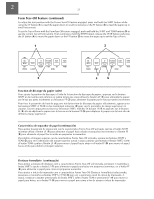
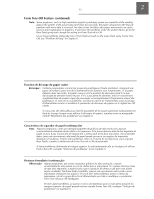
2 22 Form Tear-Off Feature (continued) To adjust the tear position with the Forms Tear-Off feature engaged, press and hold the SHIFT button while using the LF button (1) to feed the paper down in small increments or the FF button (2) to feed the paper up in small increments. To set the Top of Form with the FormTear-Off feature engaged, push and hold the SHIFT and TEAR buttons (3) to see the current Top of Form setting. Then continue to hold the SHIFT button, release the TEAR button and press the LF button (4) to move the paper down or the FF button (5) to move the paper up to set the Top of Form. 1 3 2 4 5 Fonction de découpe du papier (suite) Pour ajuster la position de découpe à l'aide de la fonction de découpe du papier, appuyez sur le bouton SHIFT en le mainte-nant enfoncé en même temps que vous utilisez le bouton LF (1) pour alimenter le papier par le bas par petits incréments ou le bouton FF (2) pour alimenter le papier par le haut par petits incréments. Pour fixer le paramètre de haut de page une fois la fonction de découpe du papier sélectionnée, appuyez sur les boutons SHIFT et TEAR en les maintenant enfoncés (3) pour voir le paramètre de marge supérieure en vigueur. Tout en appuyant tou-jours sur le bouton SHIFT, relâchez le bouton TEAR et appuyez sur le bouton LF (4) afin de déplacer le papier vers le bas ou sur le bouton FF (5) pour déplacer le papier vers le haut afin de définir la marge supérieure. Característica de separador de papel (continuación) Para ajustar la posición de separación con la característica Forms Tear-Off activada, oprima el botón SHIFT mientras utiliza el botón LF (1) para alimentar el papel hacia abajo en pequeños incrementos o el botón FF (2) para alimentar el papel hacia arriba en pequeños incrementos. Para definir el margen superior con la característica Forms Tear-Off activada, oprima los botones SHIFT y TEAR (3) para ver la definición del margen superior actual. Luego continúe oprimiendo el botón SHIFT, suelte el botón TEAR y pulse el botón LF (4) para mover el papel hacia abajo o el botón FF (5) para mover el papel hacia arriba para definir el margen superior. Destacar formulário (continuação) Para ajustar a posição de destacar com a característica Forms Tear-Off selecionada, pressione e mantenha o botão SHIFT e aperte o botão LF (1) para alimentar o papel para baixo em pequenos aumentos, ou o botão FF (2) para alimentar o papel para cima em pequenos aumentos. Para ajustar o início da impressão com a característica Forms Tear-Off (Destacar formulários) selecionada, pressione e mantenha os botões SHIFT e TEAR (3) para ver o parâmetro atual do início de impressão. A seguir, continue a manter pressionado do botão SHIFT, solte o botão TEAR e pressione LF (4) para mover o papel para baixo, ou o botão FF (5) para mover o papel para cima a fim de ajustar o início de impressão.
-
 1
1 -
2
-
3
-
4
-
5
-
6
-
7
-
8
-
9
-
10
-
11
-
12
-
13
-
14
-
15
-
16
-
17
-
18
-
19
-
20
-
21
-
22
-
23
-
24
-
25
-
26
-
 27
27 -
 28
28 -
 29
29 -
 30
30 -
 31
31 -
 32
32 -
 33
33 -
 34
34 -
 35
35 -
 36
36 -
 37
37 -
38
-
39
-
40
-
41
-
42
-
43
-
44
-
45
-
46
-
47
-
48
-
49
-
50
-
51
-
52
-
53
-
54
-
55
-
56
-
57
-
58
-
59
-
60
-
61
-
62
-
63
-
64
-
65
-
66
-
67
-
68
-
69
-
70
-
71
-
72
-
73
-
74
-
75
-
76
-
77
-
78
-
79
-
80
-
81
-
82
-
83
-
84
-
85
-
86
-
87
-
88
-
89
-
90
-
91
-
92
-
93
-
94
-
95
-
96
-
97
-
98
-
99
-
100
-
101
-
102
-
103
-
104
-
105
-
106
 |
 |