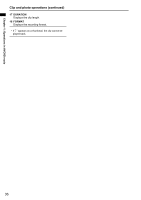
Panasonic AG-HMC80PJ User Manual - Page 35
Clip and photo operations, During clip playback
 |
View all Panasonic AG-HMC80PJ manuals
Add to My Manuals
Save this manual to your list of manuals |
Page 35 highlights
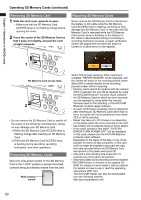
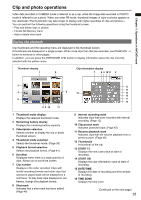
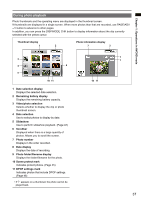
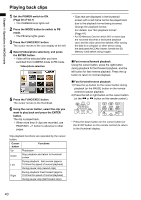
Chapter 1: Operations in AVCHD mode Clip and photo operations Video data recorded in CAMERA mode is referred to as a clip, while still image data recorded in PHOTO mode is referred to as a photo. When you enter PB mode, thumbnail images of clips or photos appear on the viewfinder (The thumbnails may take longer to display with higher quantities of clips and photos.). You can perform the following operations using the thumbnail screen. • Play and delete clips or photos • Format SD Memory Card • Add or delete shot mark During clip playback Clip thumbnails and the operating menu are displayed in the thumbnail screen. 9 thumbnails are displayed in a single screen. When more clips than that are recorded, use PAGE/ADV -/+ button to advance to other pages. In addition, you can press the DISP/MODE CHK button to display information about the clip currently selected with the yellow cursor. Thumbnail display 1 2 Clip information display 7 8 9 10 11 2 3 4 6 5 8 9 10 11 1 Thumbnail mode display Displays the selected thumbnail mode. 2 Remaining battery display Displays the remaining battery capacity. 3 Video/photo selection Selects whether to display the clip or photo thumbnail screen. 4 Thumbnail mode selection Selects the thumbnail mode. (Page 38) 5 Playback format selection Selects the playback format. (Page 41) 6 Scrollbar Displayed when there is a large quantity of clips. Allows you to scroll the screen. 7 Clip number Displays in the order recorded. Clips with invalid recording formats and other clips that cannot be played back will be displayed in a red frame. To play back clips displayed in red frames, change the playback format. 8 Shot mark Indicates that a shot mark has been added. (Page 49) 13 14 12 15 16 17 18 9 Interval recording mark Indicates clips that were recorded with interval recording. (Page 13) 10 Clip protect mark Indicates protected clips. (Page 45) 11 Resume playback mark Indicates clips that will resume playback from a previous point. (Page 49) 12 Thumbnails A thumbnail of the clip. 13 START TC Displays the time code value at start of recording. 14 START UB Displays the user information value at start of recording. 15 DATE/TIME Displays the date of recording and time at start of recording. 16 TIME ZONE Displays the time zone. (Continued on the next page) 35
-
 1
1 -
2
-
3
-
4
-
5
-
6
-
7
-
8
-
9
-
10
-
11
-
12
-
13
-
14
-
15
-
16
-
17
-
18
-
19
-
20
-
21
-
22
-
23
-
24
-
25
-
26
-
27
-
28
-
29
-
 30
30 -
 31
31 -
 32
32 -
 33
33 -
 34
34 -
 35
35 -
 36
36 -
 37
37 -
 38
38 -
 39
39 -
 40
40 -
41
-
42
-
43
-
44
-
45
-
46
-
47
-
48
-
49
-
50
-
51
-
52
-
53
-
54
-
55
-
56
-
57
-
58
-
59
-
60
-
61
-
62
-
63
-
64
-
65
-
66
-
67
-
68
-
69
-
70
-
71
-
72
-
73
-
74
-
75
-
76
-
77
-
78
-
79
-
80
-
81
-
82
-
83
-
84
-
85
-
86
-
87
-
88
-
89
-
90
-
91
-
92
-
93
-
94
-
95
-
96
-
97
-
98
-
99
-
100
-
101
-
102
-
103
-
104
-
105
-
106
-
107
-
108
-
109
-
110
-
111
-
112
-
113
-
114
-
115
-
116
-
117
-
118
-
119
-
120
-
121
-
122
-
123
-
124
-
125
-
126
 |
 |