Panasonic AG-HMC80PJ User Manual - Page 56
Adjusting the white balance and black balance, Function Menu.
 |
View all Panasonic AG-HMC80PJ manuals
Add to My Manuals
Save this manual to your list of manuals |
Page 56 highlights
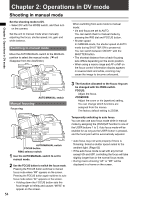
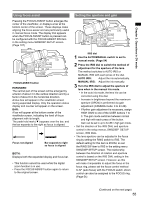
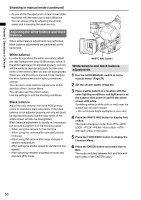
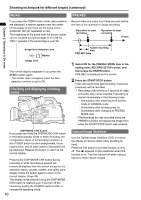
Chapter 2: Operations in DV mode Shooting in manual mode (continued) • As you shrink the aperture to a near closed state, resolution will decrease due to light diffraction. You can prevent this by adjusting the shutter speed and increasing the aperture size. Adjusting the white balance and black balance When white balance adjustments are performed, black balance adjustments are performed at the same time. White balance In order to reproduce the white accurately, adjust the ratio between the three RGB primary colors. If the white balance is not adjusted properly, not only will the white be reproduced poorly but the color tones of the entire screen will also be downgraded. When you are shooting in manual mode, readjust the white balance whenever lighting conditions change. You can store white balance adjustments to Ach and Bch of the Function Menu. You can also use the preset values. Use the settings to suit the shooting conditions. Black balance Adjust the ratio between the three RGB primary colors to reproduce black accurately. If the black balance is not adjusted properly, not only will black be reproduced poorly, but the color tones of the entire screen will also be downgraded. Black balance adjustment is usually not necessary, but be sure to perform it in the following cases. • When using the camera for the first time. • When using the camera after extended periods of disuse. • When using the camera after large changes in ambient temperature. • After setting the shutter speed to standard or low speeds. • After switching between progressive mode and standard (60i) mode. FOCUS ASSIST FOCUS IRIS FOCUS IRZIOSOM/ BWAHLITE MAAUNTUOA/ L WHITE BAL button White balance and black balance adjustments 1 Use the AUTO/MANUAL switch to set to manual mode. (Page 54) 2 Set the shutter speed. (Page 65) 3 Place a white pattern in a location with the same lighting conditions and light source as the subject, then zoom in and fill the whole screen with white. Something white (a white cloth or wall) near the subject can be used instead. • Do not include bright spotlights in your shot. 4 Press the WHITE BAL button to display Ach or Bch. The mode changes in order from ATW→ATW LOCK→P3.2K→P5.6K→Ach or Bch→ATW with each press of the button. 5 Press the FUNC/EXEC button to display the Function Menu. 6 Press the ENTER button and select Ach or Bch. The mode switches between Ach and Bch with each press of the ENTER button. 56
-
 1
1 -
2
-
3
-
4
-
5
-
6
-
7
-
8
-
9
-
10
-
11
-
12
-
13
-
14
-
15
-
16
-
17
-
18
-
19
-
20
-
21
-
22
-
23
-
24
-
25
-
26
-
27
-
28
-
29
-
30
-
31
-
32
-
33
-
34
-
35
-
36
-
37
-
38
-
39
-
40
-
41
-
42
-
43
-
44
-
45
-
46
-
47
-
48
-
49
-
50
-
 51
51 -
 52
52 -
 53
53 -
 54
54 -
 55
55 -
 56
56 -
 57
57 -
 58
58 -
 59
59 -
 60
60 -
 61
61 -
62
-
63
-
64
-
65
-
66
-
67
-
68
-
69
-
70
-
71
-
72
-
73
-
74
-
75
-
76
-
77
-
78
-
79
-
80
-
81
-
82
-
83
-
84
-
85
-
86
-
87
-
88
-
89
-
90
-
91
-
92
-
93
-
94
-
95
-
96
-
97
-
98
-
99
-
100
-
101
-
102
-
103
-
104
-
105
-
106
-
107
-
108
-
109
-
110
-
111
-
112
-
113
-
114
-
115
-
116
-
117
-
118
-
119
-
120
-
121
-
122
-
123
-
124
-
125
-
126
 |
 |
