Panasonic AG-HMC80PJ User Manual - Page 85
Useful playback functions, Adding a SHOT MARK to a clip, Repeat playback, Resume playback (RESUME PLAY), Viewing images on a television, Checking the date and time
 |
View all Panasonic AG-HMC80PJ manuals
Add to My Manuals
Save this manual to your list of manuals |
Page 85 highlights
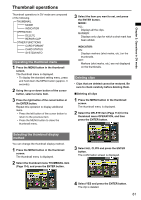
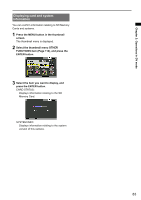
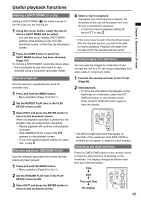
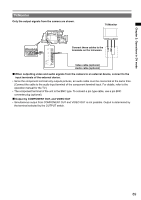
Useful playback functions Chapter 2: Operations in DV mode Adding a SHOT MARK to a clip Adding a SHOT MARK ( M ) will make it easier to find the clips you are looking for. 1 Using the cursor button, select the clip for which a SHOT MARK will be added. • You can also set or release SHOT MARK settings while shooting a clip, from the thumbnail screen, or from the clip information screen. 2 Press the USER button to which the SHOT MARK function has been allocated. (Page 107) To remove a SHOT MARK, repeat the above steps. • It is not possible to add shot marks to clips recorded using a consumer camcorder model. Repeat playback Use this setting to repeatedly play back all available clips. 1 Press and hold the MENU button. • Menu operation (Page 40 of Vol.1) 2 Set the REPEAT PLAY item in the PLAY SETUP screen to ON. 3 Select EXIT and press the ENTER button to return to the thumbnail screen. When the playback operation is performed, the playable clips are played back repeatedly. • Repeat playback will continue until playback is paused. • When REPEAT PLAY is set to ON, appears on the playback screen. • To turn the repeat playback setting off, select OFF in step 2. Resume playback (RESUME PLAY) Use this setting to play back from where clip had previously been paused. 1 Press and hold the MENU button. • Menu operation (Page 40 of Vol.1) 2 Set the RESUME PLAY item in the PLAY SETUP screen to ON. 3 Select EXIT and press the ENTER button to return to the thumbnail screen. 4 Select a clip for playback. If playback has previously been paused, the remainder of the clip will be played next time the clip is selected for playback. • To turn the resume playback setting off, select OFF in step 2. • If the cursor was moved in the thumbnail screen after the clip was paused, you will not be able to resume playback. Playback will begin from the start of the clip selected with the cursor. Viewing images on a television You can view the images on a television if you connect the unit to a TV set using a separately sold video cable or component cable. 1 Connect the camera-recorder to the TV set. (Page 89) 2 Start playback. • To show the information that appears on the viewfinder on a television, press the EXT. DISPLAY button on the remote control. Press the EXT. DISPLAY button again to clear the display. START/ EXT PHOTO STOP DISPLAY SHOT DATE/ TIME ZOOM VOL • The left and right SbEAlRaCHckPbLAaYrsSEtAhRCaH t appear on the OSD of the viSeTILwL ADfVindPAeUSrE wSThILLilAeDV SIDE CROP is enabled do not apSpKIeParSiTnOPextSeKIrPnal output displays. Checking the date andMEtNiUme Press the DATE/TIME buENtTtEoR n on the remote control to show the date and time of shooting on the viewfinder. The display changes as follows each time you press the button. Time Date Time and Date No display EXT DISPLAY PHOTO SHOT START/ STOP DATE/ TIME ZOOM VOL SEARCH PLAY SEARCH STILL ADV PAUSE STILL ADV 85
-
 1
1 -
2
-
3
-
4
-
5
-
6
-
7
-
8
-
9
-
10
-
11
-
12
-
13
-
14
-
15
-
16
-
17
-
18
-
19
-
20
-
21
-
22
-
23
-
24
-
25
-
26
-
27
-
28
-
29
-
30
-
31
-
32
-
33
-
34
-
35
-
36
-
37
-
38
-
39
-
40
-
41
-
42
-
43
-
44
-
45
-
46
-
47
-
48
-
49
-
50
-
51
-
52
-
53
-
54
-
55
-
56
-
57
-
58
-
59
-
60
-
61
-
62
-
63
-
64
-
65
-
66
-
67
-
68
-
69
-
70
-
71
-
72
-
73
-
74
-
75
-
76
-
77
-
78
-
79
-
 80
80 -
 81
81 -
 82
82 -
 83
83 -
 84
84 -
 85
85 -
 86
86 -
 87
87 -
 88
88 -
 89
89 -
 90
90 -
91
-
92
-
93
-
94
-
95
-
96
-
97
-
98
-
99
-
100
-
101
-
102
-
103
-
104
-
105
-
106
-
107
-
108
-
109
-
110
-
111
-
112
-
113
-
114
-
115
-
116
-
117
-
118
-
119
-
120
-
121
-
122
-
123
-
124
-
125
-
126
 |
 |
