Panasonic BT-LH2170 Operating Instructions - Page 22
User Data, Saving user data, Loading user data
 |
View all Panasonic BT-LH2170 manuals
Add to My Manuals
Save this manual to your list of manuals |
Page 22 highlights
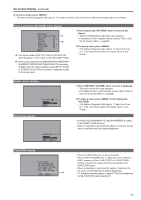
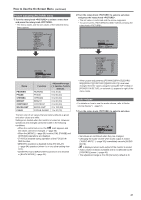
User Data This monitor can save up to five combinations of set values for MAIN MENU and screen adjustments made in the [PICTURE] (picture adjusting) menu as user data that can be recalled. You can also return set values and adjustments to their factory defaults. User data include the following settings. • Menu settings except [SETUP LOAD], [SETUP SAVE] and [REMOTE] in [CONTROL] (including button function settings on the monitor front panel) • Screen adjustments made with the rotary knob Saving user data 1. Press to display the main menu. Loading user data 1. Press to display the main menu. 2. Turn the rotary knob to select the [SYSTEM CONFIG] menu and press the rotary knob . 2. Turn the rotary knob to select the [SYSTEM CONFIG] menu and press the rotary knob . 3. Turn the rotary knob to select the [SETUP SAVE] submenu and press the rotary knob . The set values in the submenu change to green. [SYSTEM CONFIG] SUB WINDOW FULL MENU POSITION CENTER STATUS DISPLAY 3SEC OFF INPUT NAME SETUP SETUP LOAD FACTORY SETUP SAVE USER1 POWER ON SETUP LAST COLOR SPACE EBU POWER DOWN OFF POWER SAVE MODE OFF CALIBRATION MENU EXIT SEL. ENTER RETURN RETURN 3. Turn the rotary knob to select the [SETUP LOAD] submenu and press the rotary knob . The set values in the submenu change to green. [SYSTEM CONFIG] SUB WINDOW FULL MENU POSITION CENTER STATUS DISPLAY 3SEC OFF INPUT NAME SETUP SETUP LOAD FACTORY SETUP SAVE USER1 POWER ON SETUP LAST COLOR SPACE EBU POWER DOWN OFF POWER SAVE MODE OFF CALIBRATION MENU EXIT SEL. ENTER RETURN RETURN Changes to green 4. Turn the rotary knob to select settings to save from the [USER1] to [USER5] and press the rotary knob . The following screen appears. [SETUP SAVE] USER1 YES NO Changes to green 4. Turn the rotary knob to select settings to call from the [USER1] to [USER5] and press the rotary knob . The following screen appears. • To return to the factory defaults, select [FACTORY]. [SETUP LOAD] USER1 YES NO MENU EXIT SEL. ENTER RETURN RETURN 5. Select [YES] and press the rotary knob . This saves the user data. 6. To return to the previous screen, press . MENU EXIT SEL. ENTER RETURN RETURN 5. Select [YES] and press the rotary knob . This loads the user data. 6. To return to the previous screen, press . 22
-
 1
1 -
2
-
3
-
4
-
5
-
6
-
7
-
8
-
9
-
10
-
11
-
12
-
13
-
14
-
15
-
16
-
 17
17 -
 18
18 -
 19
19 -
 20
20 -
 21
21 -
 22
22 -
 23
23 -
 24
24 -
 25
25 -
 26
26 -
 27
27 -
28
-
29
-
30
-
31
-
32
-
33
-
34
-
35
-
36
-
37
-
38
-
39
-
40
-
41
-
42
-
43
-
44
-
45
-
46
-
47
-
48
-
49
-
50
-
51
-
52
-
53
-
54
-
55
-
56
-
57
-
58
-
59
-
60
-
61
-
62
-
63
-
64
-
65
-
66
-
67
-
68
-
69
-
70
-
71
-
72
-
73
-
74
-
75
-
76
-
77
-
78
-
79
-
80
 |
 |
